We bought a new side-by-side refrigerator in 1997. A number of years ago, the icemaker stopped making ice in a controlled manner, but we don’t use much ice, so it was easy to turn the icemaker on when we needed a bucket of ice, then turn it off until we used up that supply, then turn it back on. No big deal, and everything else worked fine. Everyone–friends, salesmen, and any type of serviceman who came to our house to fix anything over the years–told us to keep our old appliances as long as we could, because the new ones are expensive, and they don’t last very long. The servicemen often told us tales of things they fixed in the first two or three years of a new appliance’s life, and of appliances that needed to be replaced after only five years.
Time went on, and the icemaker began to cause problems. It dispensed undersized ice cubes, dropped non-stop ice cubes into a glass, and randomly allowed ice cubes to slip out of the chute and fall to the hardwood floor, where they melted if we didn’t hear them drop and pick them up immediately. It was becoming a major nuisance. Sure, we could have manually made ice cubes in trays, but the refrigerator was 28 years old, so we decided to put it to rest.
We liked our side-by-side refrigerator, and we like the water/ice dispenser on the outside of the unit, making it unnecessary to open either the freezer to scoop ice out of a tray, or the refrigerator to fill a glass with chilled water. Well, that style is fading away and is available in only a few models. Nearly all of the new models have French doors on top and a freezer drawer at the bottom with a large box for the icemaker to drop cubes into–thus using up freezer space and requiring the user to open the freezer to scoop ice into a glass. We settled on a Bosch refrigerator because (1) it’s a very good brand, and (2) they had two models with an icemaker/water dispenser on the outside of the door.
Here’s what we’ve enjoyed for 28 years.
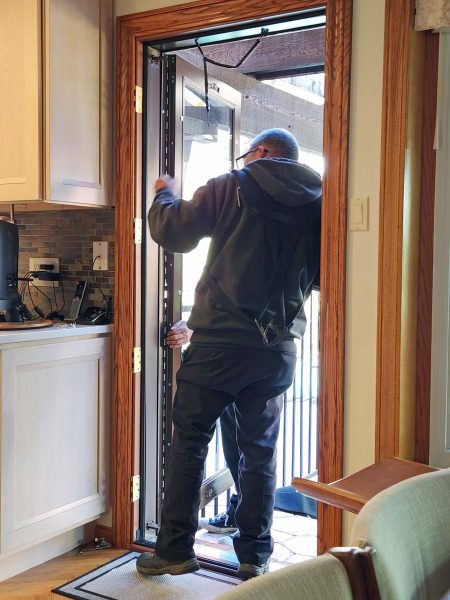
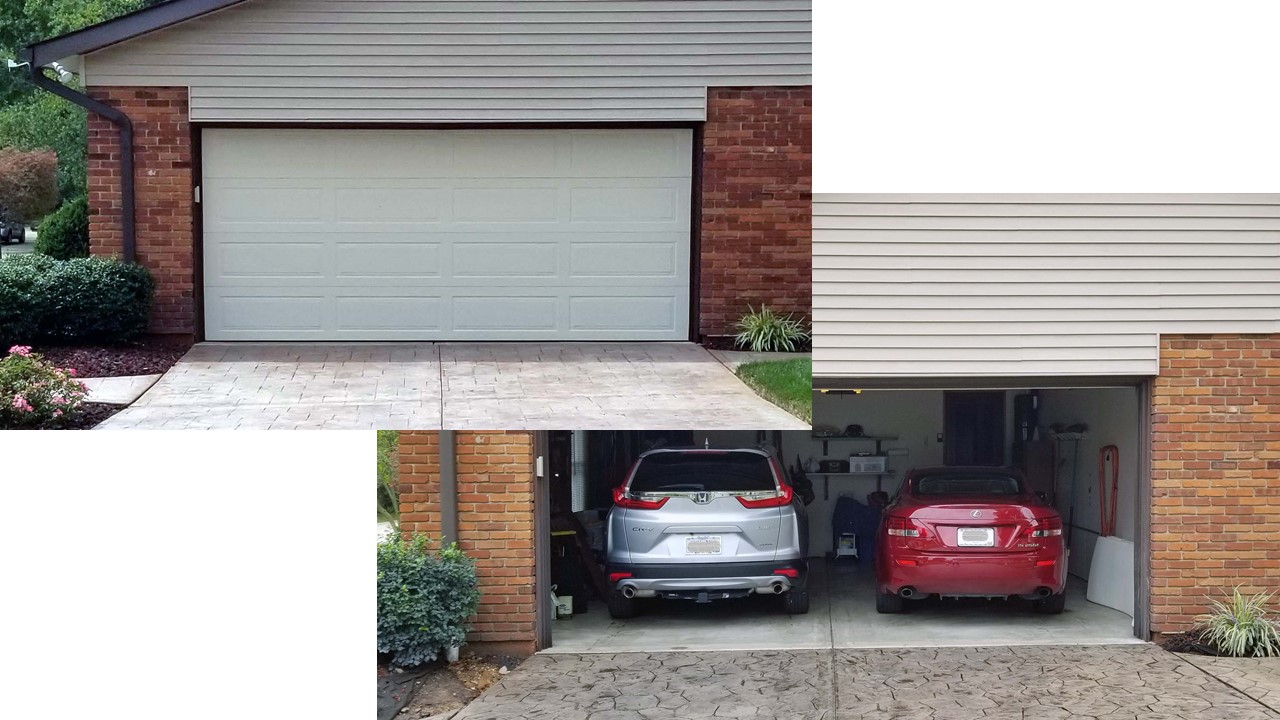
The installation guys surveyed our house for the best route in and out with a refrigerator and measured all the doorways and both refrigerators before deciding what Ted and I already knew–the exterior door in the kitchen is the best one to use for this. Unfortunately, the new refrigerator was wider than the doors would allow, so the guys had to remove the interior door and the storm door to bring in the new refrigerator.
They took the doors off the old refrigerator, and there was no dolly in sight, so I thought they were going to slide it across the room to the doorway. I didn’t want the hardwood floor scratched, so I asked if they planned to put something under the old unit. “Oh, no,” the senior guy said, “we’ll just carry it to the truck.” “Yikes!” I thought. “They must be really strong!”
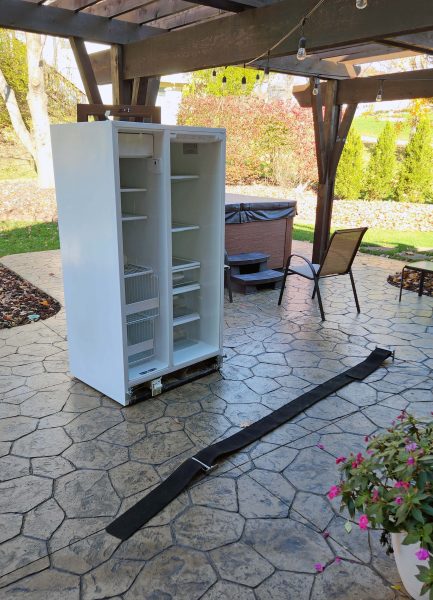
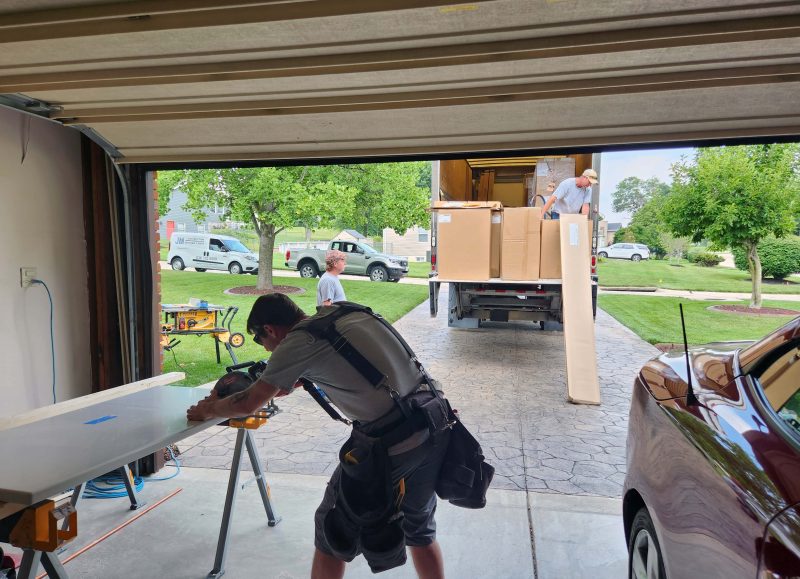
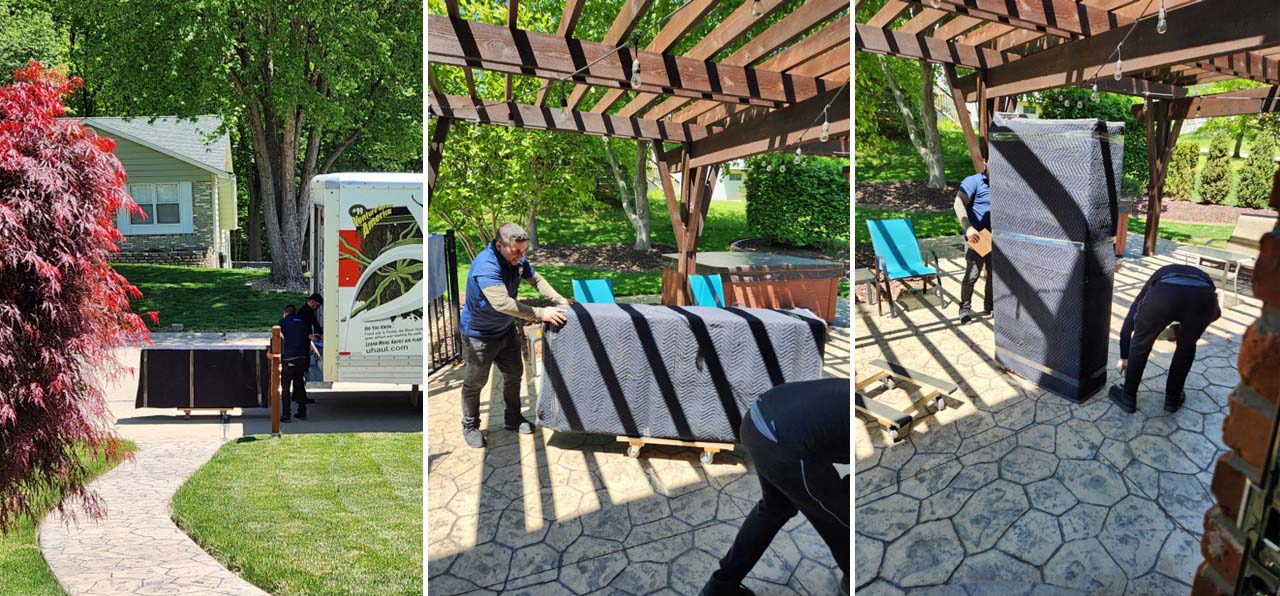
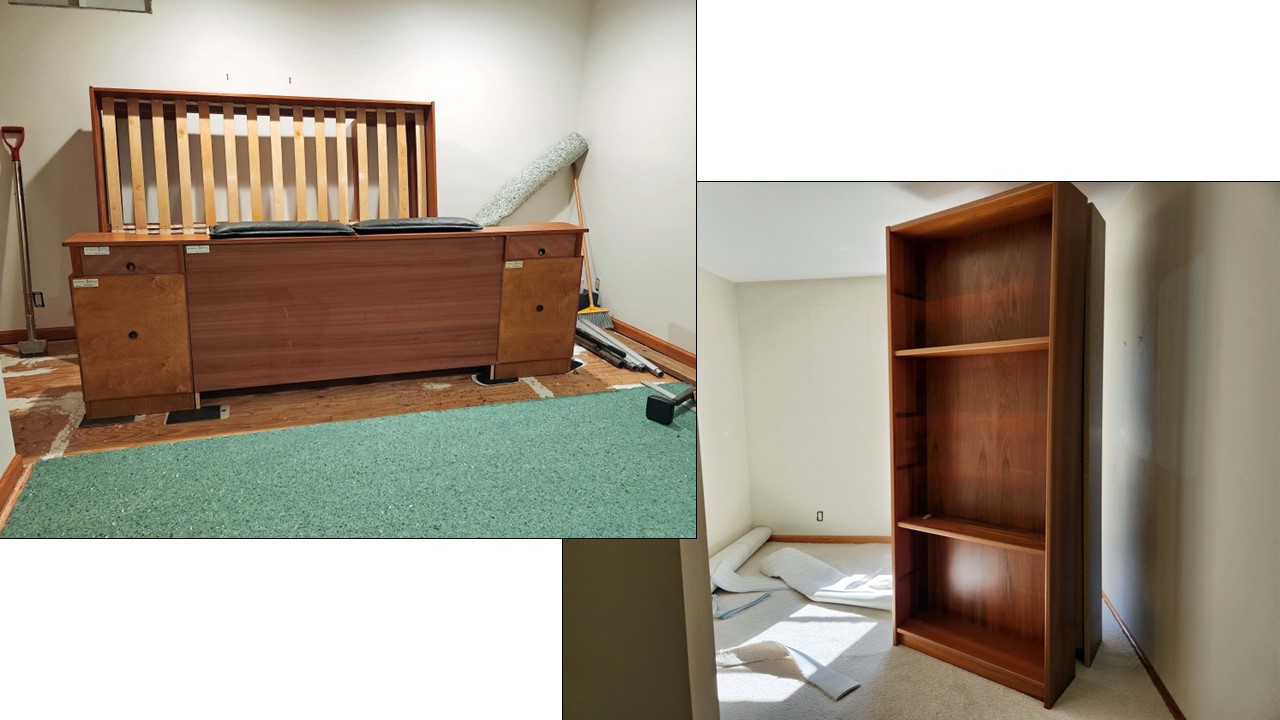
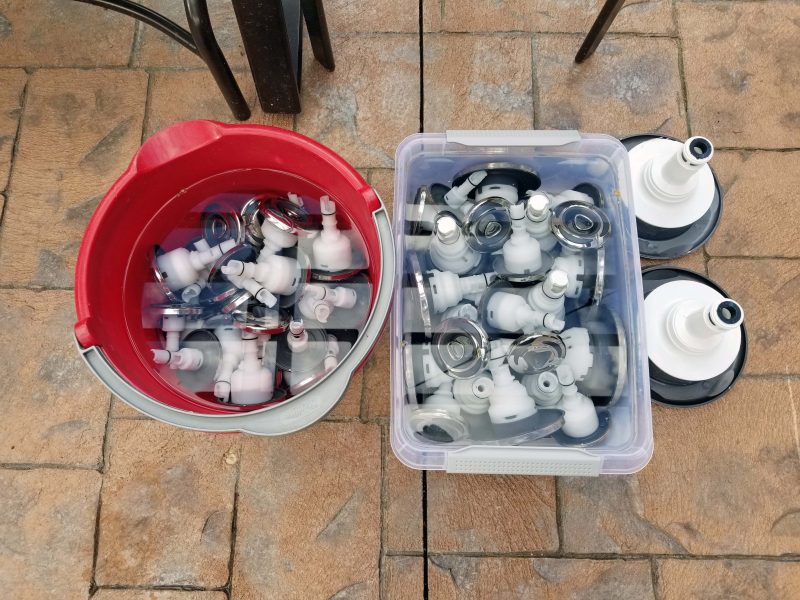
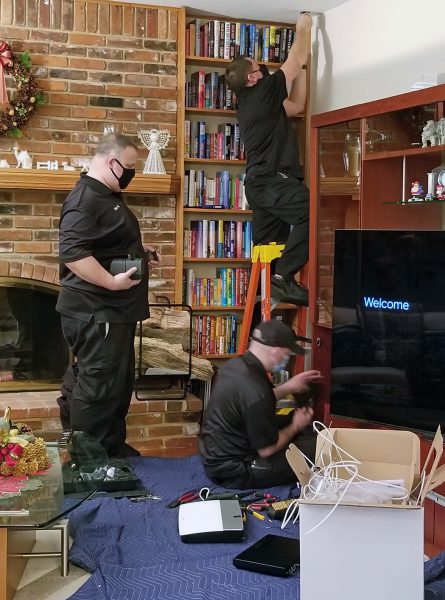
Well, each man had a harness that circled his waist with an over-the-shoulder strap that circled from one hip up and over the opposite shoulder, then back to the hip. In the photo below, you can see the long strap they slipped under the refrigerator and a little bit of the harness shoulder strap on the man’s left side. Each man hooked one end of the long strap to the harness at his waist. When they picked up the refrigerator, I could see how the belt was holding the weight and distributing it over their entire bodies, rather than taxing only their arms and shoulders. All they had to do was balance the refrigerator to keep it from tipping over.
They carefully maneuvered the refrigerator through the doorway and parked it on the patio, leaving the belt to pick it up again later to carry the refrigerator to the truck. I think Ted and I could have carried a refrigerator with a belt and harness like that. It was a great system!
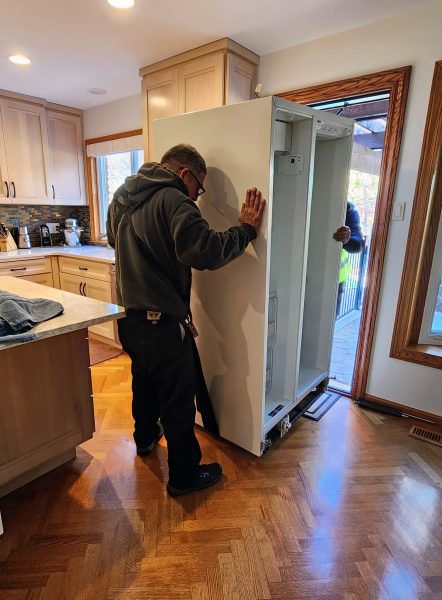
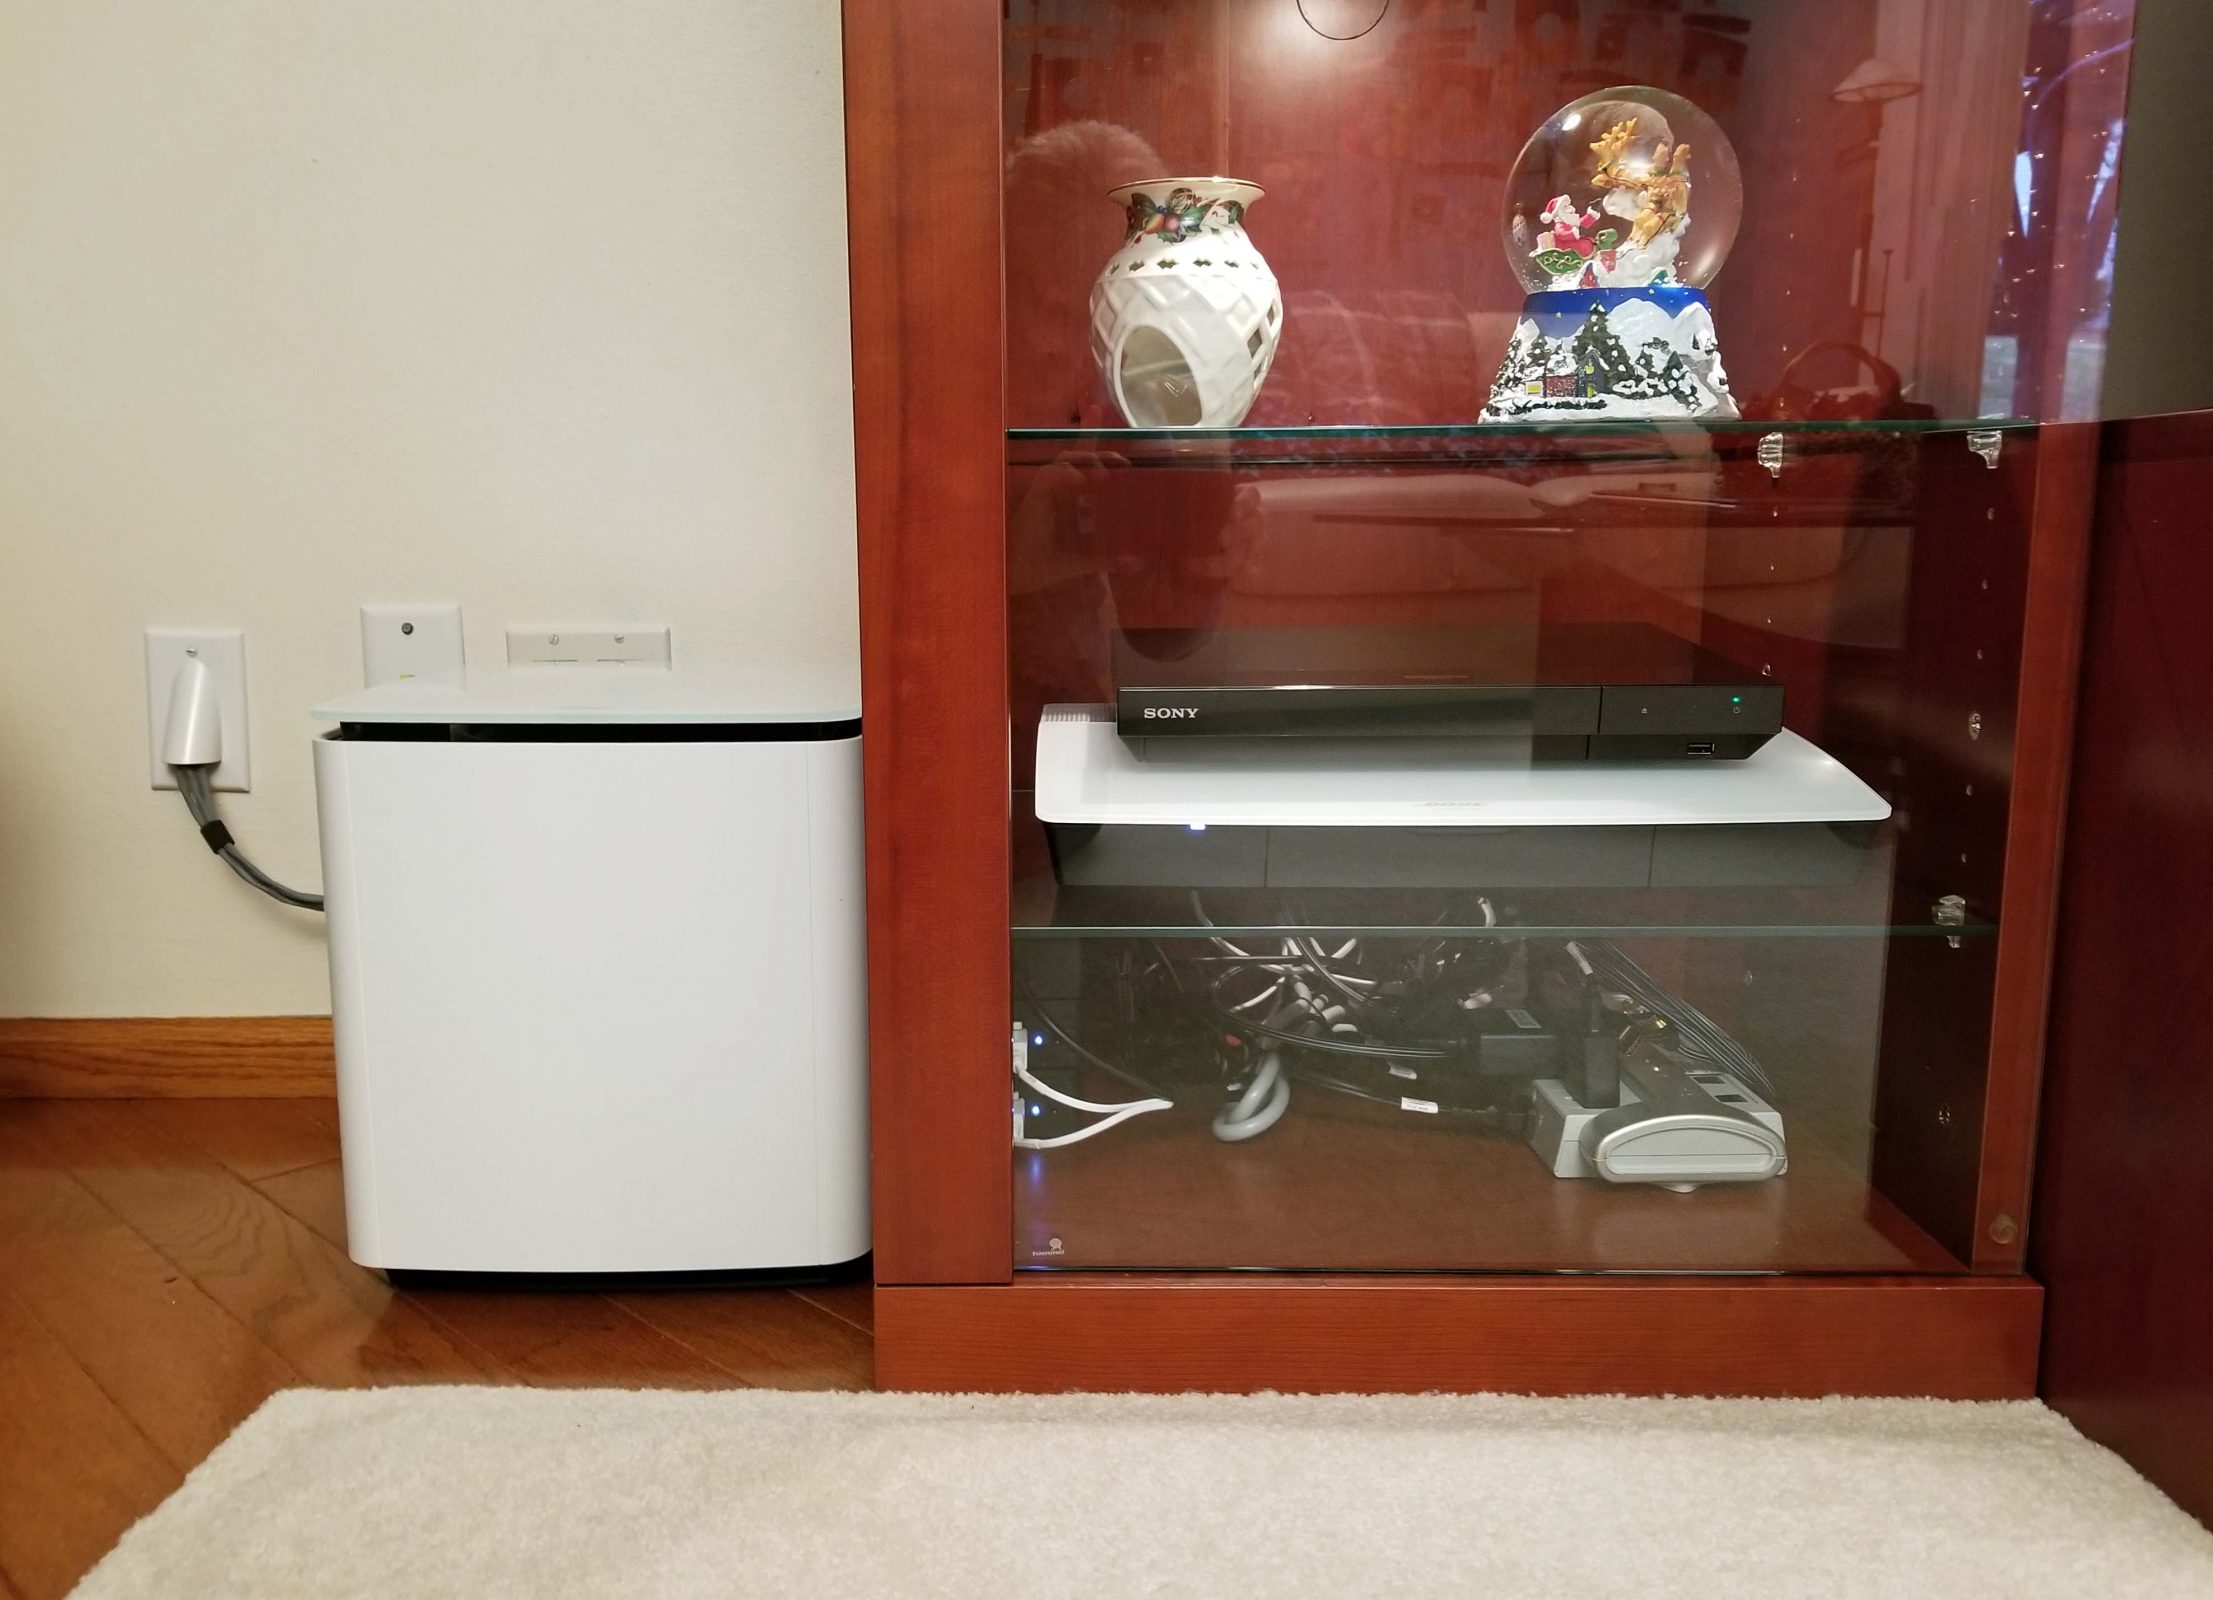
Here’s our new refrigerator. Neither of us was thrilled about the French doors and the freezer drawer, but as time goes on, we’re getting used to both and we like it. Best of all, we can get a drink of cold water and/or dispense ice without opening any doors and letting the cold air out.
We’ve heeded the advice to keep our old appliances until they wear out. When we updated our kitchen in 2023, we kept our old refrigerator and stove, planning to replace them when they wore out. Well, the refrigerator is gone now, but the stove still lives. We bought it in or around 1993, making it over 30 years old. It still works perfectly and has never been repaired. When it dies, we’ll get a new one and then all of our kitchen appliances will be stainless steel instead of white. This will probably happen just in time for stainless steel appliances to go out of style. I’ve already seen brightly colored appliances in stores and I’m half-expecting poppy red, harvest gold, and avocado green appliances from the 1970s to return, because retro is “in.”
P.S. Our first washer and dryer lasted 22 years. Our current one is 30 years old and still working, with only minor repairs over the years (two thermostats for the dryer and a solenoid for the washer). They don’t make ’em like they used to!
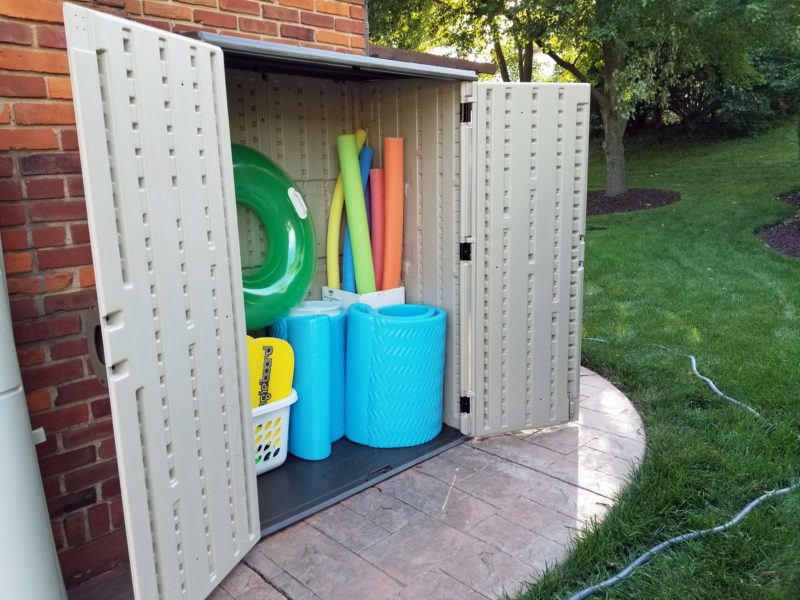
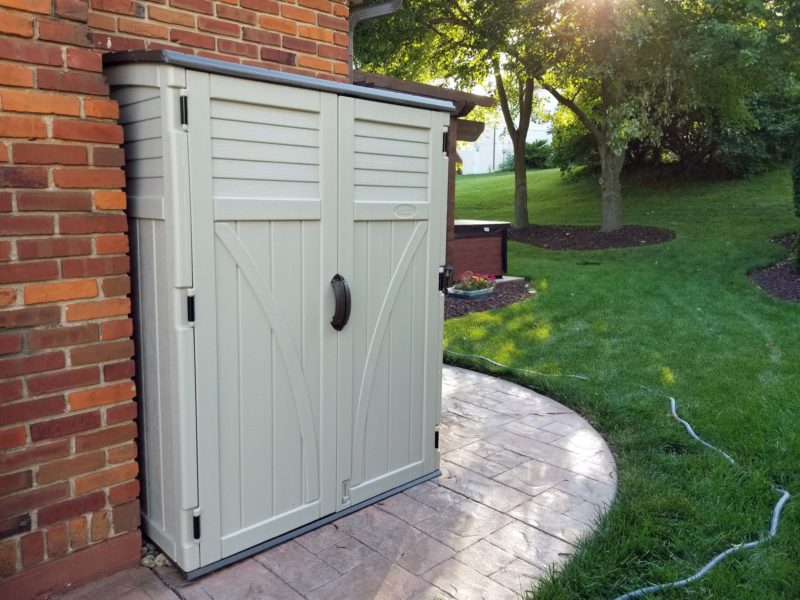
Before the weather got too cold, I thought I should scratch some little jobs off my list.
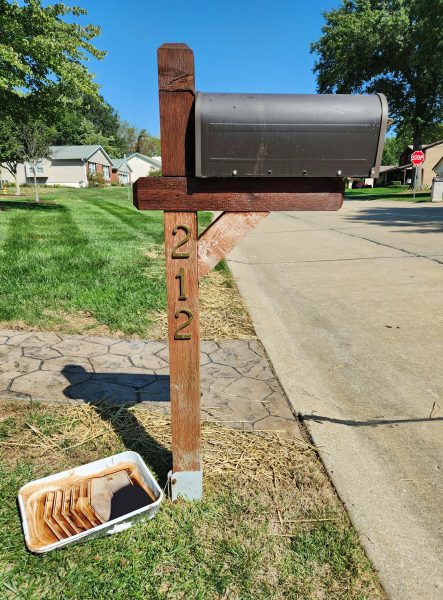
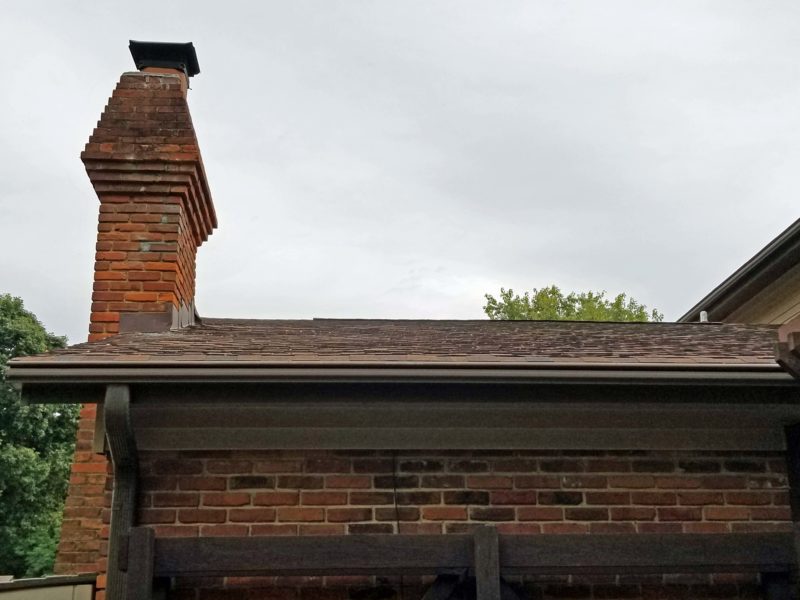
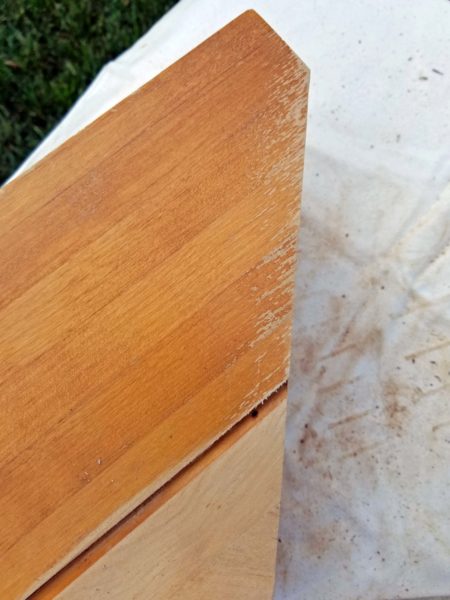
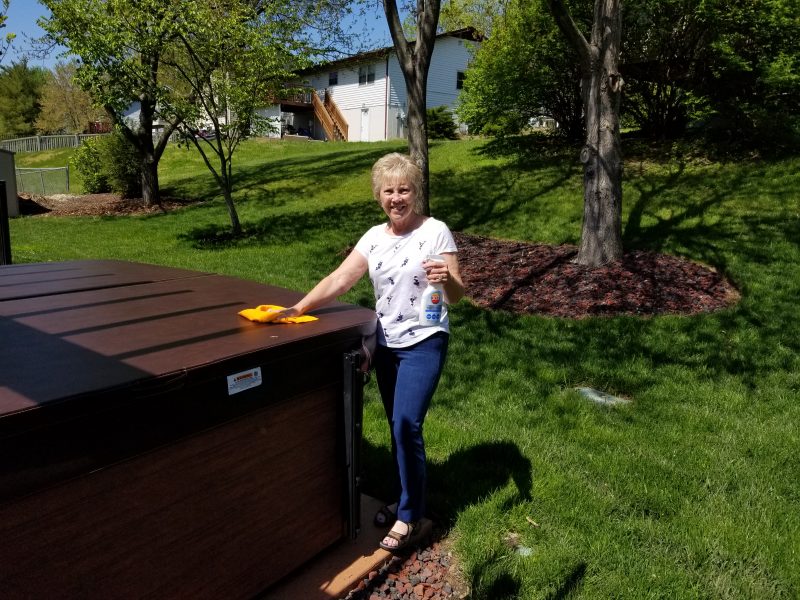
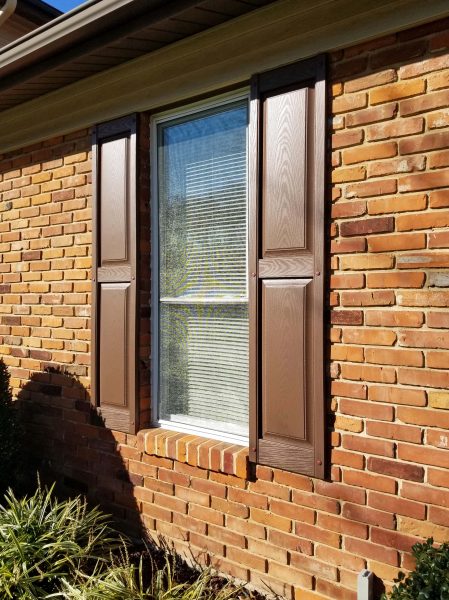
The stain on our mailbox post and on the front porch support posts has faded badly. Ted and I finally drove to the home decorating store to buy stain, and then I went to work. If you look at the bottom of the mailbox post in the photo below, you can see how faded the color was before I freshened it with new stain.
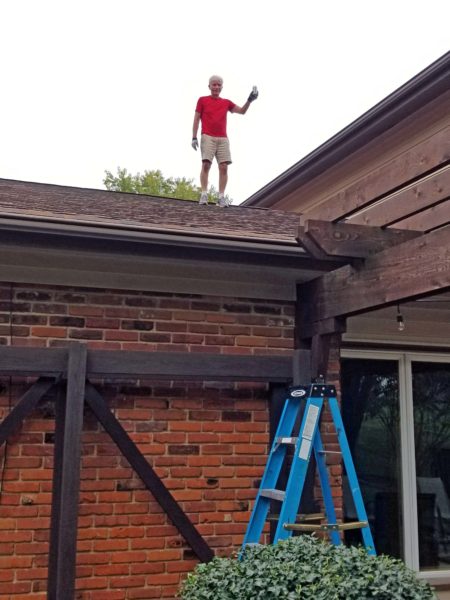
The same was true of the porch posts, but they look better now. I was wearing a boot for an ankle injury, so Ted helped me by climbing the ladder to stain the high parts and I stuck to what I could reach.
Okay, the little outdoor jobs were finished, but I still had one little indoor job to do. We have a jet tub in the upstairs bathroom. Because of the extra depth of the tub and the placement of the jets, shower curtains are too long–unless you want the jets to massage the shower curtain rather than your body. That’s not a problem for me–I just cut the curtain shorter and hemmed it.
We had the bathroom re-painted as part of the 2023 interior update of our house, so we bought a new shower curtain for the bathroom to celebrate. The piece I cut from the bottom of the curtain was long enough to make a matching valance for the bathroom window. That piece of fabric has been waiting for me to do something with it for over a year, and I finally did.
Obviously, the cure for procrastination is to just do it. Now I can’t help wondering, “What took me so long?”
When Ted and I updated the interior of our house in 2022-23, we deliberately chose not to re-hang artwork or to set out decorative objects that we were getting tired of looking at. We also decided to simply leave the affected walls and surfaces bare in order to provide incentive for us to shop for new things.
It takes patience to find something that tells you, “This is the one.” We’ve been browsing in a variety of places every now and then–not too often, because you have to give the stores time to put out new stuff if you don’t like what you see. When I see furniture ads on TV, I don’t look at the furniture–I look at the artwork on the walls and at the accessories on the tables. If it looks appealing, we check out that store.
Last weekend, we went to Main Street in St. Charles to browse at the annual Mosaics Fine Art Festival. We weren’t sure we wanted a mosaic piece, but we’ve seen beautiful mosaic work on our travels, so it was worth a look. Not only that, but the weather was beautiful for a stroll through a festival. Surprise! We saw just about every variety of art–except mosaics!
After walking the half mile up Main Street where the displays were placed, and then the half mile down Main Street to get back to where we started, we liked only one thing. Wouldn’t you know it? We saw it at the third booth we visited! The walk gave us time to think it over, though, and to come back after some time had passed to see if we still liked it. This piece said, “Take me home,” so we did.
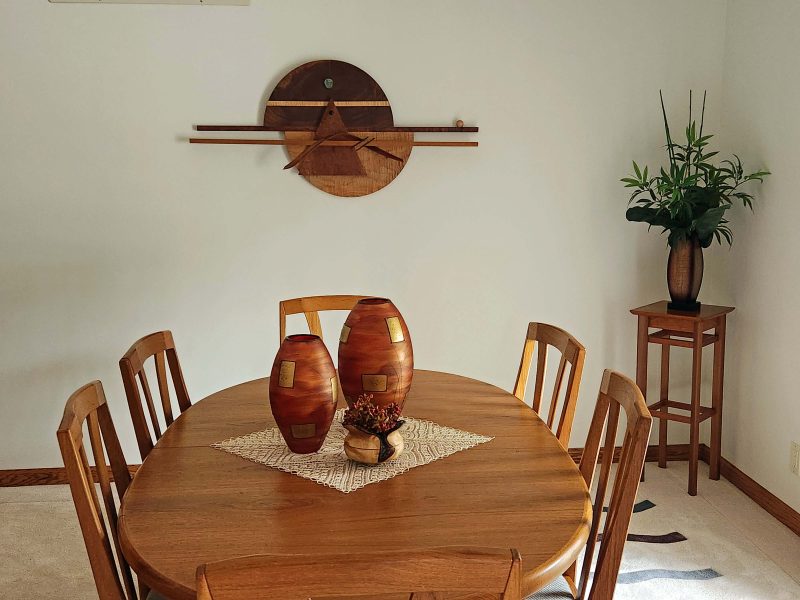
We hung it the next day, and it looks just as good as we hoped it would. It was made by an artist from Iowa. He titled the piece “Out of Balance.” We had to make a decision about which horizontal line to level when we hung it, because none of the horizontal lines is parallel to any of the others–therefore, they’re “Out of Balance”! It goes well with the vases Kathy bought from the Chicago Art Museum and gave to us for Christmas one year. We like it!
P.S. The small bowl in front of the vases is also from Kathy. She’s so artistic!
One day I walked into our family room during the few minutes the setting sun shone through the window and directly on our “Wave” sculpture from Hawai’i. It really made the blue color of the sculpture stand out in the room.
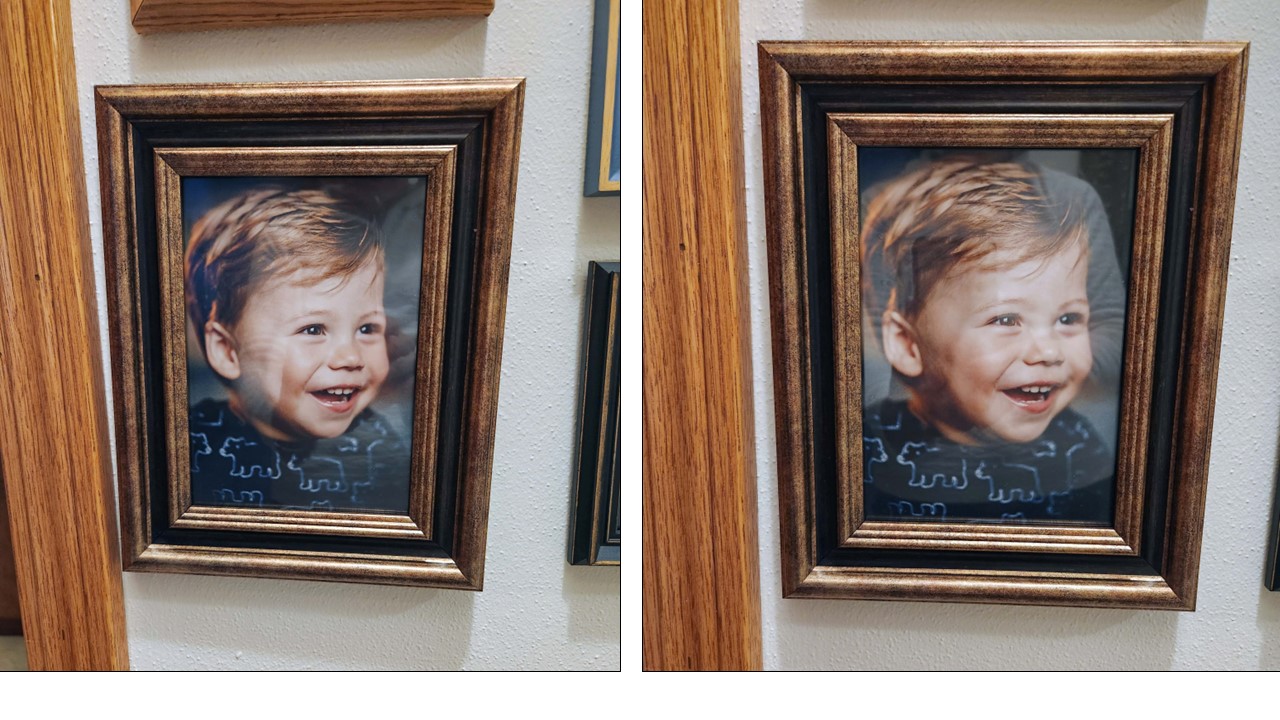
One of our gallery pictures of our grandson has always hung crooked, no matter what I did to straighten it. One day, I decided to weight the picture with pennies. Unfortunately, between Ted and me, we had only one penny, and that turned out to be insufficient. The picture still hung crooked.
I mentioned this little problem at a family gathering and said I thought I needed another two cents. The conversation moved on, but after a few minutes, Dylan re-entered the room and handed me two cents. Thank you, Dylan!
I added Dylan’s pennies to the back of the picture and it still didn’t hang straight, so I tried a nickel. That didn’t help, so I moved up to a quarter. That helped a little. When I added a second quarter, the picture hung straight.
I don’t think I’ve ever added more than two cents to a picture, but this one was a 53-cent job. The bottom corner of the picture butted up against the door frame. I wonder how far it would have tilted if the door frame didn’t stop it. Well, at least it’s finally straight and this little guy’s picture is no longer cockeyed.
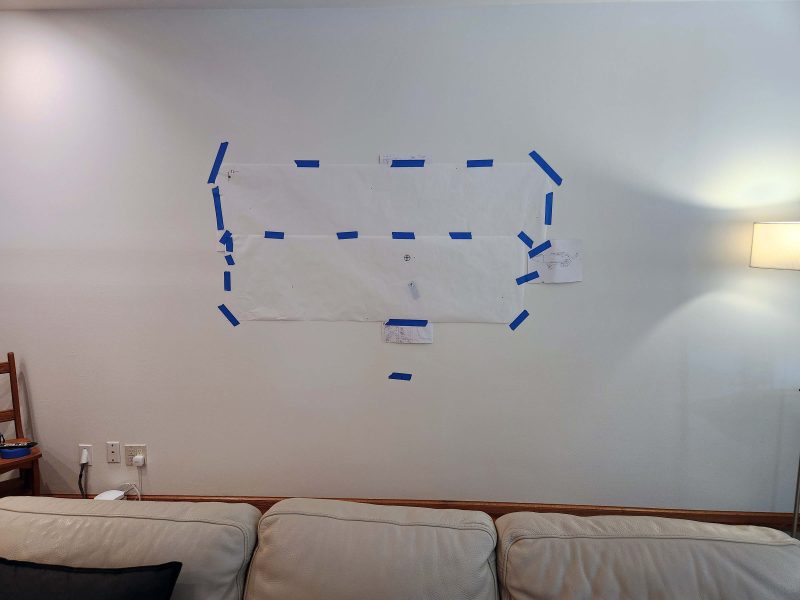
Ted and I had to clear our walls for the painters in Fall 2022. We were both tired of looking at the same old things on the walls, so we decided that we would only re-hang the things we missed looking at. One of the things we missed looking at was a two-piece sculpture. It’s not an easy thing to hang. The two pieces need to be properly aligned; they are heavy and awkward to handle; and the design pieces have sharp corners. An added challenge is that it needs to be hung on eight irregularly arranged hangers.
I decided that a template would probably avoid repeated trial-and-error efforts, so we spread some large, taped-together sheets of paper on the basement floor and properly aligned the sculpture pieces on them. Then we marked where the irregular hangers were so we’d know where to put the nails into the wall. The hangers are welded to the sculpture frame, but the frame does not extend to the edges of the sculpture. That provided another challenge: deciding where to place the template on the wall so that the sculpture would hang where we wanted it to be. We worked with the outside measurements of the sculpture and the template to determine the center, transferred those measurements to the wall, and then taped the template to the wall.
Instead of pounding the nails all the way in on the template markings, I tapped them just hard enough to make a visible dent in the drywall. Then we removed the template and put in four of the eight nails we needed–just enough to hold the sculpture temporarily–before hanging the sculpture to check its placement. It looked good, so we took it down and hammered in the other four nails. Now the sculpture is securely hung and the placement looks good. Nice work, if I do say so myself.
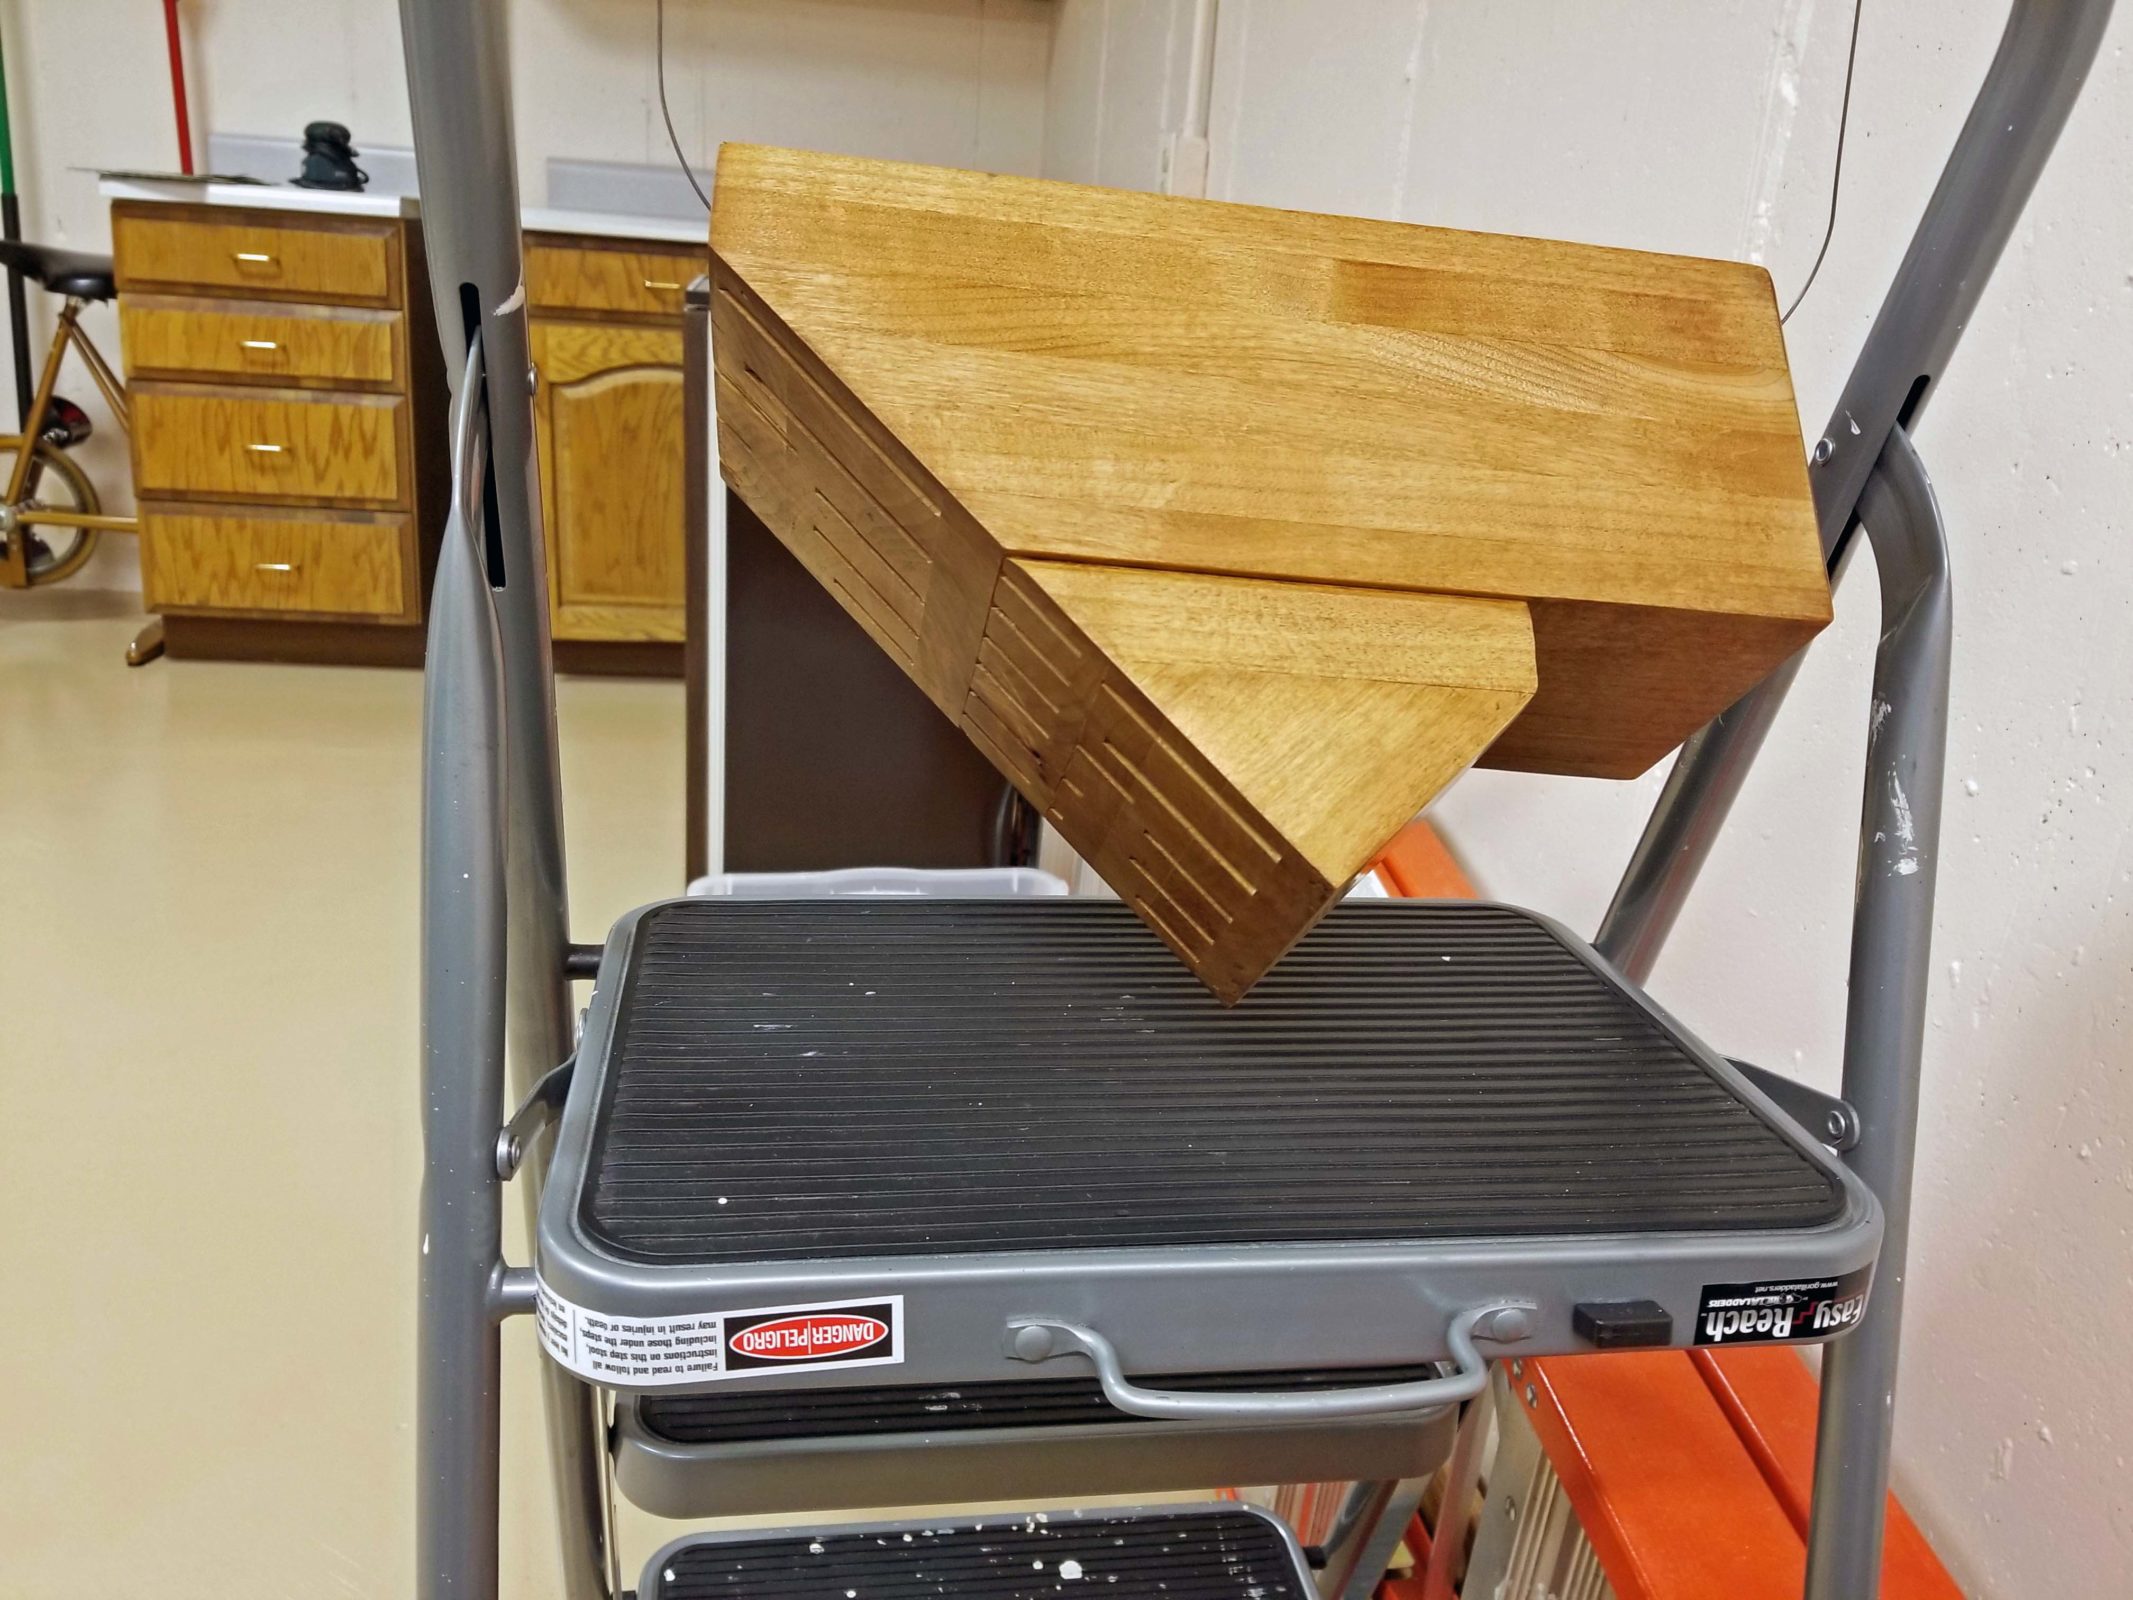
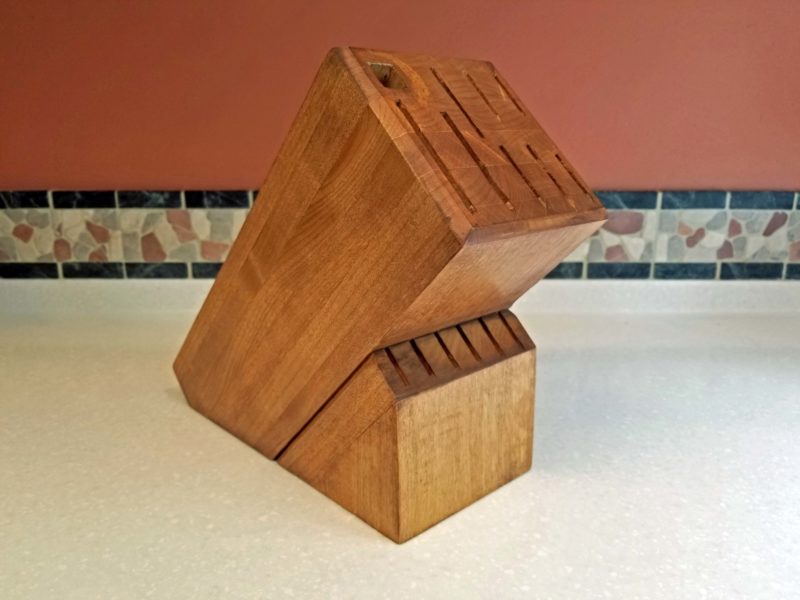
Thanks to the kitchen update, the basement workshop got an update too. The last time we updated our kitchen, we selected some of the old, to-be-removed cabinets from the kitchen and had them moved to the workshop for neater storage down there.
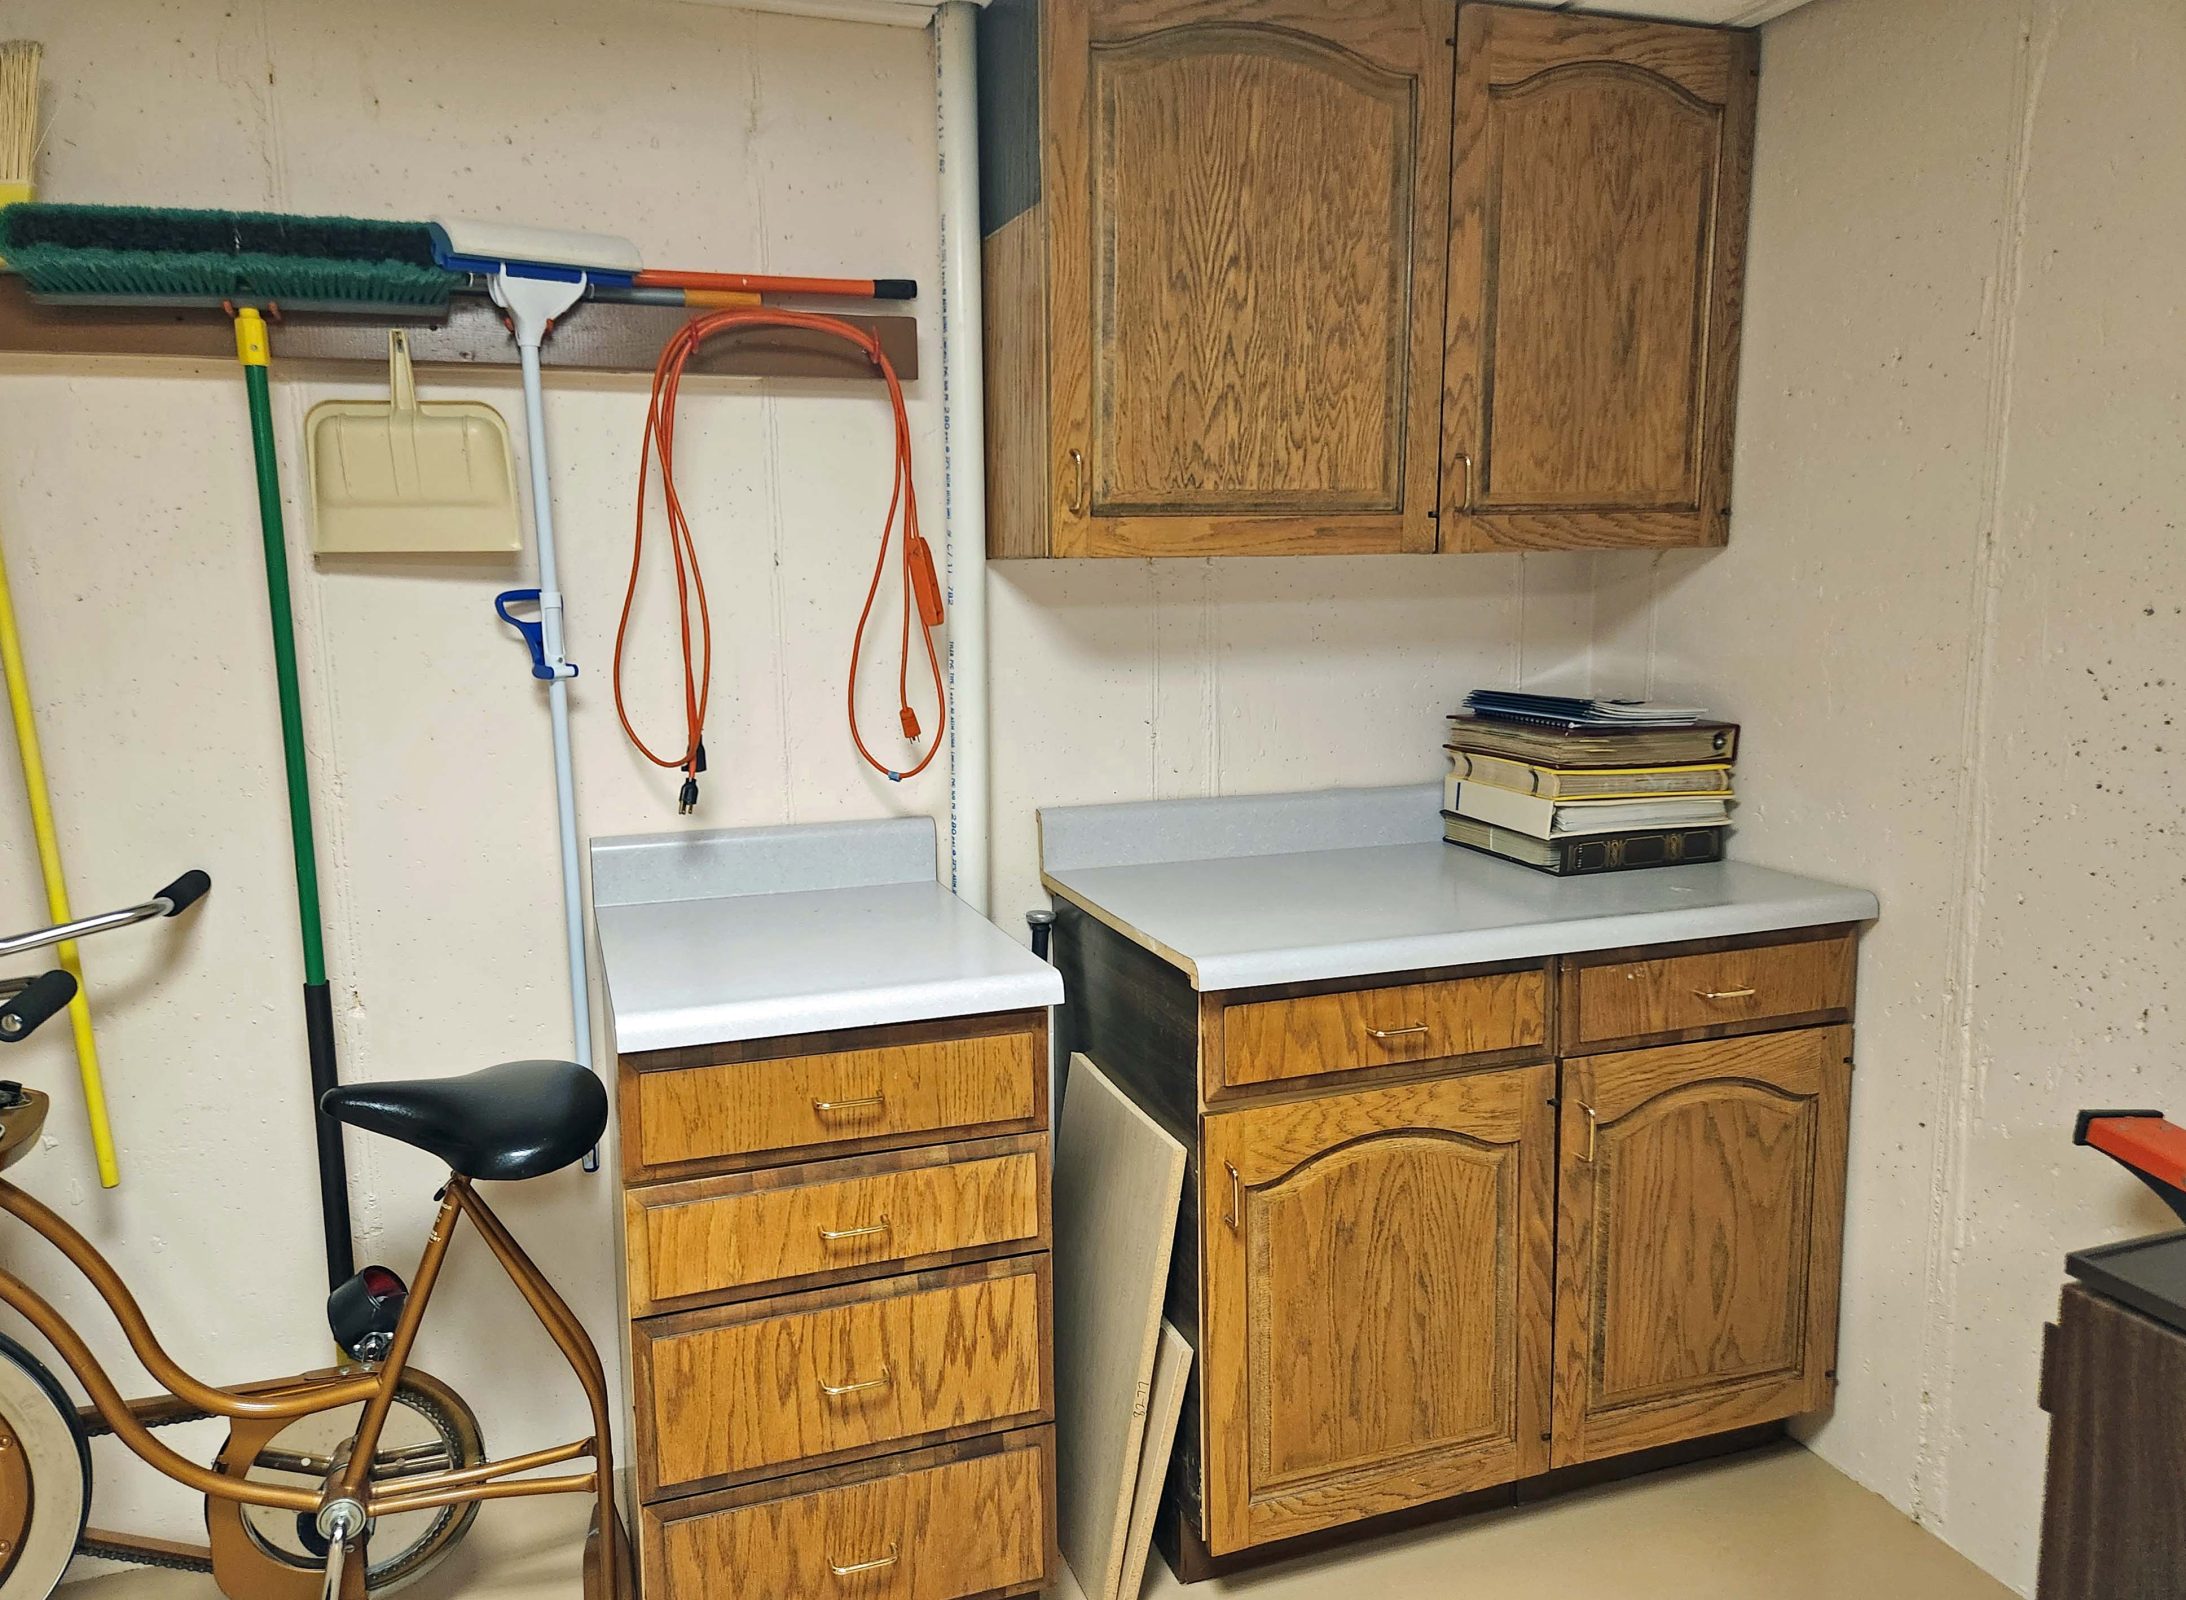
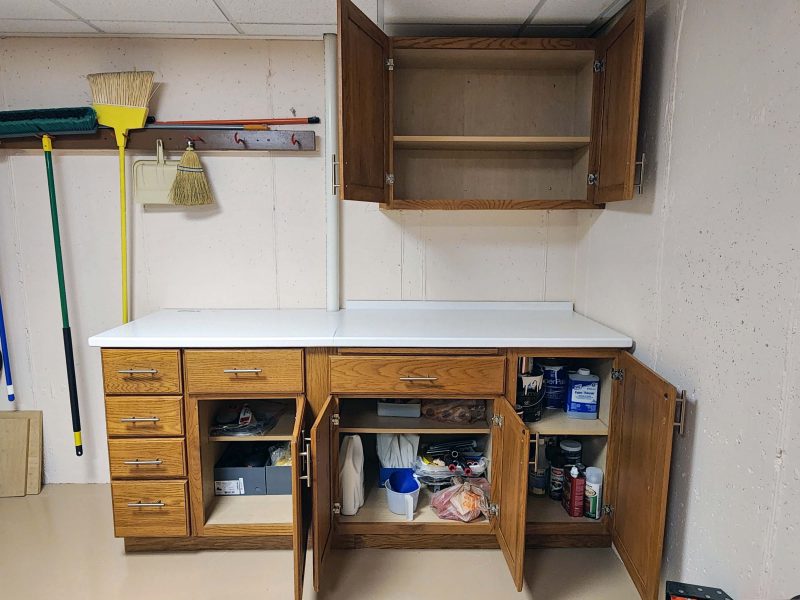
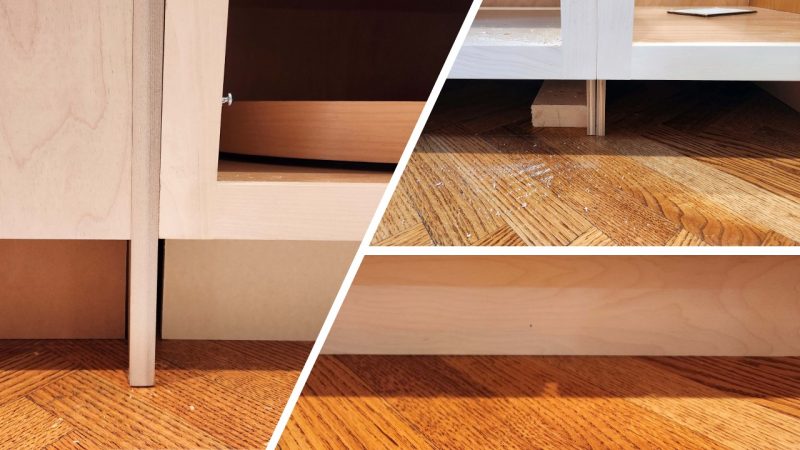
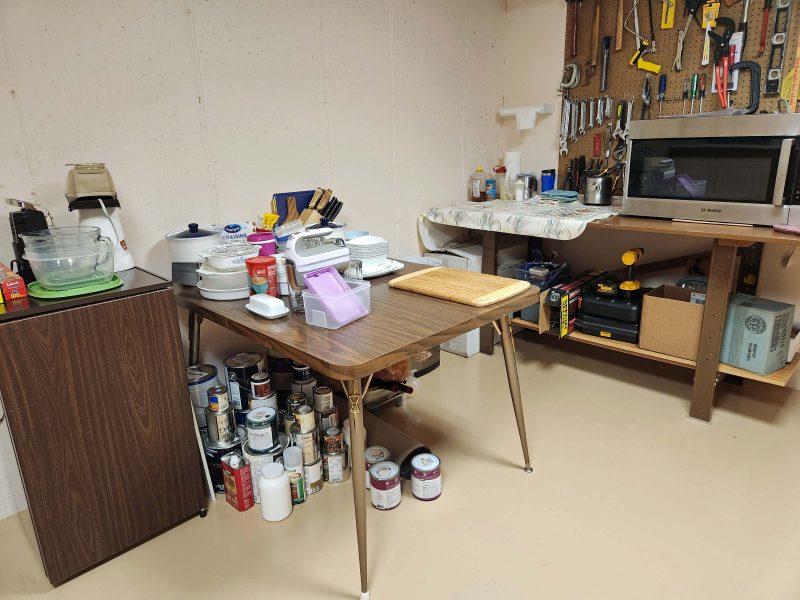
The cabinets pictured below were original to the house, and are now 44 years old. They show their age and the drawers no longer work very well. Naturally, the upper cabinet is installed (i.e., fastened to the wall). The lower three pieces, however, are just set in place against the wall with the countertop pieces simply resting on the cabinet tops, making those pieces easy to move. Not surprisingly, we never moved them. The PVC pipe drains the washing machine above, so the cabinets were placed separately on each side of it. The dark portions of the cabinet sides are the original color of the cabinets. I hated that dark color when we bought the house, so I stripped the cabinets and stained them lighter. The dark areas were against adjacent cabinets, so those portions didn’t get stripped. You can see the raw edge of the Formica countertop in the center. That countertop wasn’t originally on that cabinet; the workers at the time cut it to fit.
This was the workshop in the basement, so we didn’t need or expect beautiful cabinetry. We were satisfied for many years, but with new cabinets coming to the kitchen, it was the perfect time to replace these worn-out cabinets with something only half their age.
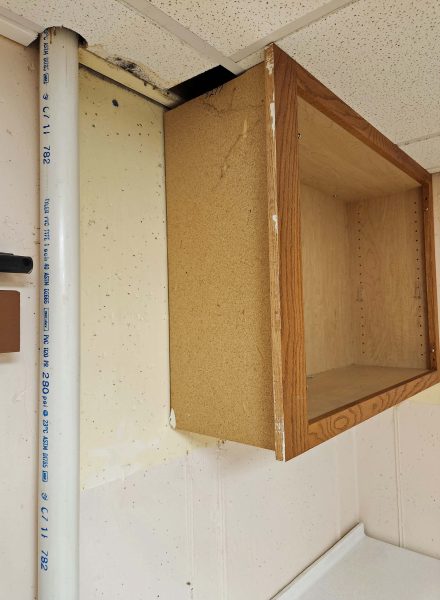
When our kitchen crew, Christian and Craig, removed the upper cabinets in the workshop, they noticed mold and some ceiling tile damage. That must have developed years ago when the washer hose broke and sent a full load of water to the basement floor–gallons of wash water and more gallons of rinse water. I left the washer running while I was away from home, so I wasn’t there to immediately turn off the water. Oops! What a mess that was to clean up! Since the cabinets were installed before the washer hose ruptured, we couldn’t dry the water or remove the ceiling tiles above them, and we couldn’t see the resulting damage. As a result, the water absorbed by the ceiling tiles in that area dried slowly enough to develop mold. It’s a good thing Christian and Craig could repair it now.
I expected the same kind of installation from Christian and Craig as we had last time: attach the upper cabinet to the wall, put the lower ones in place, and cut the countertop(s) to fit. Wow! Was I surprised!
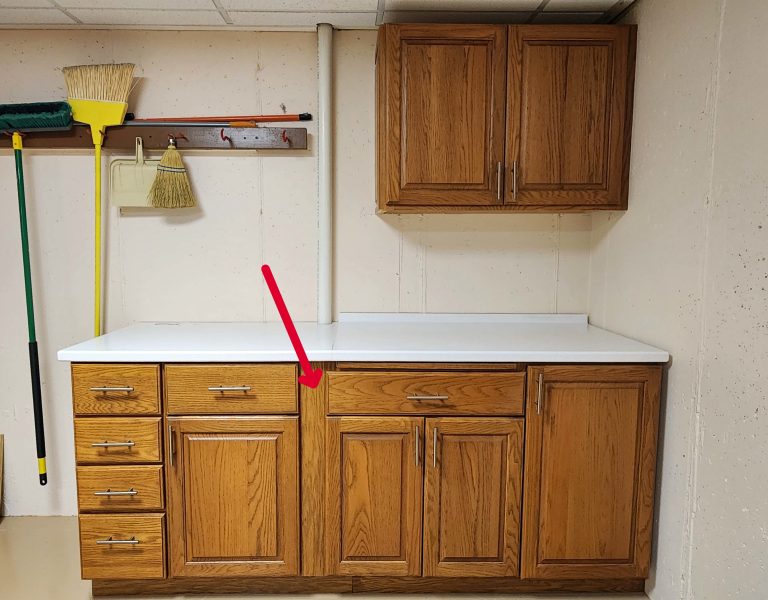
These guys didn’t put the cabinets in the basement; they installed them. They leveled everything and fastened every cabinet to its adjacent wall and to its adjacent cabinet. To hide the drainpipe space needed between the cabinets, the guys cut a spacer from a flat wood panel taken from a to-be-trashed cabinet from the kitchen, and inserted the spacer between the cabinet sections (arrow). None of the removed countertop pieces was long enough for the entire lower surface, so the right portion has a backsplash and the left portion doesn’t. To make a continuous countertop around the drainpipe, Christian cut a half-circle into the back edge of the countertop and joined the two pieces with a nearly invisible seam sealed with clear caulk. The back edge is also caulked along the wall. All of those details make the four lower cabinet pieces look like a single unit. Compare the photo below with the top photo above. Attention to detail makes a big difference!
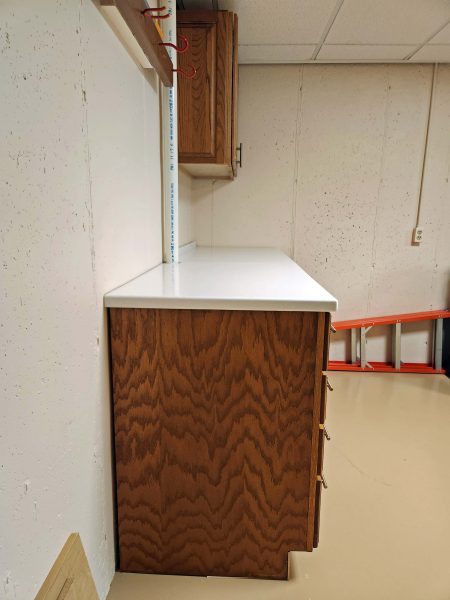
Speaking of details, . . . The over-the-top thing the guys did in the basement was to cover the exposed end of the upper cabinet with a trim piece (below). It’s not a perfect fit, but, like the spacer and the continuous countertop, I didn’t expect that level of detail in the workshop. Craig cut the piece from one of the old, matching cabinet doors and attached it to make the upper cabinet look nice from the side. Uh, that would be the side that faces the storage room. Doesn’t everyone want to see a beautifully finished workshop cabinet edge from the storage room?! Christian and Craig certainly do!
I expected these repurposed cabinets to look a lot like the previous ones, but in better condition. Instead, I feel like we ought to do something special in this room to justify such nice cabinetry. When I repeatedly complimented Christian and Craig on how beautiful the cabinets looked, they kind of shrugged as if to say, “How else would we have done it?” and Craig said, “Well, I like my workshop nice.” Obviously, it could have been done as simply as the previous crew did with the previous cabinets, but that’s not how these guys roll.
When we emptied all of our living area rooms for painting and carpeting in Fall 2022, we got rid of so many things, that we removed shelving and still have extra shelf space. The same was true when we refilled the “new” basement cabinets–we have extra space in our updated workshop. I wonder how long it will take us to fill all the empty shelf space we now have throughout the house. There’s a saying that the more countertop you have, the more things you set on it. I’ll bet the same is true for closets and shelves.
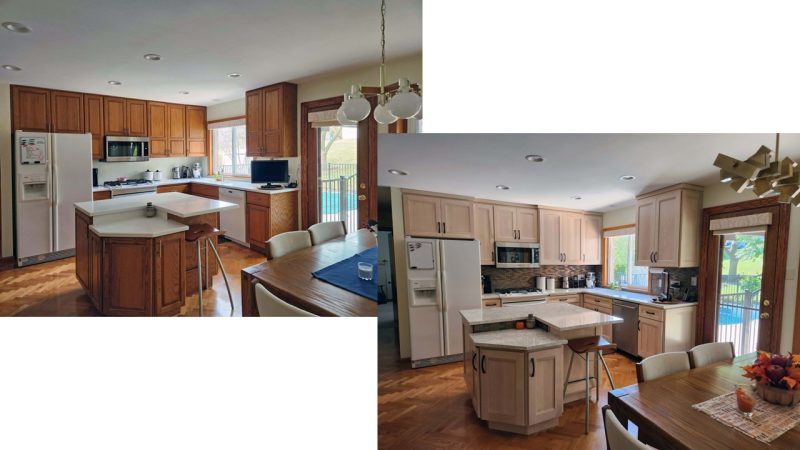
Our kitchen update project included some changes to bring our kitchen from its circa 2000 look to the 2020s era of design. Most of the changes were optional. One was not.
One evening last spring, while Ted and I were eating dinner, the chandelier we installed when we updated our kitchen 20+ years ago abruptly turned itself off. Everything looked good when we checked the breakers and the light switch connection. We tested the five light bulbs in another lamp and they all worked fine. In August 2022, we had the electrical box for this light moved to center it over the kitchen table. We wondered if there might be a problem with the installation, and felt nervous about using a light that might have wiring problems. I called our electrician, and he assured me that, as long as the switch was turned off, we were not in danger of an electrical fire. We planned to replace the chandelier with a new one during our kitchen update, but now we had a sense of urgency to shop.
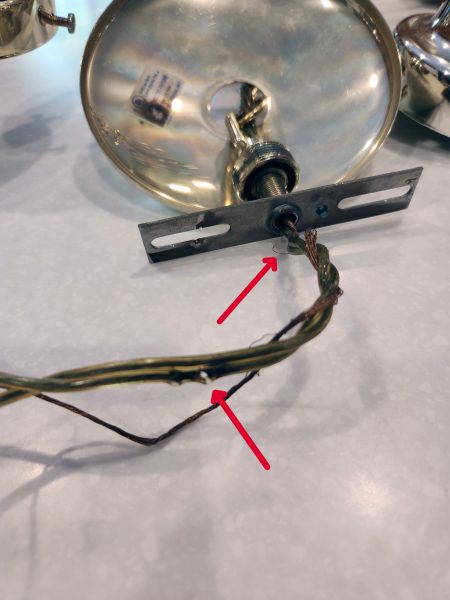
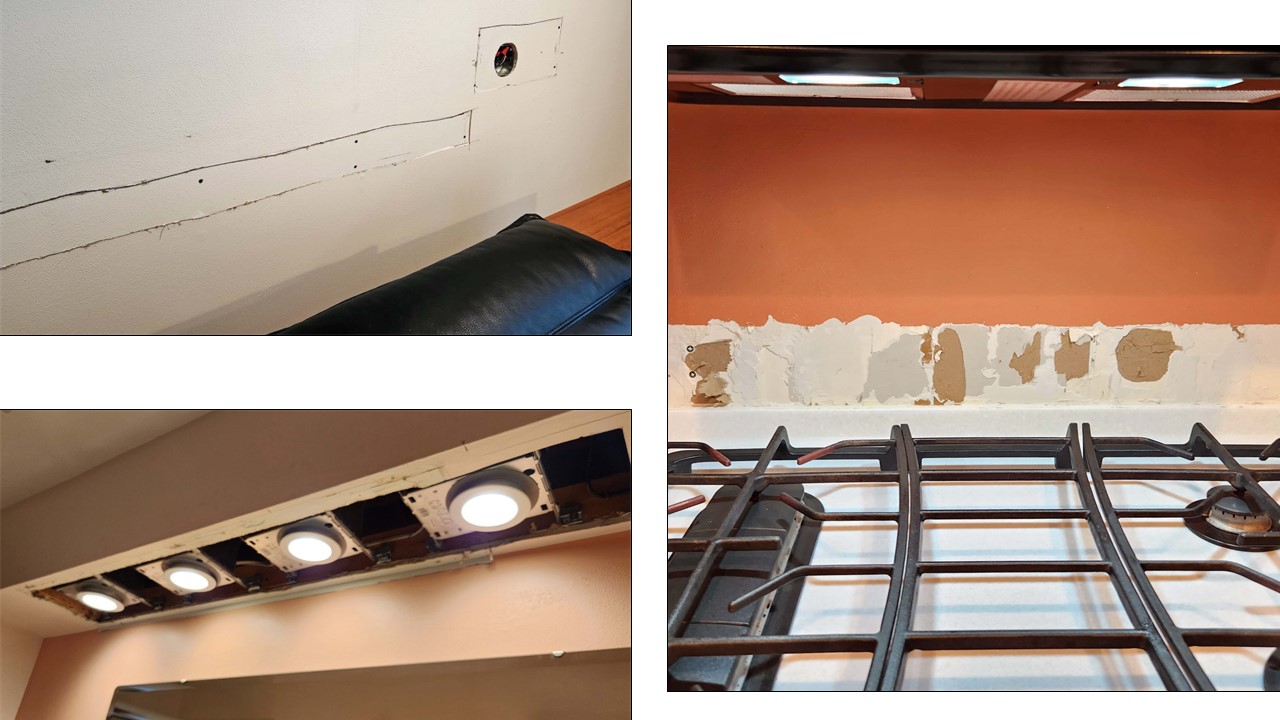
We bought a new chandelier and called the electrician to install it. When he removed the damaged light from the ceiling connection, he found the problem. The installer who moved the kitchen table light in 2022 (same company) pinched some wires with a screw when he attached the chandelier to the electrical box, and that eventually broke the wire. You can see the damage indicated by the arrows in the photo below. After installing the new light, the electrician prepared to leave and informed us there was no charge for the service. The company, he said, stands behind its work and we lost a chandelier due to their error. He even offered $100 toward our new light.
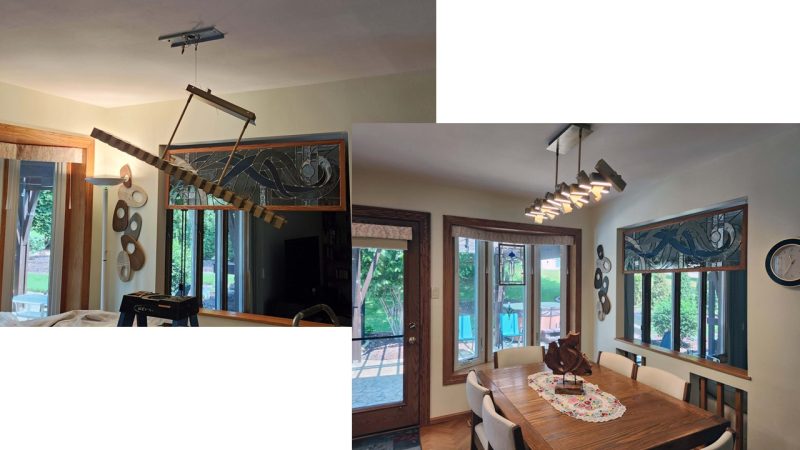
While he left his work area to get some other tools, the electrician let the (relatively heavy) new chandelier hang by a wire designed to hold the fixture during the installation process (left). I’d have been nervous about doing that, but it worked just fine. We used a 1980s vintage pole lamp from the basement (in the corner, left photo) for table lighting while we shopped and waited for the new chandelier installation. The right photo shows the new chandelier, properly attached to the ceiling.
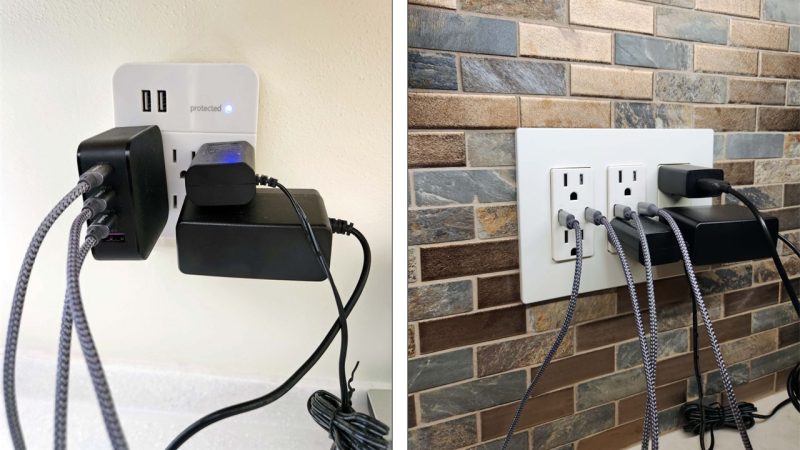
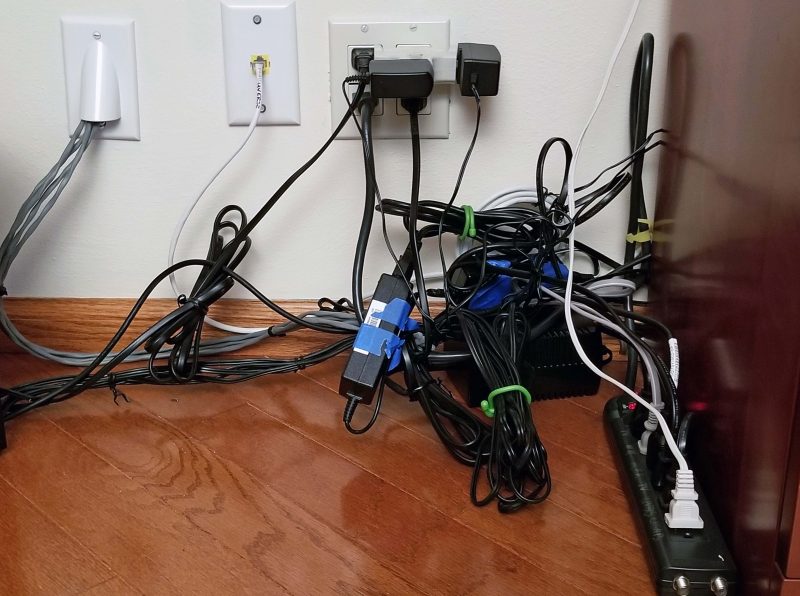
In addition to the new chandelier, we made a number of other changes to our kitchen design. There weren’t a lot of home devices to charge in the late 1990s when we last updated our kitchen, so one of our kitchen outlets used to look like the left photo. All of those plugs are inserted into a six-gang tree with 2 USB chargers which, in turn, is plugged into a two-gang outlet. Twenty-some years later, we had a six-gang outlet with built-in chargers installed to accommodate our current needs at that location. Much neater.
Instead of our Bed, Bath & Beyond silverware tray, we now have a two-tiered built-in silverware tray in this drawer.
All of the lower cabinets have drawers instead of shelves. Now it’s much easier to put things away and to get them out because we don’t have to remove the items in the front to extract an item from the back.
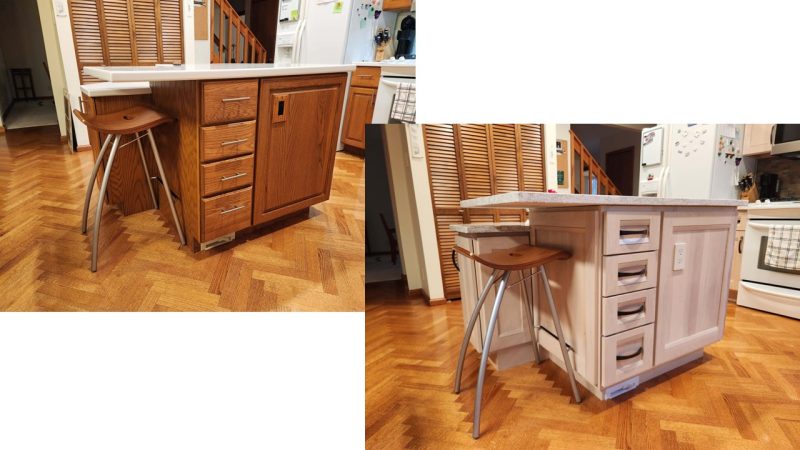
We added a drawer to the island so that we can store placemats and napkins conveniently near the table.
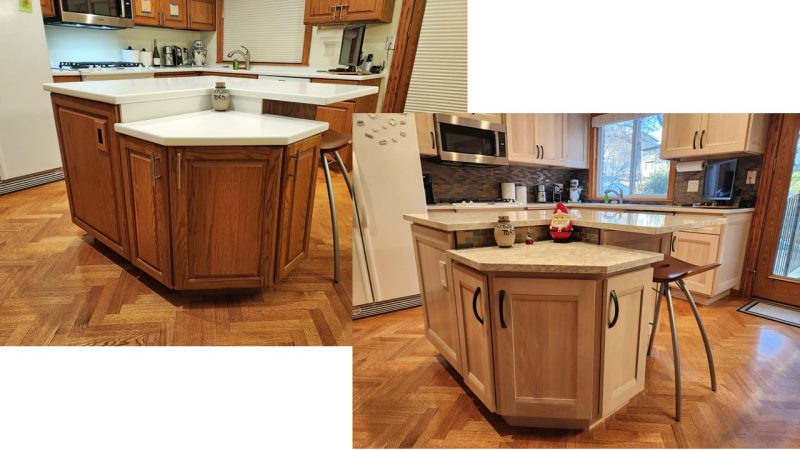
In our last kitchen update, the island backsplash matched the countertop. This time, we matched it to the backsplash over the cabinets.
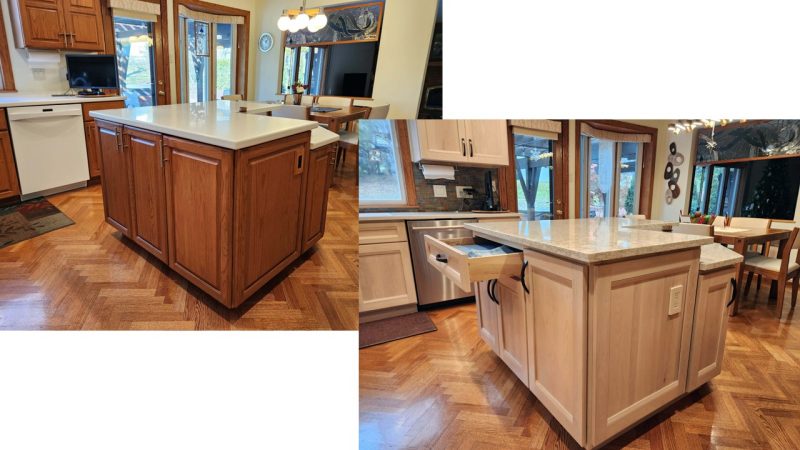
Some of our previous cabinets had a matching flat panel on the exposed sides. This time, we added a trim panel to all the exposed sides, even in the corner where we keep the stool.
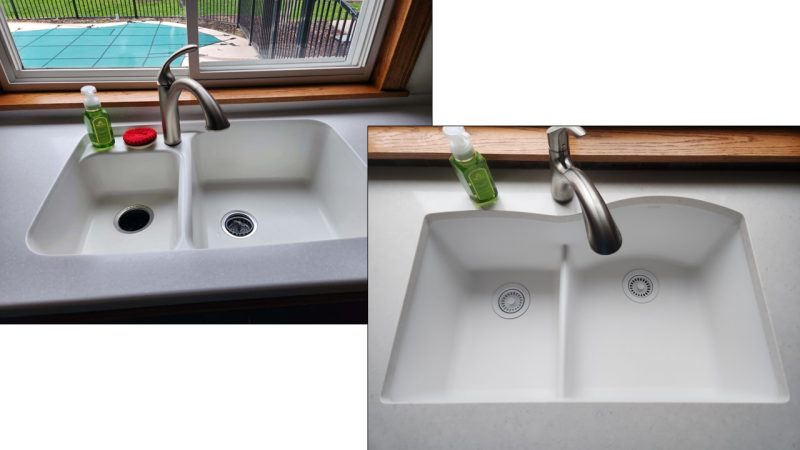
We replaced our Corian sink with a composite one. The Corian sink was still in great shape, but could not be removed from the surrounding Corian countertops, since they were poured together. Now we have a composite sink attached separately to the countertops.
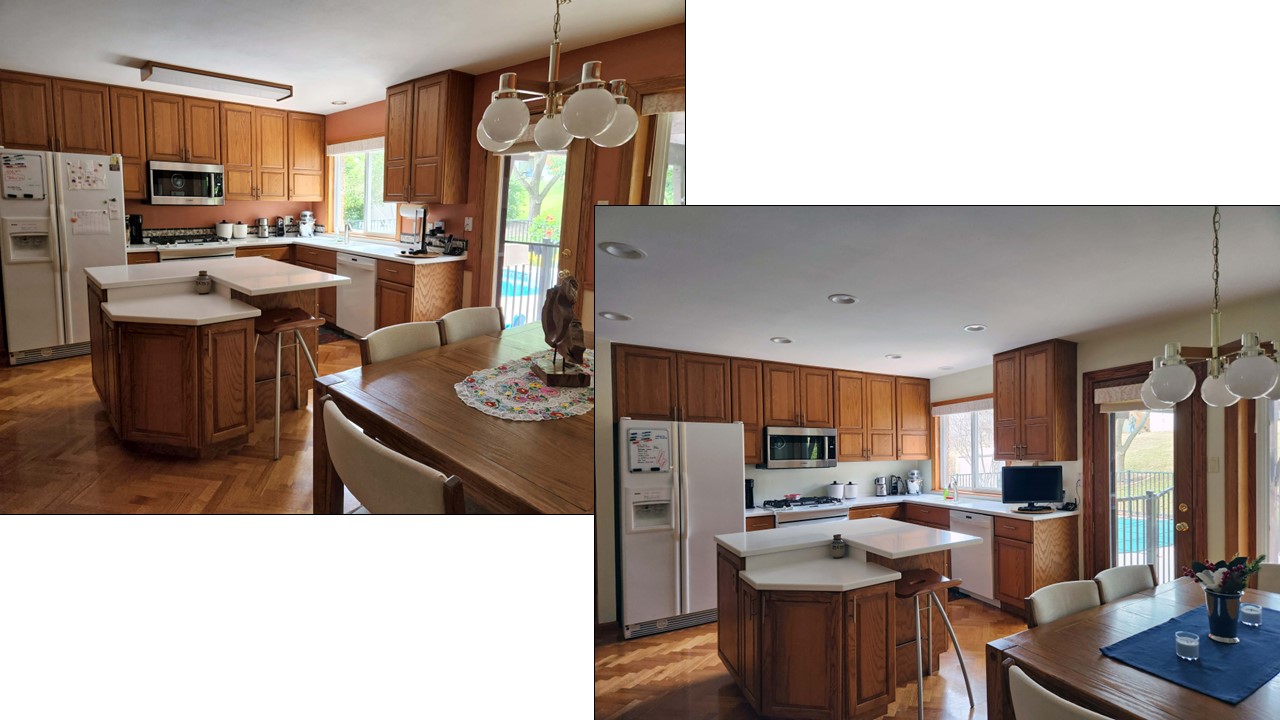
For this update, we ordered upper cabinets of varied depths to eliminate the straight-line front edge of the upper cabinets. Compare the old kitchen look (left) with the updated look (right).
Here’s a picture of Jimmy’s, Christian’s, Craig’s, Ted’s, and my favorite change: the LED strip lighting over the countertops. It’s gorgeous in the evenings when the random bronze-colored backsplash tiles shine softly in the light.
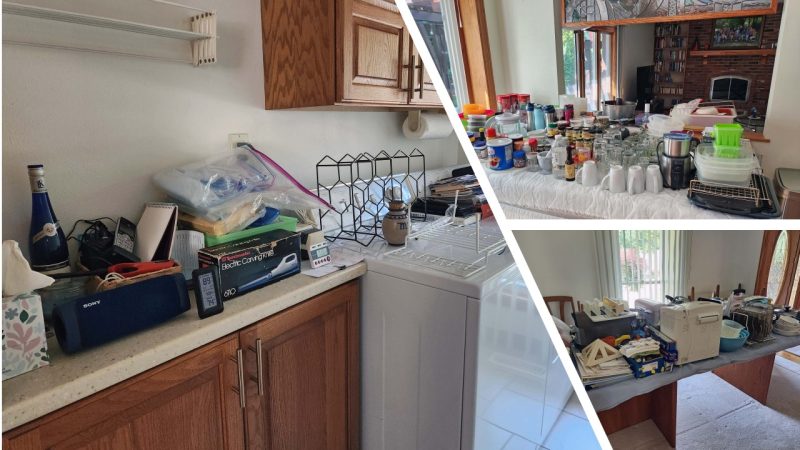
In addition to setting up temporary kitchen/dining areas in the basement, we had to empty all of the kitchen cabinets before the crew could begin their work.
Just like closets, you can get a lot of stuff in cabinets!
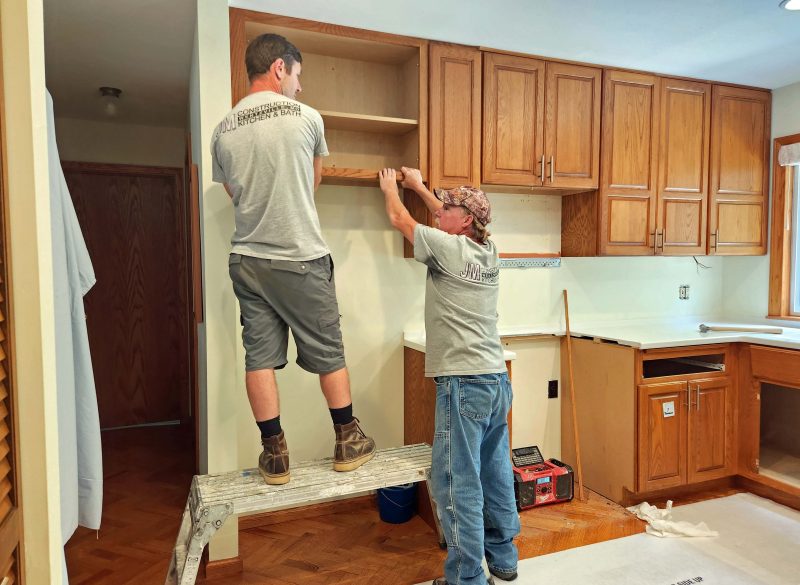
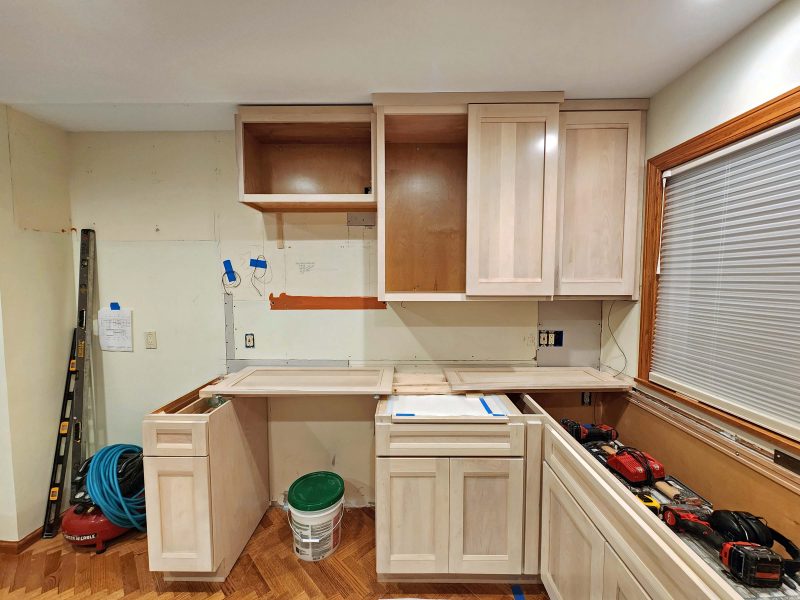
Jimmy, the company owner, sent Christian (left) and Craig (obviously, right) to start working on our kitchen on June 21. The two guys worked daily through July 16. They started by removing our old (20+ years) cabinets. The cabinets were installed from right to left, so needed to be removed in the opposite direction.
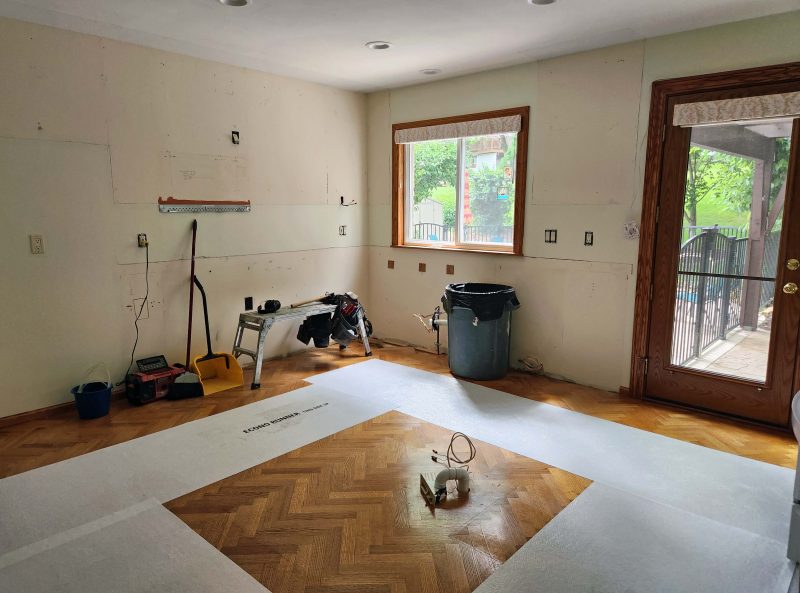
The cabinets are gone and the hardwood floor is well-protected. The kitchen looks so spacious!
When we replaced the original kitchen cabinets in our house, we put some of them in the basement to provide closed/covered storage. They are now 44 years old and definitely show their age. In our current kitchen contract, we included removing those original cabinets and replacing them with some of our current (now old) cabinets.
During this project, the guys made their mess in the garage and in the driveway, and cleaned it up every day. In the photo below, the truck is delivering the new cabinets and Christian is cutting one of our current/now old countertops to fit the new/old cabinet arrangement in the basement.
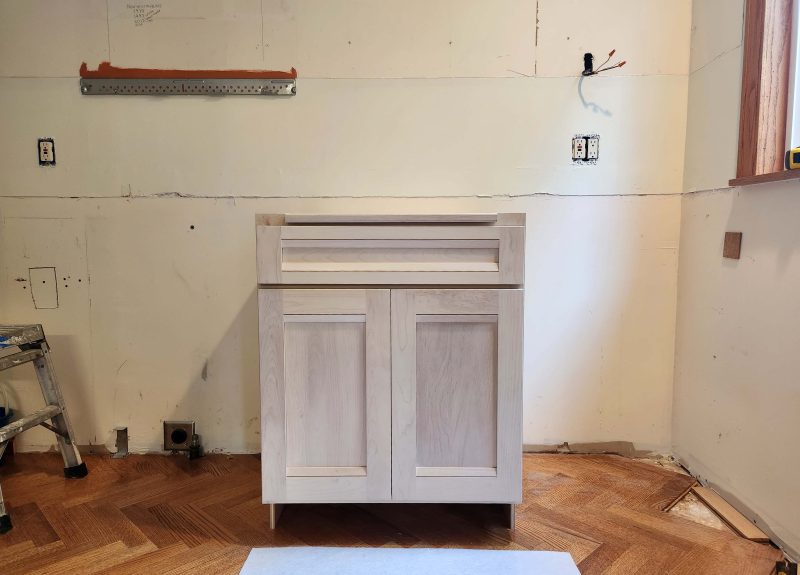
The first cabinet is installed. The wood is birch.
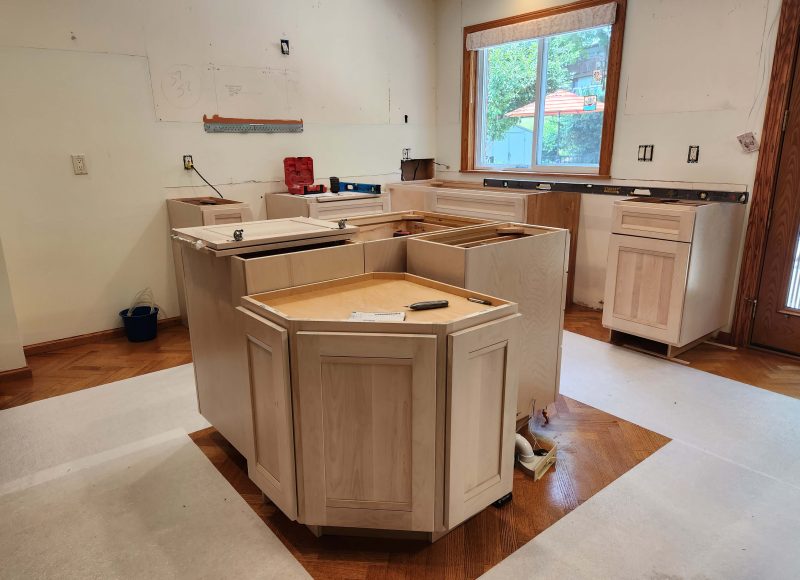
All of the base cabinets are installed. By doing the lower cabinets first, the guys can keep busy working on the upper cabinets while waiting for the countertops to be measured, manufactured, and installed. The island is actually four cabinets. It looks like a cabinet puzzle fitted together in this photo.
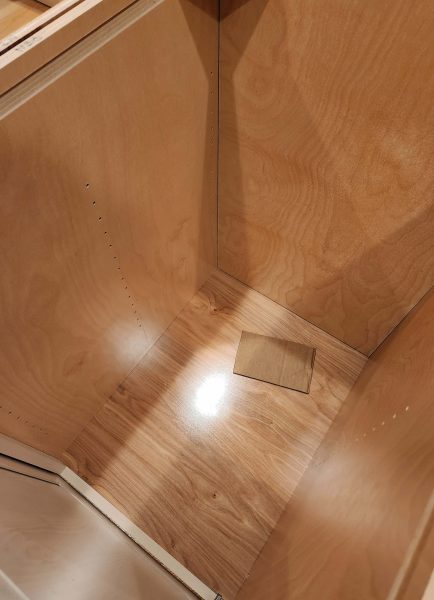
Even the interiors of the cabinets are beautifully finished.
Some of the separate cabinets for the island were built with full-length side panels. When two cabinets were placed side-by-side, this created a great place to stub toes while working at the island (left image). Fortunately, Christian had a neat little toe kick saw that could cut a square corner under the cabinet (upper right image) to allow for a continuous toe kick all the way around the island (lower right image).
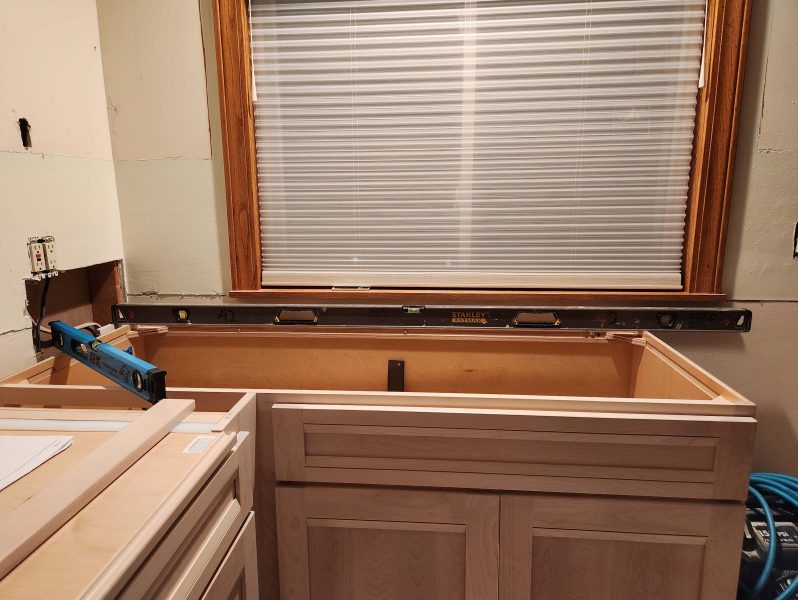
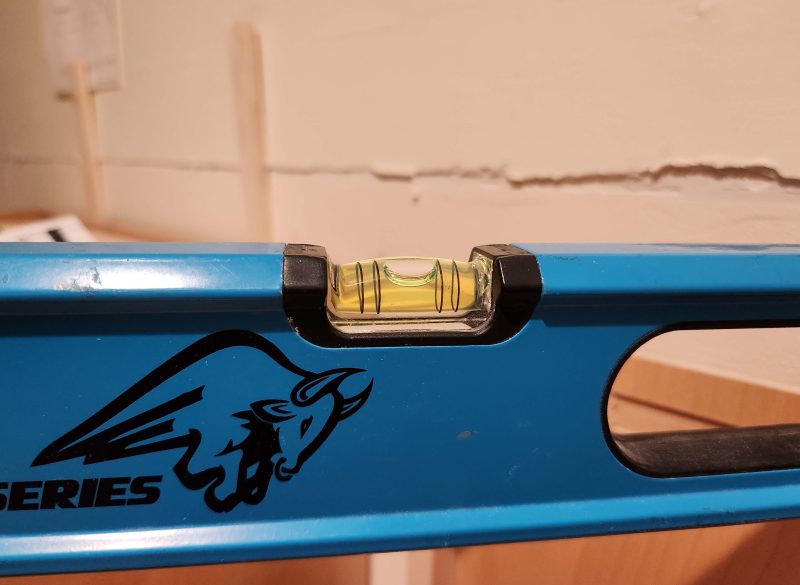
Christian was at least as picky as I am about details. His level was his constant companion. Are these cabinets level by themselves as well as with each other? . . .
. . . You bet they are!
Under-cabinet lighting for all the upper cabinets was part of our design and required new electrical work. You can see the large hole in the wall and wires extending from the walls where the lights will be connected to the switch.
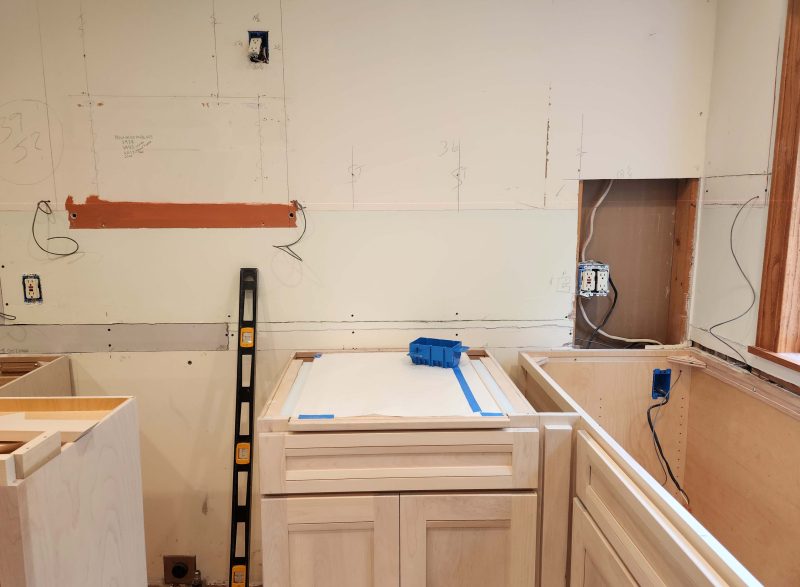
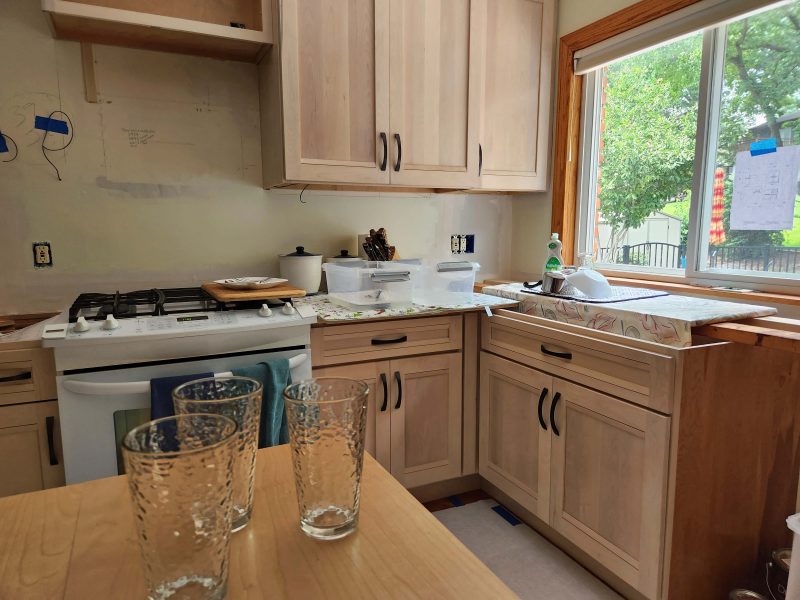
At this point, we ran into a problem and the guys had to pause their work for ten days while we waited for the countertops and a new cabinet to be made and delivered. Notice that rust-colored stripe of paint in the left center of the above photo. That was formerly covered by our microwave, which was mounted beneath a 24-inch long cabinet. You can also see the outline of the microwave installation template in that photo as well as the handwritten dates for each new microwave oven we installed. The delivered cabinet (short upper one, below) was only 18 inches long. Christian said he called the designer to verify the size because it seemed high to him. She verified an 18-inch long cabinet, so he installed it.
Why was that a problem? If we’d installed the microwave beneath that 18-inch cabinet, the bottom edge of the microwave would be where the top edge of the blue tape is in the photo below. The microwave cooking tray would be three inches above that line and the top edges of the cooking dishes in the microwave would be even higher. Check the blue tape line and my line of sight. I would have been unable to see whatever was in the microwave! Christian and Craig removed the 18-inch cabinet and the contractor ordered a longer one.
The mystery is why the designer planned an 18-inch cabinet for that space and why Jimmy, the boss man, who came to measure the cabinet dimensions in person didn’t catch the error either. As for Ted and me, cabinet length never came up in our design conversations, and we made the assumptions that the experts used standard lengths, and that the length of the two 24-inch long cabinets we’ve had above the microwave over the past 44 years was a standard length.
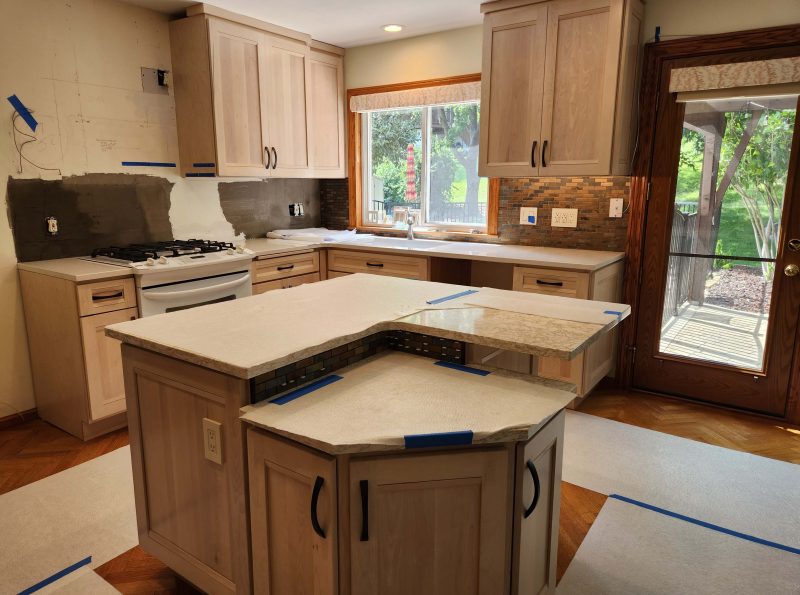
After the ten-day hiatus, work resumed on July 26 with the installation of the countertops.
After the countertops were installed (still waiting for that over-the-microwave cabinet), Christian got started on the backsplash. You can see it below on the island between the two countertop levels and to the left of the exterior door. The wall above the cabinets on the left is multi-colored because there was another problem.
After Christian and Craig installed the stove, I noticed that its back edge was more than one-quarter inch farther from the wall on the left than on the right. Even to a non-perfectionist, the stove looked like it wasn’t pushed in all the way on the left. I tried pushing it in, but it was tight against the front edge of the lower cabinets and didn’t budge. I told Christian it was going to drive me crazy to have the stove looking crooked every day for the next 20 (?) years and he agreed. He explained that he (as a fellow perfectionist) squared that line of cabinets with the line of cabinets under the window. Doing that revealed that the two walls formed a greater-than-90-degree corner. This didn’t affect the line of the cabinets, because the countertop was measured and fitted after they were installed and it fit tightly against the fronts of the cabinets and against the wall.
To compensate for the crooked wall, Christian painstakingly built up the wall surface (the dark-colored stuff) that would be behind the backsplash. When the backsplash was installed, the back edge of the stove was in parallel with the backsplash. The refrigerator covers the left edge of the backsplash, but if you move the refrigerator and examine that backsplash edge, you’ll see that there’s one-quarter inch of built-up surface material visible behind the standard backsplash trim piece. Christian is my kind of project worker!
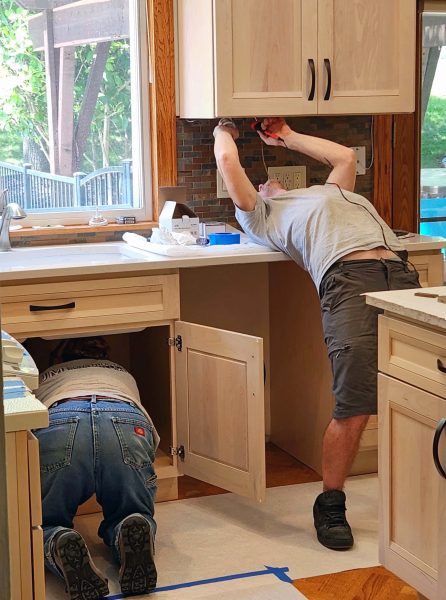
In this photo, Craig is installing the garbage disposal and Christian is finishing up the under-cabinet lighting. He admitted it was hard on his back and he was glad to be finished with that task.
The guys worked through August 1 and then went on another hiatus and worked on other jobs. The cabinet for over the microwave had not yet arrived, and Ted and I needed to prepare for our overseas trip. The remaining upper cabinets and some finishing work were completed on October 21 after we returned home.
Most of our interior house update was completed by December 2022. In February 2023, Ted and I got serious about updating the kitchen. We updated the lighting and had the room painted in 2022, but that’s all. We had our first appointment with our kitchen designer on February 21. The planning, selection, and ordering processes took awhile, and we were finally scheduled for the professional workers to arrive on June 21.
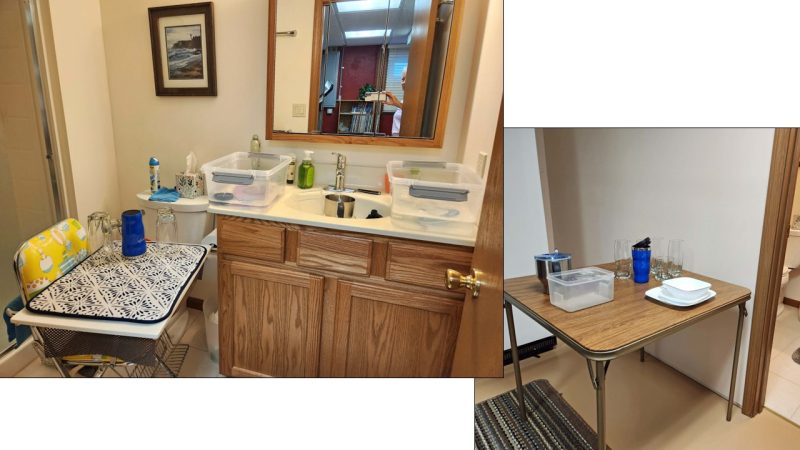
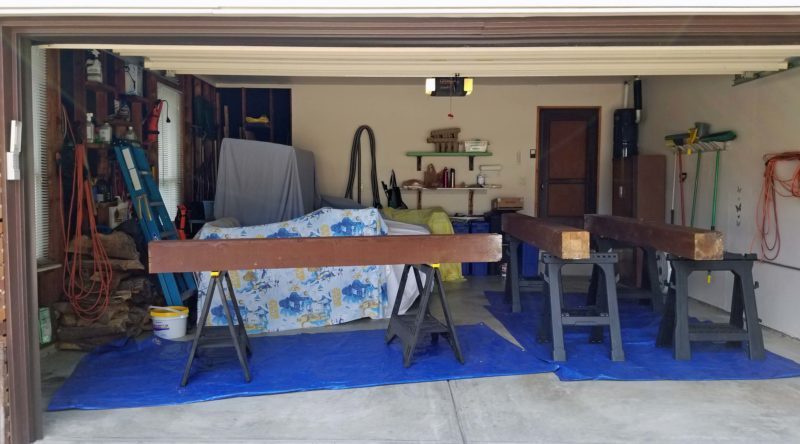
Before giving the pros permission to demolish our kitchen, we had to set up an alternate eating and cooking space. Just like 25 years ago, that space was in the basement. We got out my old Wal-Mart craft table and some of the folding chairs we acquired in the early 1970s with grocery store trading stamps, and voilà! we had a dining room.
We also needed a prep/storage area. We set that up in the shop, where we have a table with a power outlet for the microwave. We won’t have the convenience of a stove for awhile, so I cooked and froze some meals in advance. We’re going to count on the microwave and eating out until the kitchen update is functional again. We used the shop table and our wedding gift kitchen table for prepping food and for storing the things we needed while the upstairs kitchen was unavailable. The paint cans under the table are not food-related. They are waiting to be put into “new” cabinets coming from our current kitchen.
Dishwashing was a challenge, but not impossible. Since we didn’t do any big cooking projects, we didn’t have many pots or pans to wash. Our system was to scrape the dirty dishes, then stack them in the bathroom sink. A dishpan on the right worked for washing and one on the left took care of rinsing the dishes. A large cutting board on our 1972 vintage baby high chair served as a place to drain the rinsed dishes before drying them. Then we stacked the clean, dry dishes on our trading stamp card table just outside the bathroom door before taking them back to the shop and putting them in the prep/storage area. (Photographer visible in mirror.)
The crew had to pause our job for ten days while we waited for the delivery of a cabinet. It had already been five weeks since the work started, and my frozen dinner supply was running very low (i.e., gone). Fortunately, the guys were at a point at which they could connect the stove. (Still no sink or water source in the kitchen.) By then, we appreciated the luxury of having a stove and an oven. We had no countertops, so the microwave had to stay in the basement. All but two of the cabinets were installed and off the floor, so there was room for us to collapse our kitchen table and to eat beside our soon-to-be installed dishwasher. We’re moving up in the world–literally up–from the basement.
We laid some of the shelving from the yet-to-be-installed cabinets over the unfinished island to create some surface space. That made it possible for us to set things down somewhere in the room. Some 2x4s and two doors from our old cabinets covered with plastic tablecloths gave us counter space under the window and beside the stove.
Even dishwashing became a little easier. We didn’t have running water or a drain in the kitchen yet, but at least the dirty dishes could be set on the stove, washed and rinsed in our trusty dishpans, and set to dry where the future sink would be installed. Clean, dry dishes could be put on the shelf-covered island. That’s a lot more space than we had for doing dishes in the basement! We could work side-by-side and move our elbows!
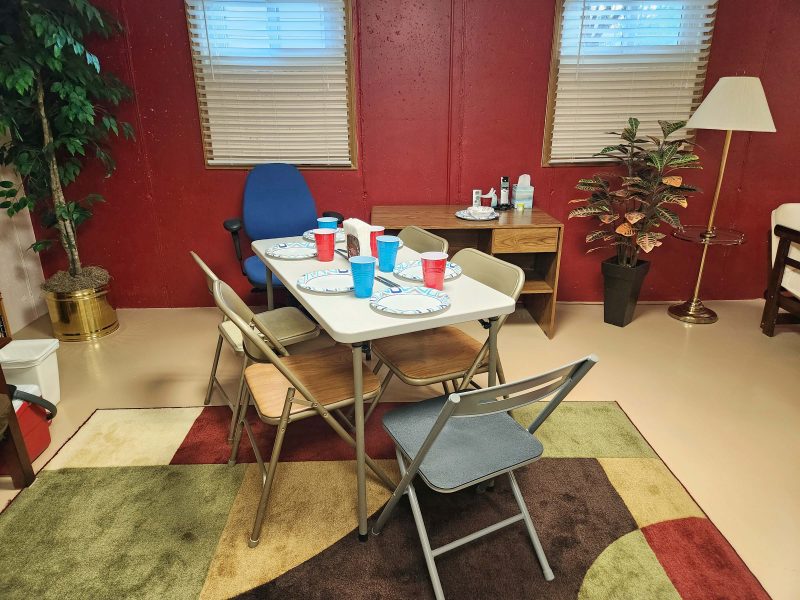
All of the above was inconvenient, but not especially difficult. In fact, it worked well enough that we decided we could entertain guests. We didn’t have enough space in the kitchen yet, but we invited Kari’s family to join us for a pizza party in our basement dining room. With paper plates and cups and carry-out pizzas, it was easy and fun.
During our interior update, Ted and I replaced our old futon and wanted a new mattress cover for it too. We found one in an acceptable color for only $20 at a going-out-of-business futon store. Oops! When we unpacked it to put in on the mattress, I discovered that the zipper was hopelessly broken. There were no other identical covers at the store, and I didn’t see any other colors or patterns I wanted online, so I decided to replace the zipper.
Nylon zippers can be “repaired” by simply sliding the zipper pull downward on the zipper. Problem #1: In this case, the zipper teeth were so far out of alignment that the zipper pull wouldn’t move. Problem #2: All along the length of the zipper, the nylon coils were so badly bent that the zipper could not possibly move smoothly in either direction. Problem #3: The bottom end of the zipper was completely separated, making it impossible to ever match the teeth again.
This is what might have happened to cause such extreme zipper damage. (1) In the factory folding/packaging process, the zipper was sharply folded in a variety of places. (2) Someone bought the mattress cover and unzipped it to put in on their futon mattress. Because of all the sharp bends in the zipper teeth, the movement of the zipper head caused the teeth to separate. (3) The buyer returned the mattress cover to the store without mentioning the damage. (4) The store re-sold the mattress cover–to us. Luckily, and thanks to my mother, I’m an expert seamstress.
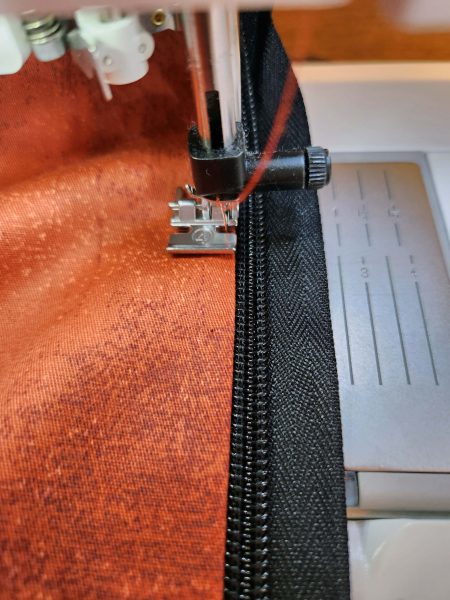
I bought some black zipper-by-the-yard (color choices were white, brown, and black), ripped out the damaged zipper, and replaced it with my new zipper yardage. I don’t think I’ve used the zipper foot on my sewing machine since I bought it. All zipper feet are based on the same design principle, but this one is awesome. It’s the best zipper foot I’ve ever used! It sits very comfortably on the fabric and effortlessly guides itself along the zipper teeth. I wish I had another zipper-style project to sew because it would be fun to use the zipper foot again.
It didn’t take long to finish putting in the zipper. Then it was time to put the mattress cover on the mattress. Voilà! We now have a new futon with a new mattress cover.
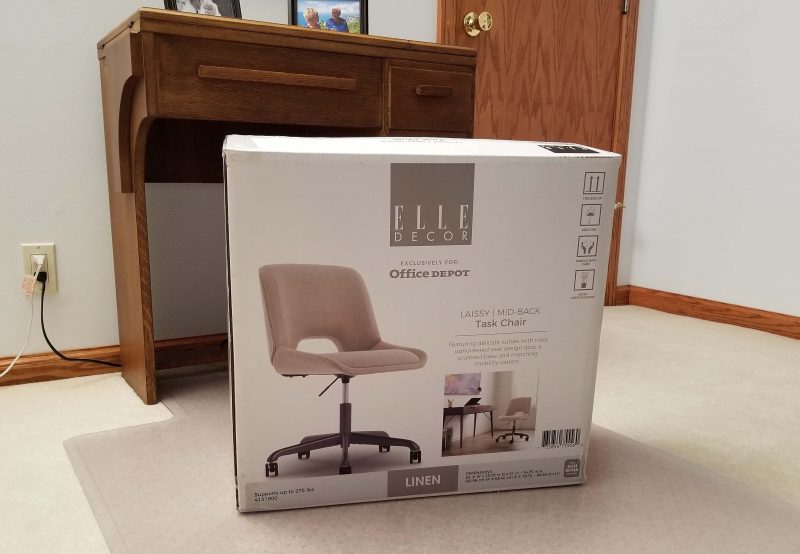
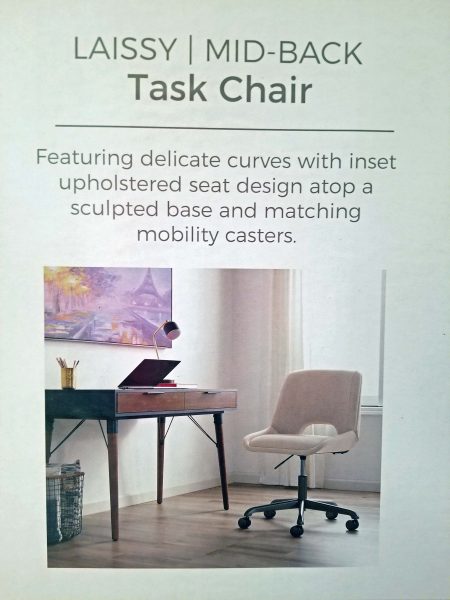
As part of our interior house update, Ted and I decided to replace our many-years-old baker’s shelf in the kitchen with a nicer piece of furniture. We shopped, and we shopped some more before we finally selected a cabinet that we liked and that would fit in the corner. Then we eagerly looked forward to its delivery.
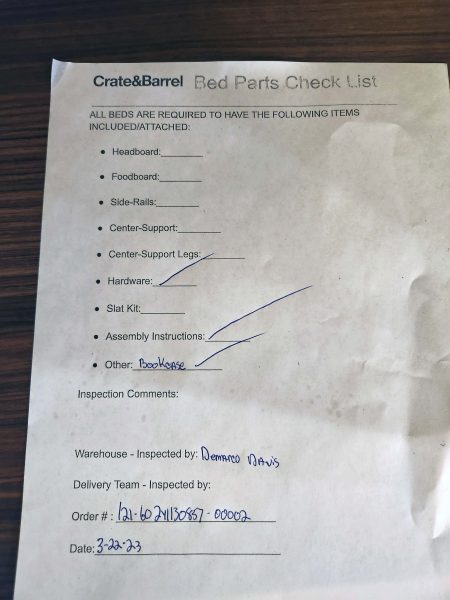
Included with the delivered cabinet was a duly checked and signed checklist–for bed parts. Huh?
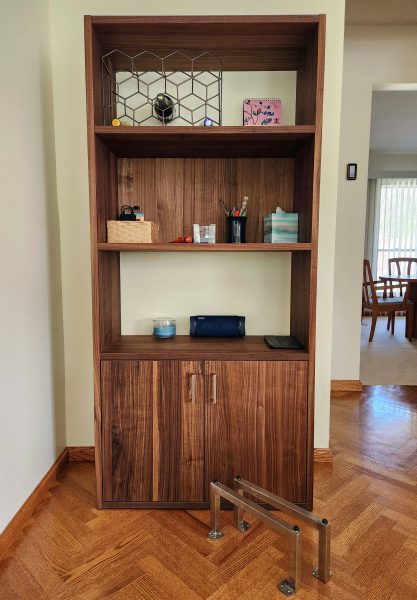
The delivery men brought the cabinet in, removed the protective bubble wrap, laid out the parts (shelves, doors, legs, etc.), and discovered that the 12 screws needed to attach the legs had not been included. “Hardware” was checked on the list, but “Legs” does not appear. We had the unmentioned legs, but not the checked-off hardware. Go figure! Here’s the cabinet, standing on the floor with the legs waiting to be attached.
One of the men called the boss man, explained the problem, and told us they would send someone out within the next two weeks to attach the legs. Okay, things happen. Everything will be fine in two more weeks. Or will it?
As promised and scheduled, two more delivery men arrived–without screws. I offered to let them select screws from our collection, and I made the alternate suggestion that they could go to Home Depot to purchase new screws. “No,” they said, “we can’t do that.” Apparently, the screws have to be the manufacturer-provided screws or the store’s responsibility for assembly becomes null and void. I would have attached the legs myself, but Crate & Barrel would not allow us to pick up the cabinet to save the delivery cost. Instead, they charged us $250 to deliver and assemble it. For that, I decided they could work this out themselves.
Ted followed up with a call to our salesperson to explain the situation and to express our disappointment that we’d had two delivery/assembly appointments and neither one had the screws needed to complete the assembly. Ted mentioned that we were disappointed at receiving this kind of service from a reputable store. To make up for the problem, the salesman sent us a $200 Crate & Barrel gift certificate. That made us feel a little better while we waited another two weeks for the next two delivery men, who arrived with a surprise.
Instead of bringing 12 screws and a screwdriver, they brought a replacement cabinet. Again: Huh? There was nothing wrong with the first cabinet; it simply needed screws to attach the legs. However, Team #3 not only had the replacement cabinet, but the screws as well. Whoopee! They attached the replacement legs to the replacement cabinet and, three delivery appointments after we bought the first cabinet, we have a cabinet standing on its legs.
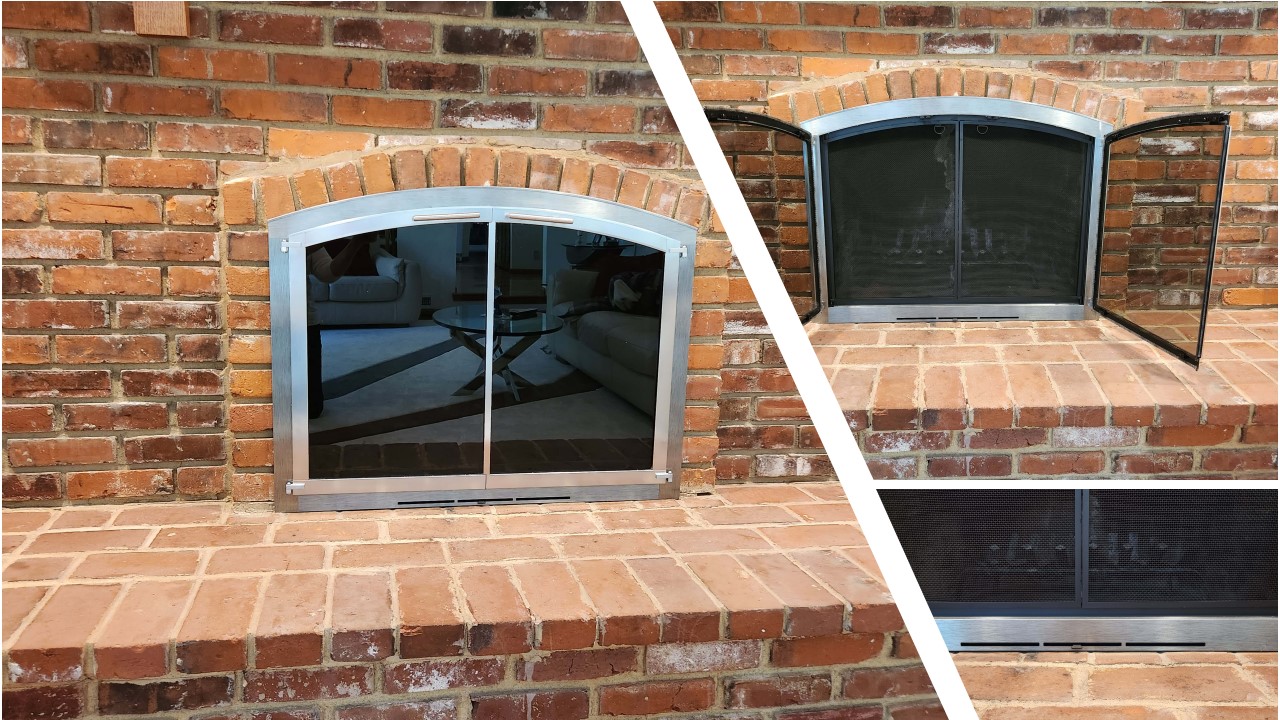
As part of our house update, Ted and I ordered a new fireplace screen in February, and it was installed this week. Our fireplace has a curved arch, so it requires a custom-made screen. Our old screen has served us for 40+ years, and it was time for a new look. The old screen had folding doors, and obvious signs of use along the lower edge.
The new screen is similar, but in a different color, with one-piece doors, and a vent on the lower edge. The doors also seal more tightly than the old doors.
The fireplace season is over, but we’ll be using the new screen next fall.
Just so Ted and I could see the difference after we finished our interior update, I took “before” pictures around the house. Now that we have “after” pictures as well, it’s good to see that all the work was worth it.
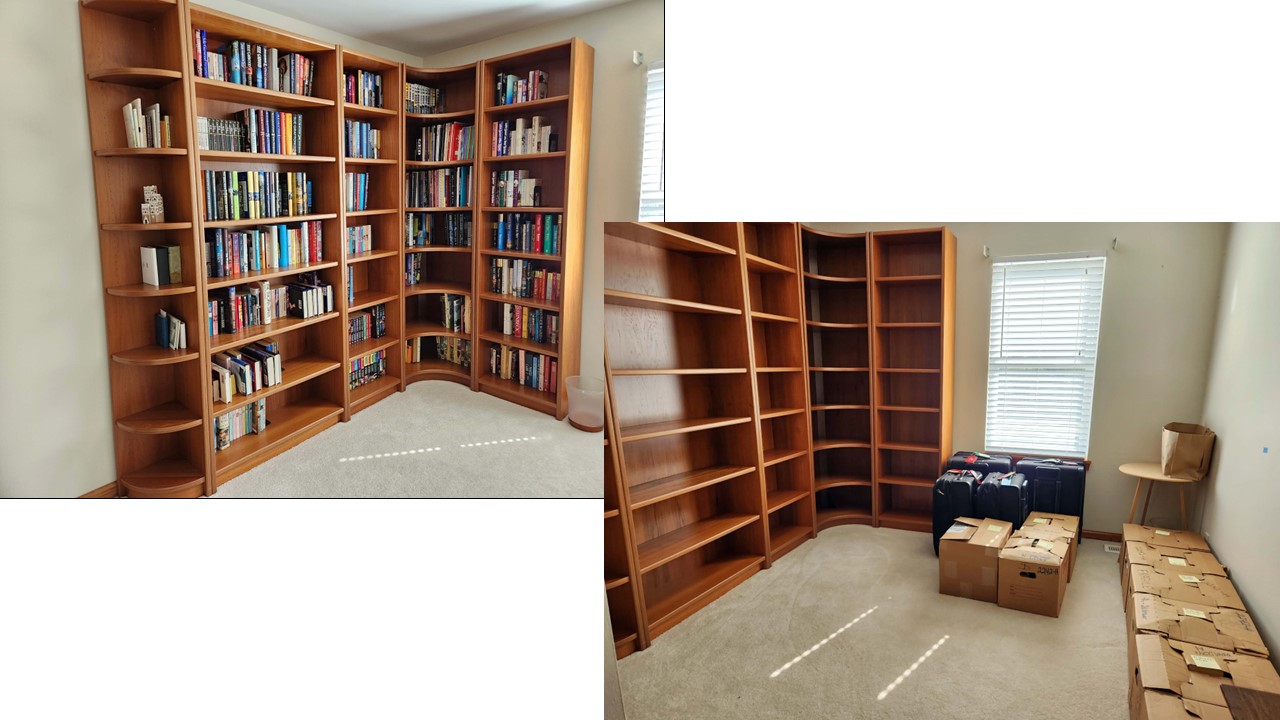
LIBRARY
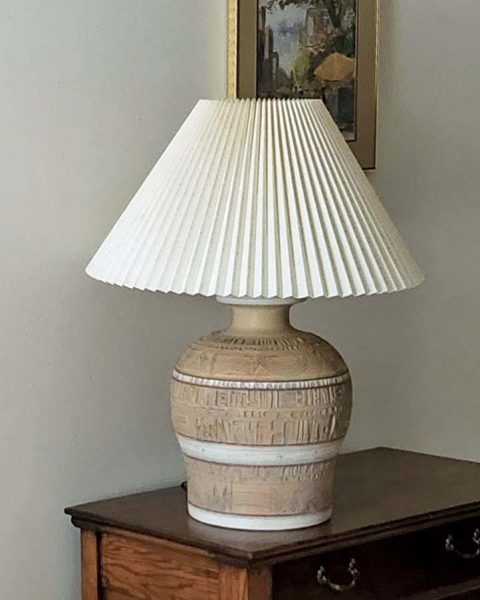
When I was in grad school, I kept my textbooks and research materials on a bookshelf in the living room near our computer so that I could easily reference them. I’ve only occasionally looked at a few of those books since I finished my last advanced degree in 2005, so it seemed logical to move that bookshelf to the library where the other bookshelves live. Here’s the library before and after we made the update changes. The washstand originally belonged to my great-grandparents. Ted and I bought the rocking chair unfinished when we were expecting Jeff. I finished it and made cushions for it. The big clay lamp is no longer with us. “Before” is on the left; “after” is on the right.
CLOSETS
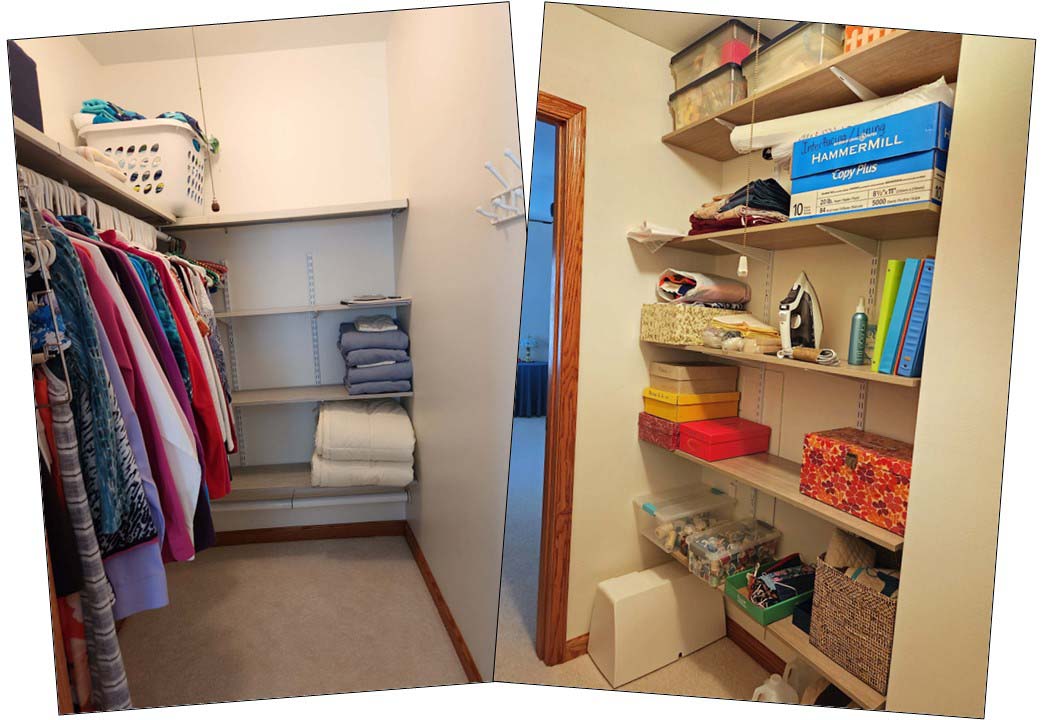
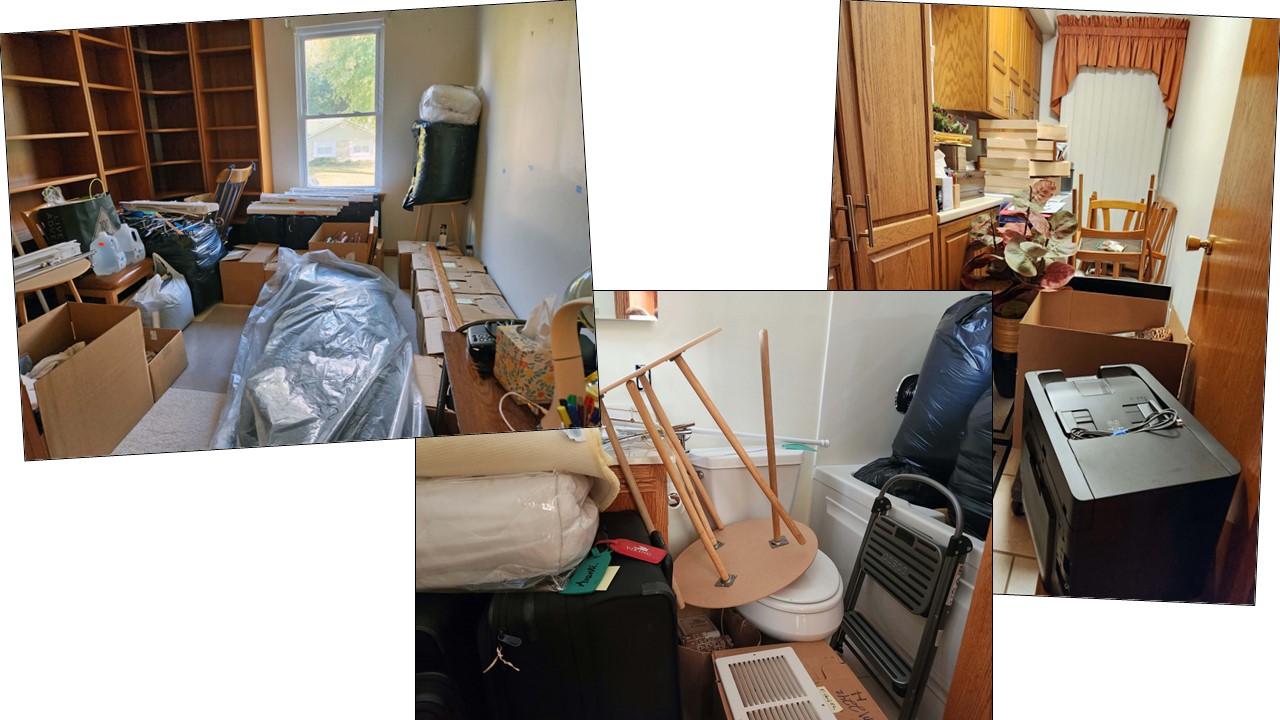
Emptying the closets for the painters gave us a chance to throw things away, to give things to Goodwill, and to remove/reorganize some shelving. As a result, our closets have 17 fewer shelves and empty spaces on the remaining shelves. (We got rid of a lot of stuff!) You can see that the closet shelves on the left are pretty bare. That closet used to have three more filled shelves–one above the current shelf over the clothing rod, plus two additional shelves on the back wall. The closet on the right is in the project room. We removed the unneeded clothing rod and the six smaller shelves that were on the side wall (pictured) plus four shelves from the back wall. Then we filled the side wall with these five new, longer shelves. I love it! Now I can easily find everything I need when I work in that room.
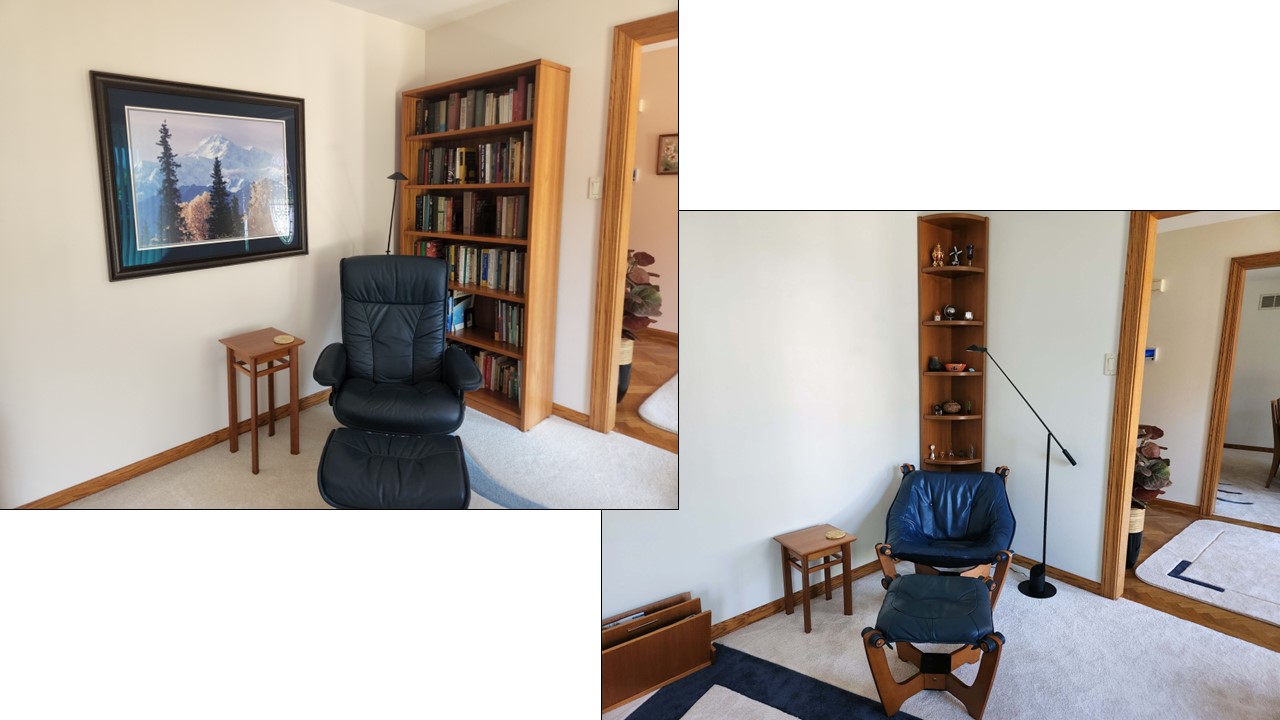
PROJECT ROOM
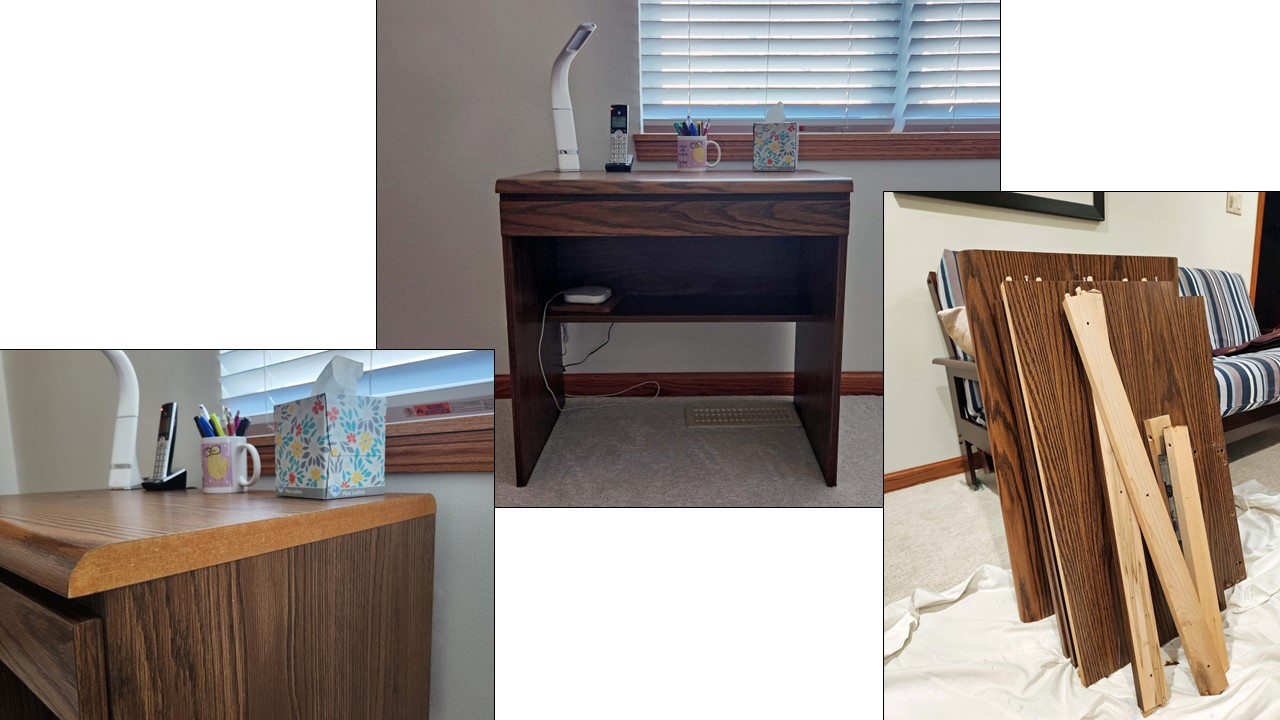
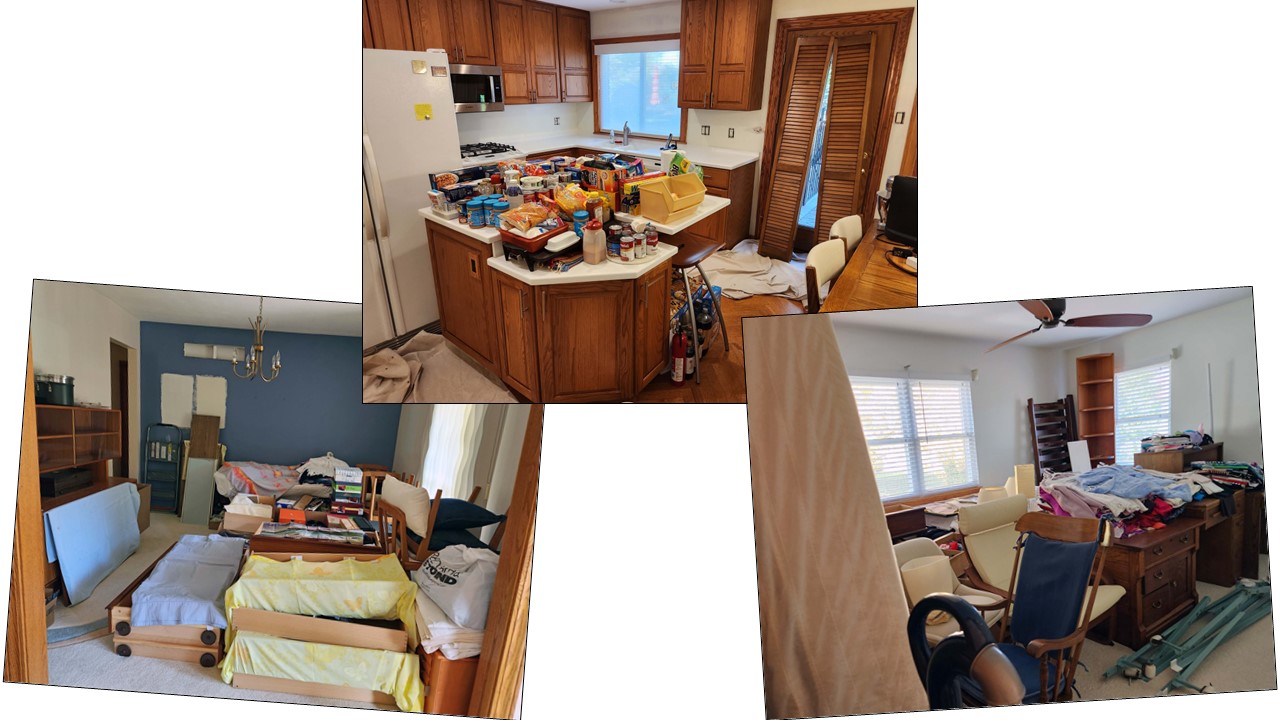
The desk on the left has a new life–probably as firewood. I started shopping for a desk to replace it in January 2020. There isn’t room for a full-sized desk because of the extendable work table beside it, and I don’t need a full-sized desk anyway. I only need some shelf space (or a drawer) for a few office supplies (to make sketches and to calculate measurements for projects) and a surface large enough to hold my serger. It’s surprisingly difficult to find a desk in a 30-35″ size that includes a drawer or shelves, but I found one I liked at IKEA. Unfortunately, it was out of stock, like everything else in 2020. Every few months, I checked the website, but it was always out of stock. Two weeks ago, I checked the website for the umpteenth time, and there it was! Only 36 months later! Ted and I went to IKEA, picked it up, and retired the old desk.
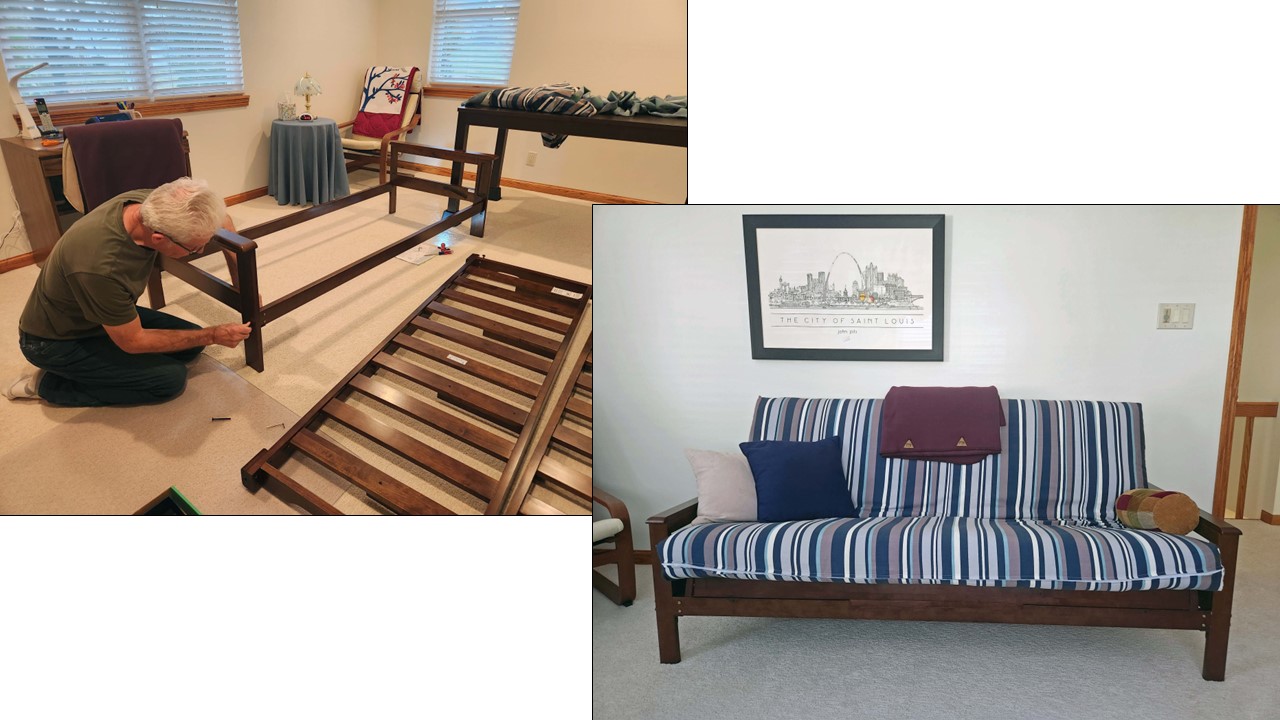
We also replaced the futon in the project room, which doubles as a guest room when needed. The old futon served us well, but the mattress had become very hard over the years and the frame didn’t match any of our current furniture. The new mattress has inner springs, so it will be more comfortable for us to sit on and for guests to sleep on, and the frame matches the other furniture in the room.
After the contractors left, Dean and Dylan installed the bar light above my sewing machine. I just finished a sewing project and the bar light works well. It’s also much cooler than the 1980s pole lamp with its 300w halogen bulb.
In the photos below, you can see the project room before and after the new desk and desk lamp were added and after the ceiling lighting and ceiling fan were installed. Now I don’t need the box fan that’s hiding in the corner behind the table (left).
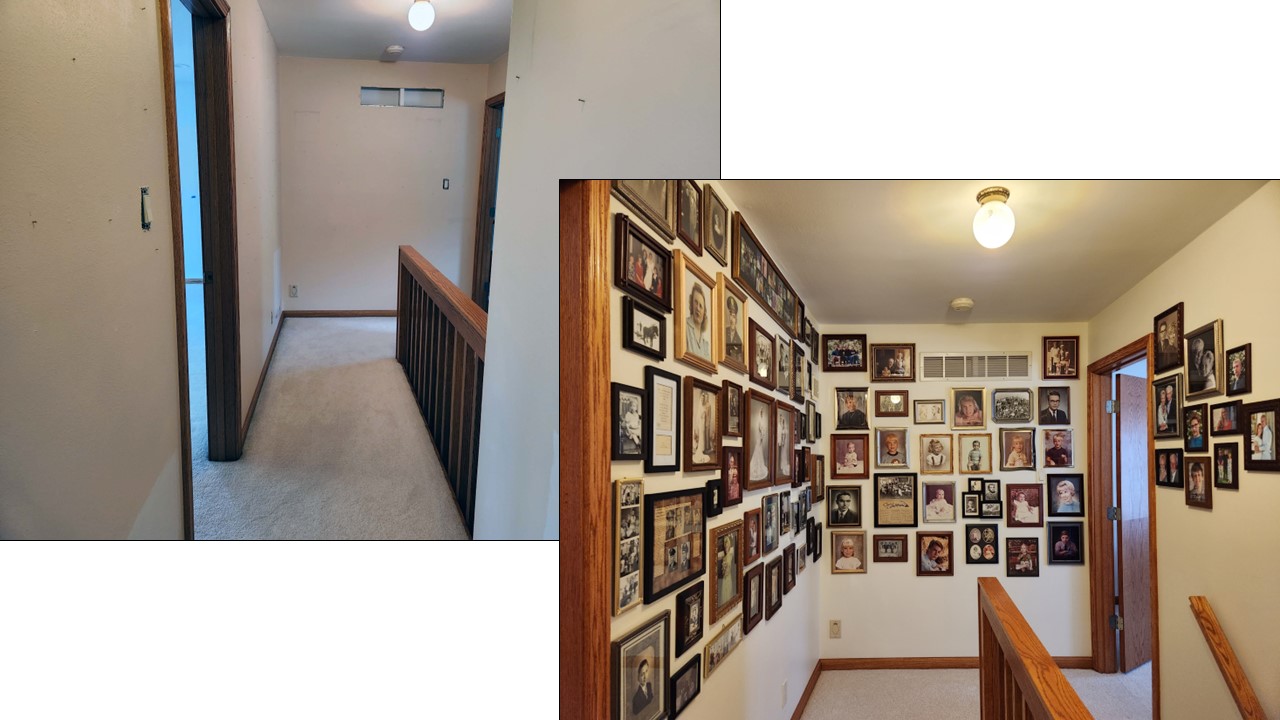
GALLERY
There’s a code for homeowners to use for professional painters: leave the nails in the walls if you’re going to re-use them and don’t want the holes filled. You can see place-saving nails in the photo on the left. That made it much easier to re-hang the 100+ photos in our gallery/upstairs hallway. In case you’re counting photos, there are two walls of photos that don’t show in the picture on the right.
STAIRS
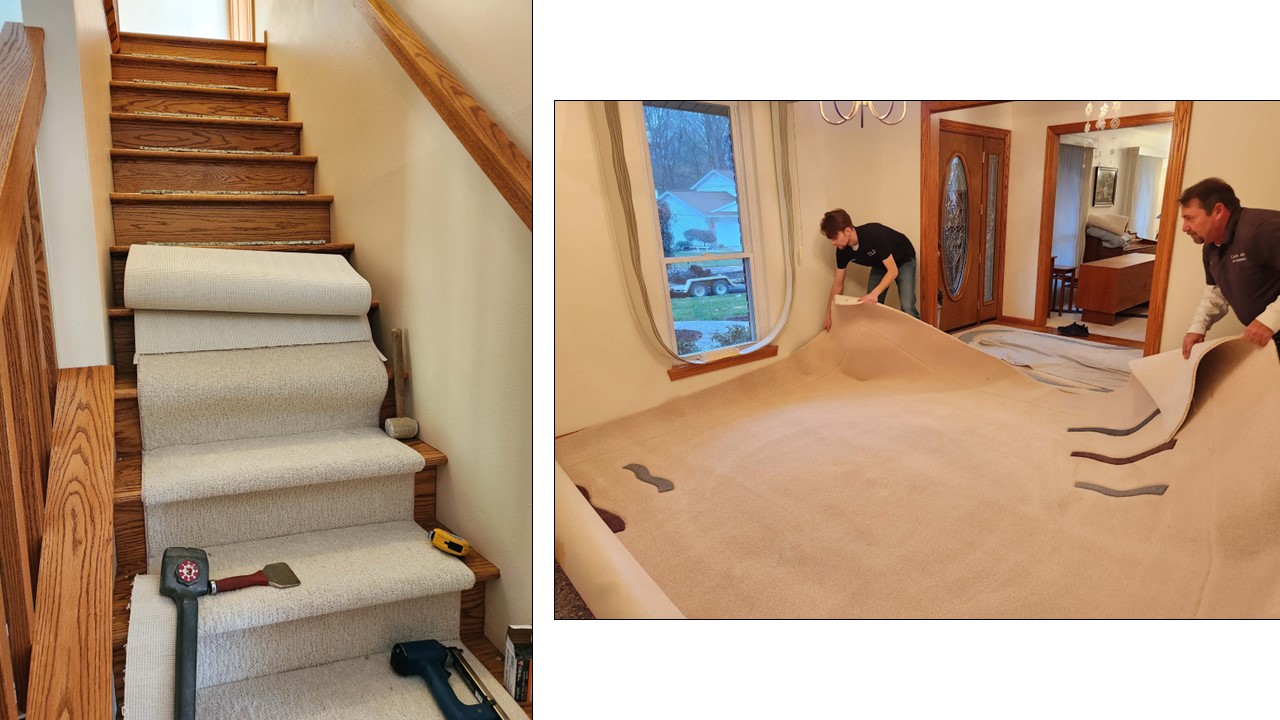
The carpeted stairs are much safer than the slippery hardwood stairs were. We didn’t want to eliminate the look of hardwood completely, so the carpet folks suggested a cap-and-band style of carpeting on the stairs. We like it.
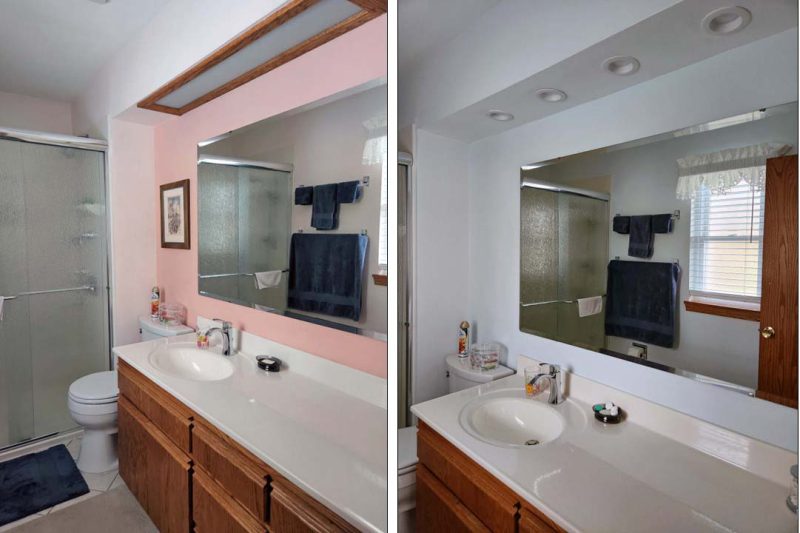
MASTER BEDROOM AND BATHROOM
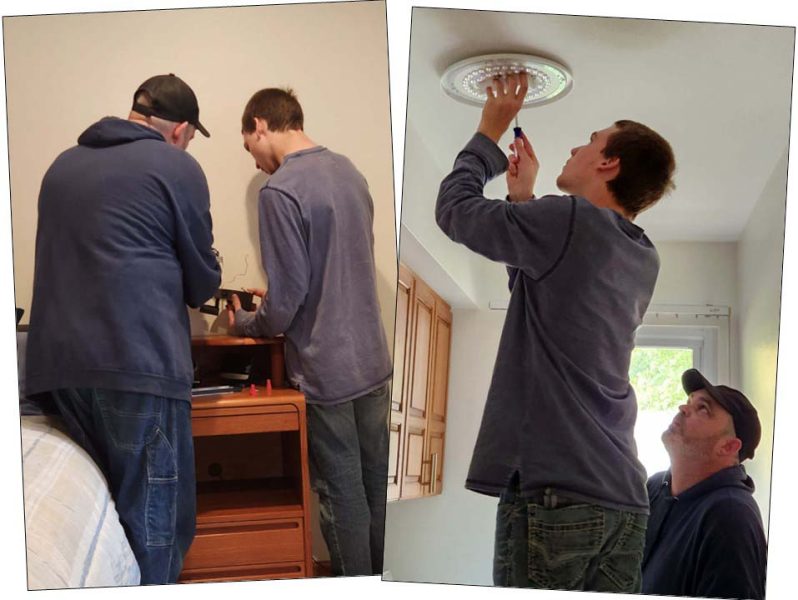
Here’s our bedroom with our old Wal-Mart bed lamps and with the new wired bed lamps. Ted and I extend our thanks to the professionals who installed the wiring and to Dean and Dylan who installed the lamps.
The master bathroom has always had a fluorescent light above the sink. We changed that to recessed halo lamps. They look a lot more modern, and that’s what an update is about, right?
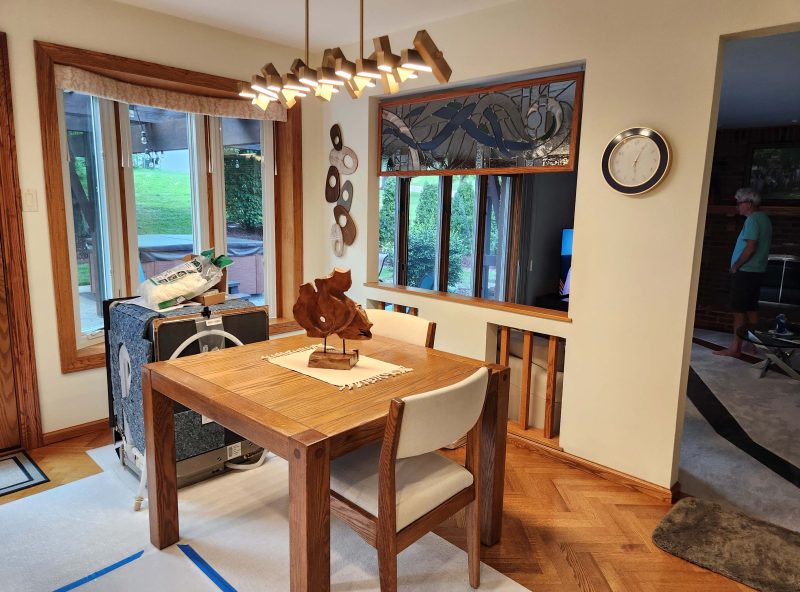
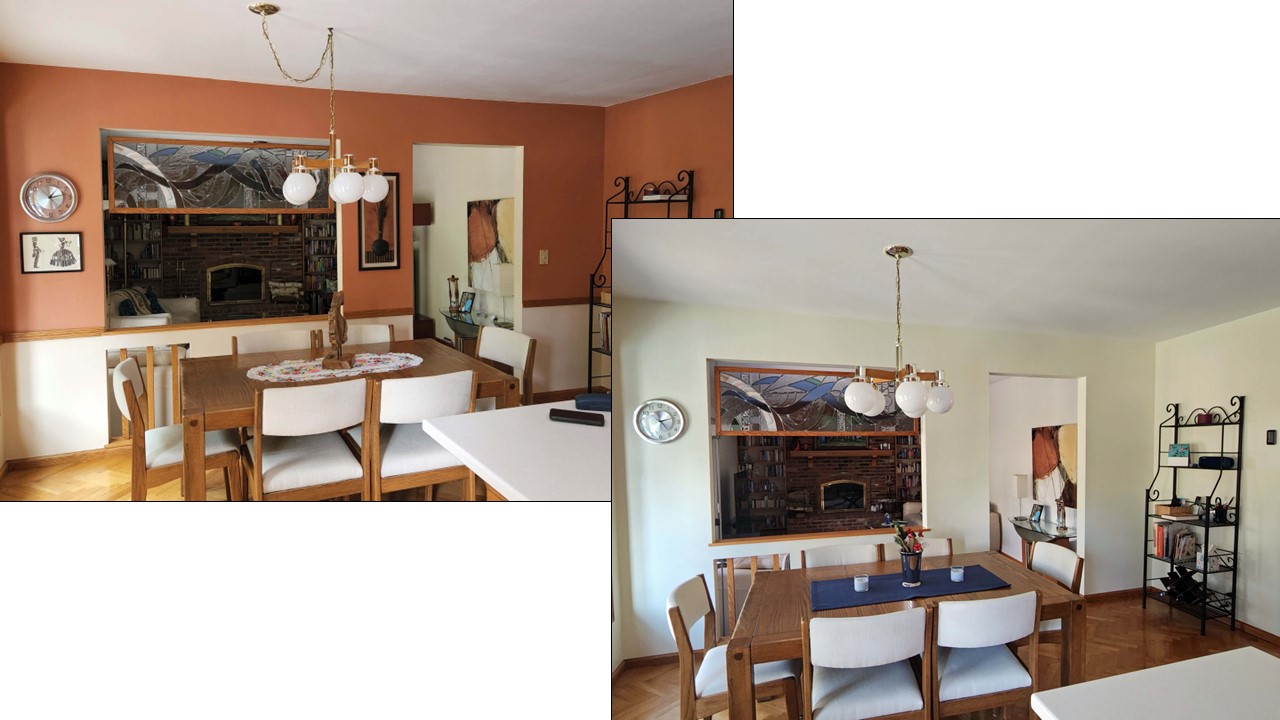
DINING ROOM
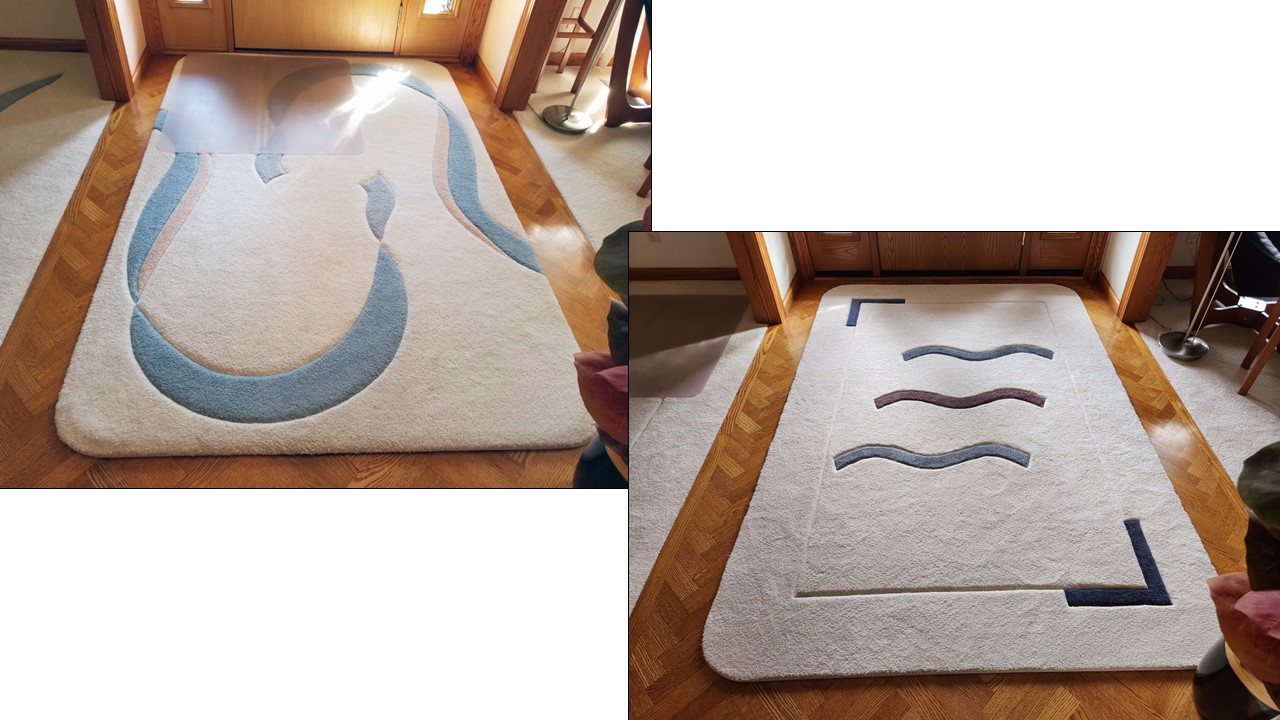
Our last update (20+ years ago) included carpet art in the living room, dining room, foyer, and family room. We loved that look, but were ready for new colors and a different design. Here’s the new carpet art in the dining room (right).
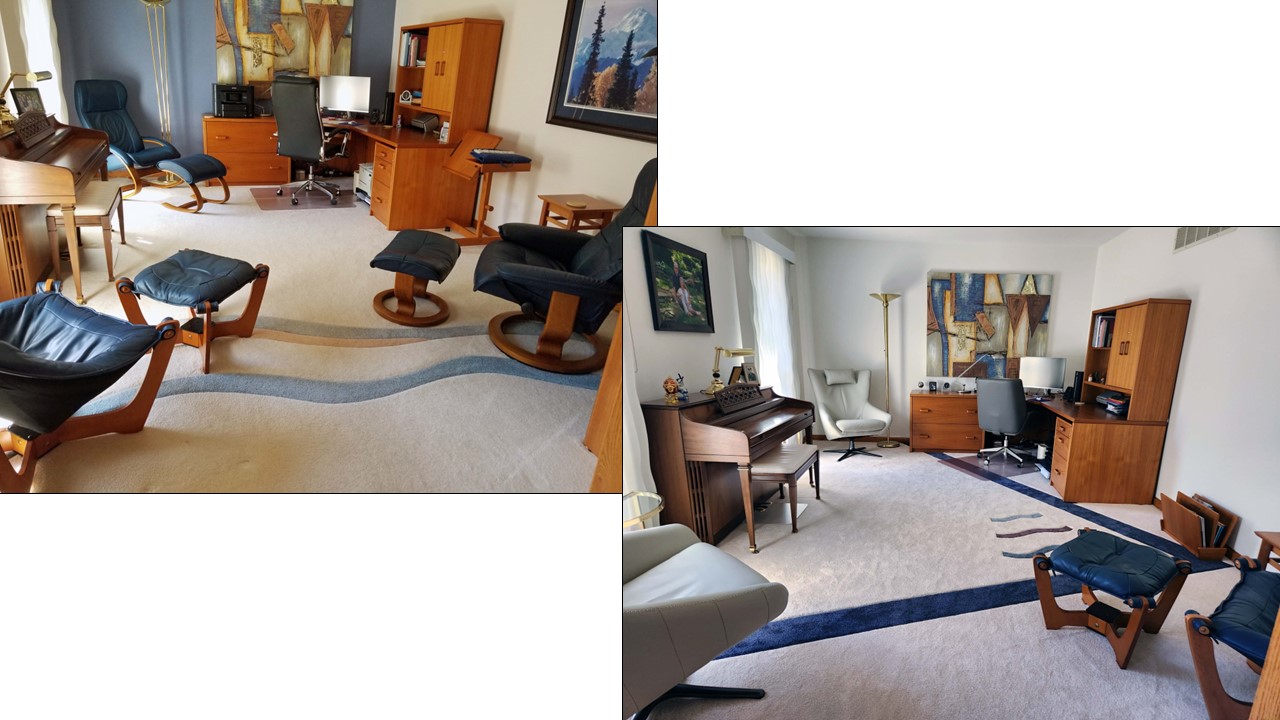
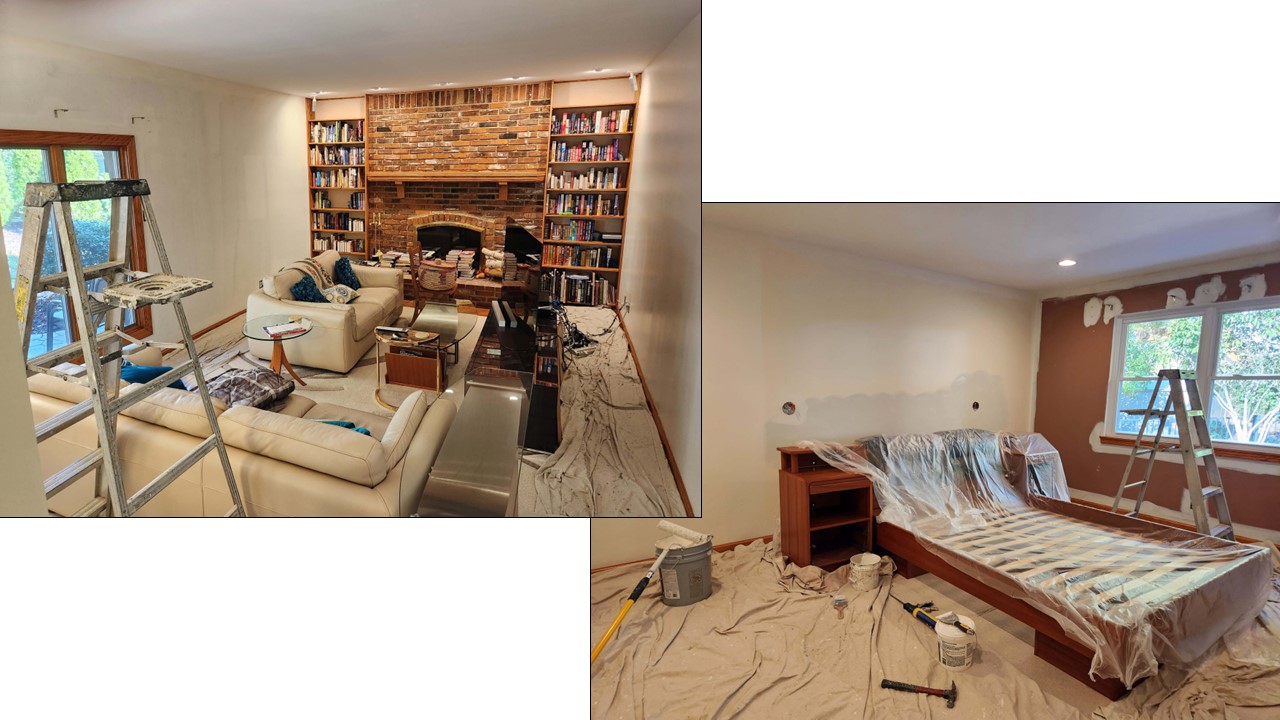
LIVING ROOM
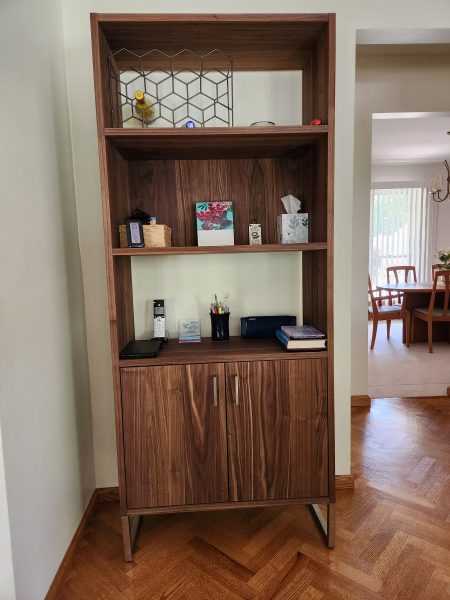
We removed two of the blue leather chairs and footstools from the living room and replaced them with off-white chairs. Without all that footstool clutter, the new carpet art shows well. We bought a smaller desk chair and also replaced the bookshelf with a much smaller display unit. Lighter paint and chairs, fewer footstools, and smaller pieces of furniture opened up the room very nicely.
FOYER
When we mentioned replacing the carpet art, our listeners always remarked that it didn’t look like it needed to be replaced. Closer inspection easily shows how faded the colors had become. Some of the peach-colored art in the foyer carpet (left) was nearly colorless from sunlight shining through the front door. It really was time for an update.
LAUNDRY ROOM
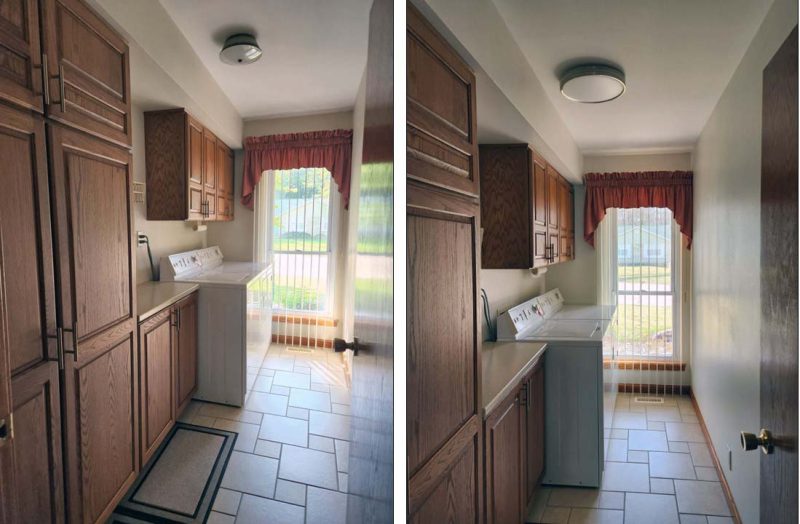
The photo on the left shows the laundry room ceiling light installed by our builders. I never liked it, but we don’t spend a lot of time in the laundry room, so we never bothered to replace it. Now it was time. Thanks again, Dean and Dylan, for helping Dylan gain experience for his future career.
KITCHEN
The holes and gashes in the kitchen ceiling from installing the lighting, and the damage above the countertops from ripping off the ceramic tile backsplash gave the drywall repair man a chance to show off his camouflaging skills. The newly painted ceiling and the wall above the countertops look much better now. We’ll replace the backsplash after we have new cabinets installed.
Our kitchen originally had a fluorescent ceiling light in the work area (left). We replaced that with recessed halo lights. We always used warm fluorescent bulbs, so the kitchen didn’t have a blue glow, but the halo lights provide much better lighting–and they’re dimmable, if desired.
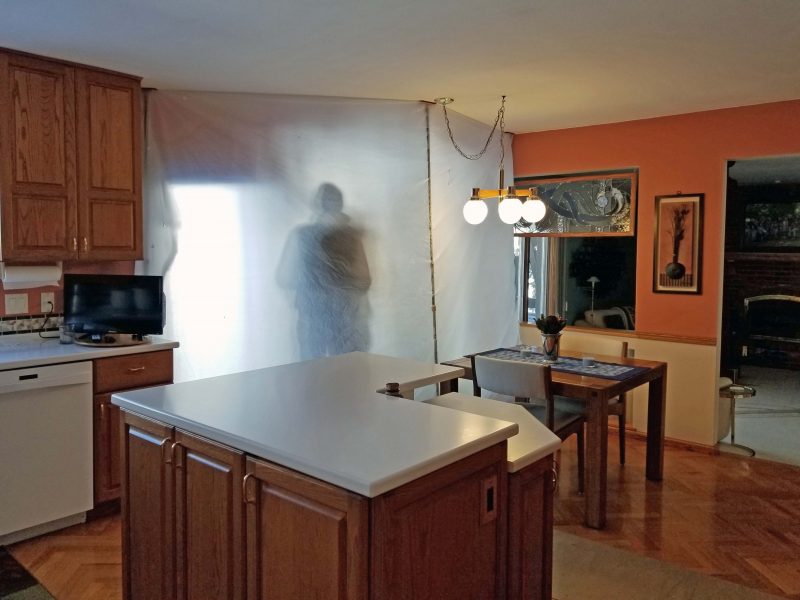
Ted and I have never come up with a reason why our builder wired the kitchen eating area ceiling light where he did. It’s not centered over the table (or anything else), so we always had to have a lamp with a chain to center the lighting over the table (left). We asked the electricians to center the electrical box for that lamp over the table. We shortened the chain and re-hung the lamp, but when we replace the lamp, a chain won’t be a requirement. Our interior designer said that removing the chair rail and painting the kitchen walls a single, lighter color would open up the room. She knows her stuff!
FAMILY ROOM
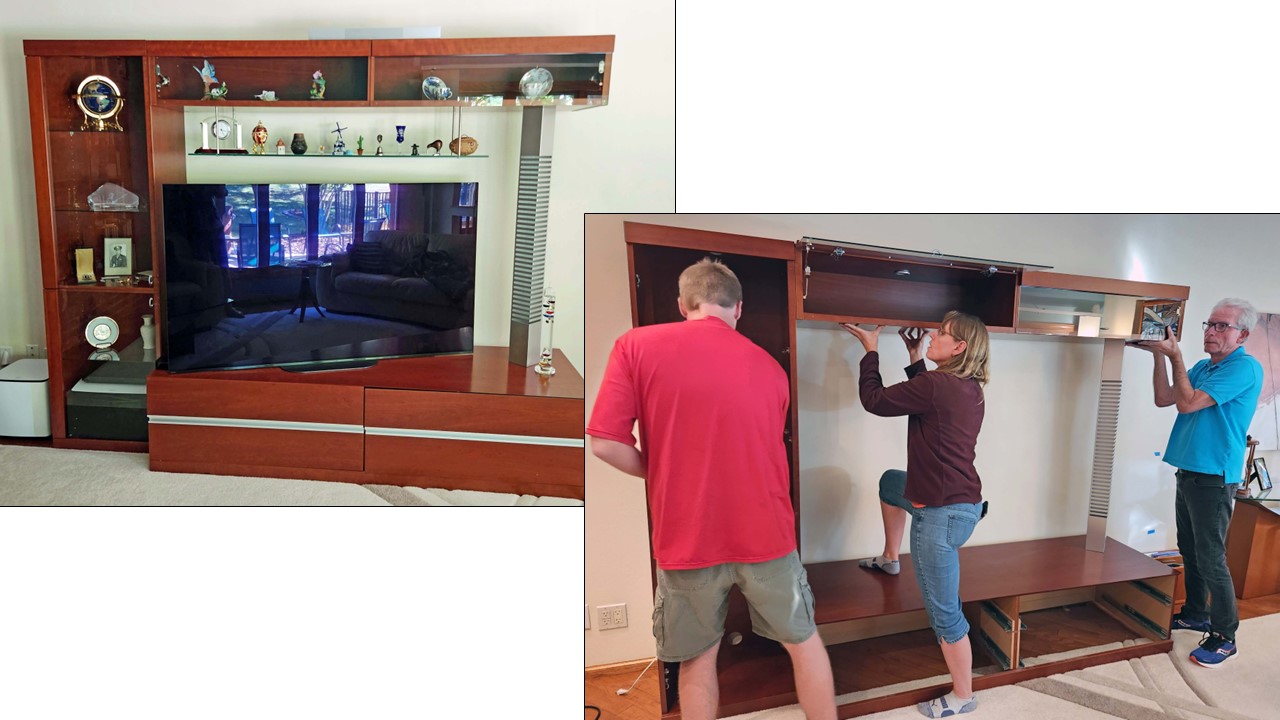
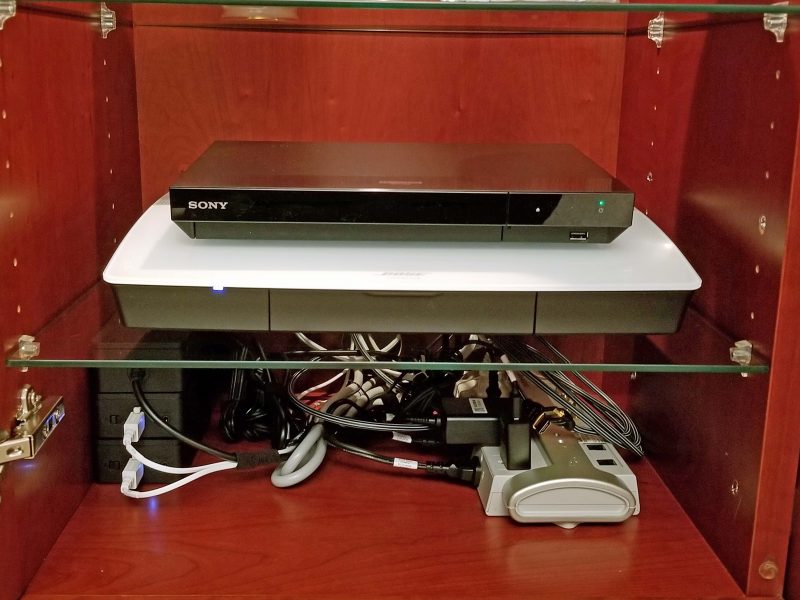
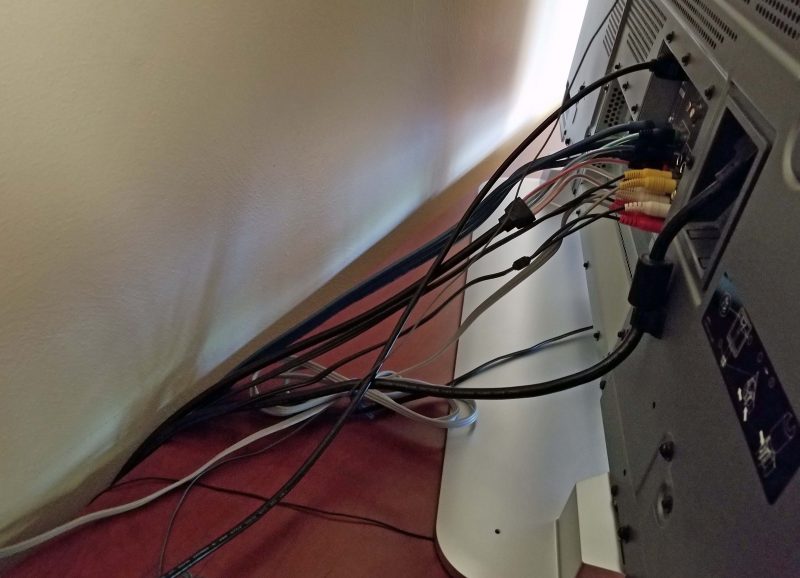
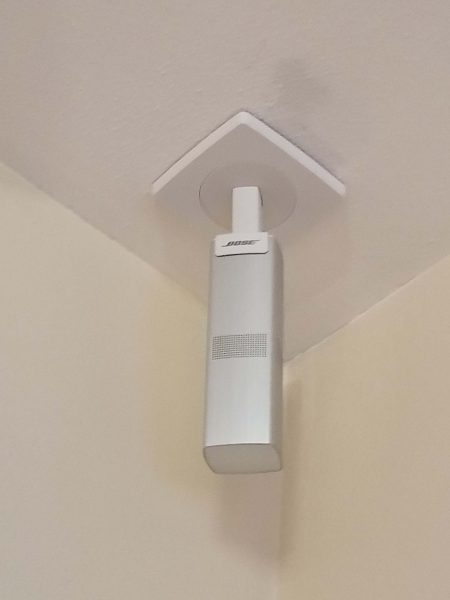
We have an 8-foot window wall on the near end of the family room, but that leaves the far end dark. In 2019, we had an electrician install an art light to highlight our 50th anniversary family picture. Without the art light, that end of the room would look even darker in the photo below (left). Our interior designer suggested limewashing the fireplace to lighten things up. We asked the painter about that and he, in turn, asked how often we use the fireplace. I told him that we burn more than a cord of wood each year. In that case, he said, the limewash would turn gray over time and there would be nothing to do about it. He suggested a light wall instead, and we like the row of eyeball lights the electricians installed. The designer was right about our old media center too. It was so big that it shut off the room from the doorway perspective and it didn’t match anything in the room. With a smaller media center, the room feels more spacious.
MORE TO COME
Ted and I still have a lot of finishing touches to add in every room: new valances for all the windows to match our new paint colors; new kitchen cabinets; some new pieces of furniture; some new pieces of wall art; and (my favorite) “more.” With all of this to be done, none of our rooms is completely updated at this point, and most of them have a somewhat stark look that will remain until we find replacements that we like. That stark look will keep us motivated to continue shopping, and to stick to our less talk and more action resolution.
While Ted and I were clearing the walls, emptying the closets, and moving the furniture around for our interior update, we found a lot of things that we either (1) never use, or (2) are simply tired of after so many years. When you have to actively pick up and put so many things into boxes, it makes you pause to wonder, “Do we really need to keep this?” During our interior update process, we donated and trashed a lot of now-useless (to us) stuff, as well as some long-time treasures that have become less treasured. The useless junk was easy to pitch; some of the other things–especially if they had sentimental value of any kind or of any degree–required more decisive thinking to give or throw away.
We bought this hanging wall lamp with trading stamps from the grocery store. Does that give you a clue about its age? Let’s say mid- to late 70s. When this was my sewing room, the light hung over my sewing machine. It was wonderful because I could adjust the weight (the black thing at the bottom of the cord) to drop the lamp closer to my work. It worked just fine and provided additional light in the room, but now, it’s gone.
We bought a pair of these lamps in the mid-1970s and set them on our matching teak end tables. We sold the other lamp and the end tables at a garage sale many years ago, but kept this one just because we needed a lamp. Now, it’s gone.
I started playing clarinet in sixth grade and played first chair clarinet in my high school band. I wanted to play in the University marching band, but in the old days, they didn’t allow women to do that because the drills were “too strenuous” for women. (Back in those days, we had to wear skirts for dinner in the dorms too. 👎) I’ve probably played my clarinet six times since high school. Each time, my embouchure was so bad, it wasn’t fun, so my clarinet has been sitting on a closet shelf for over 50 years. Now, it’s gone!
Ted bought a full set of The Encyclopedia Britannica when he was in college. Before the internet and Google, we and the kids occasionally used it for reference. We asked the kids what they remember about the encyclopedias and they all said the same thing Ted and I said: the transparent layered pages that showed the human anatomy. The first page had an illustration of a naked human; then you could peel back a transparent page at a time to see the nerves, the veins, the muscles, and the internal organs. It was fascinating–kind of like dissecting a body without the gore. At this point, however, we can’t remember the last time we used an encyclopedia for anything except as a weight (those books are heavy!). Now, they’re gone!
I bought this HP LaserJet 2300 printer c. 2000 for the heavy-duty printing required to provide chapter-by-chapter, and revision-by-revision copies of my doctoral dissertation to my four dissertation committee members. It’s a trusty machine, and it prints at a good speed, but it takes so long to warm up that I just press the button on my color printer and finish my print job in less time than it takes to wait for the LaserJet. Now, it’s gone!
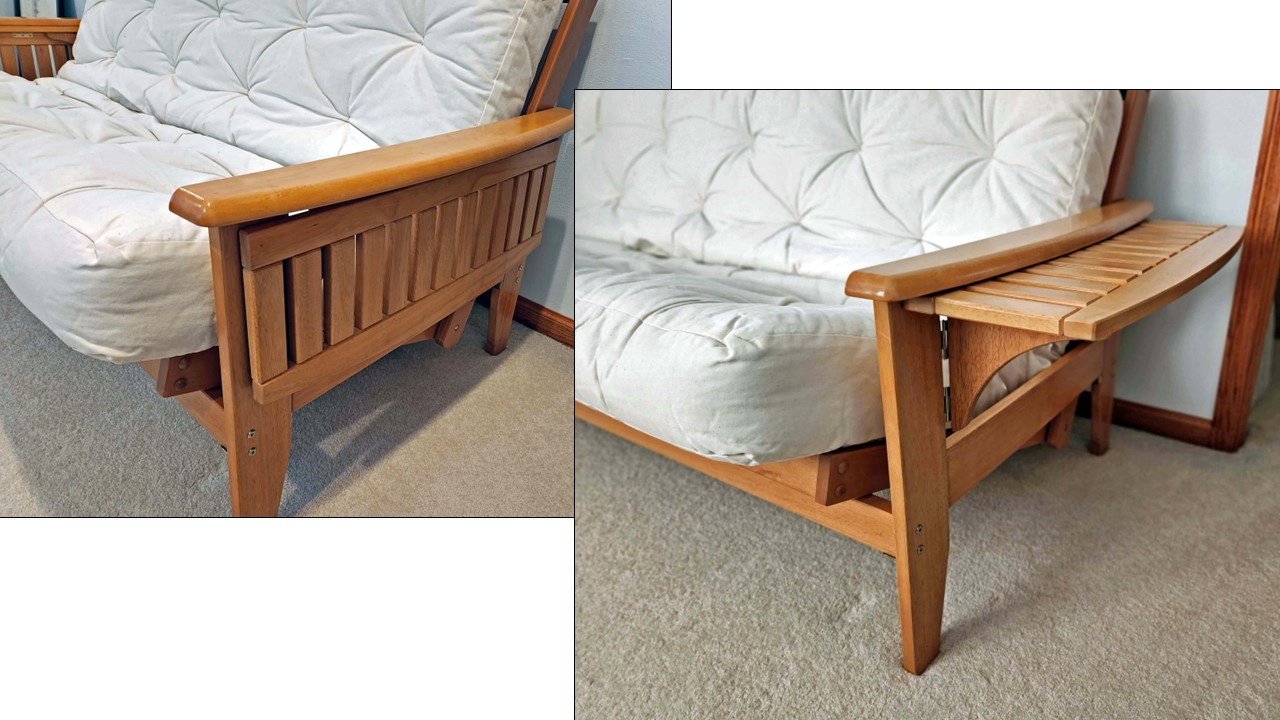
We bought this futon in the mid-1990s. We liked the fold-out “tables” on the arms. Unfortunately, the mattress has become quite solid over the years (dry-rotted foam?) and the futon itself was extremely heavy, not to mention that we don’t have any other light-colored wood in the house. We decided to buy a new futon with a more comfortable mattress for our guests. Now, it’s gone!
I bought this desk at R-way Furniture in Sheboygan, WI in the mid-1980s when Kari and I took a trip to visit my Mom and Dad. The desk cost $30 and came in a box, to be assembled at home (IKEA probably got that idea from R-way). The price was so reasonable that I bought two desks: one for the girls’ bedroom, and one for the boys’ bedroom to give the kids a place to do their homework. I don’t remember what we did with the second desk, but when I need to use my serger, I set it on this desk. The leg on the right is no longer stable, so the desk has to be lifted carefully to move it, and cannot be dragged on the floor. The strip of laminate along the right side of the desktop has also peeled off. It’s long past time for a new desk. Now, it’s gone!
I bought this used sewing machine and cabinet for $100 in 1966. It was four years old when I bought it, and I used it a lot. I made all of my own clothes; dress pants and sport coats for Ted; heavy and light jackets for winter and summer for all of us; doll clothes for the girls’ dolls; etc., etc. It’s a Singer Slant-o-Matic (“The best sewing machine ever invented” according to the instruction book) and I still had all the original accessories. In all the time I had this sewing machine (56 years now), it never needed a repair.
In 2016, I bought a new electronic sewing machine and had the cabinet re-fitted for the new machine. After using the new sewing machine several times, I went back to my Singer because I missed the slanted needle. That’s when I realized that, although I loved that old sewing machine, the electronic one is much nicer to use and I will never choose to work with the Singer again. Even knowing that, it took me more than six years to get over my sentimental feelings for the Singer. As Ted and I were emptying closets for the upcoming painting and carpeting, I knew it was time to part ways with the past. Now, it’s gone! (With a tiny teardrop or two and a tiny tug on my heartstrings. I’ll always miss the slanted needle.)
Ted and I bought this media center 20+ years ago for two reasons: (1) We liked the display space; and (2) it was large enough for a 50-inch TV (huge, at that time). When our interior designer suggested that a smaller media center would “open up” the family room, we agreed. and decided to replace this one. It was assembled in place, and it was so large and so heavy that it took four people to take it apart and move it out of the room. Thanks, Jeff and La. Now, it’s gone!
Sometimes, you just have to bite the bullet and get rid of the things that no longer give you joy–even if they did in the past. Now, they’re gone!–but not forgotten, and still good for stories and happy memories.
By July, Ted and I had all of our planned outdoor work contracted. It was time to get moving on the house interior update–things that can be done in bad weather. We kept putting this off mostly because neither of us is good at design or color selection. I mentioned this to Jeff and La and they suggested we do what they did: hire an interior designer. Good idea!
The interior designer (not decorator–there’s a difference) had some very good ideas, and she was honest and tactful enough to guide us without offending us when she pointed out problems and made suggestions. We had never even thought about some of her ideas, but we definitely wanted to include them in our update. What we appreciated most, however, were the dozen paint color samples she gave us. Ted and I hate picking out paint colors. More than once, we’ve painted, then re-painted, a room because the color we chose didn’t look as good as we’d imagined it would. Having to choose from only 12 of the 1,700 Sherwin-Williams interior paint colors (I checked) eliminated 99.3 percent of the possible color decisions just like that! (I did the math, too.)
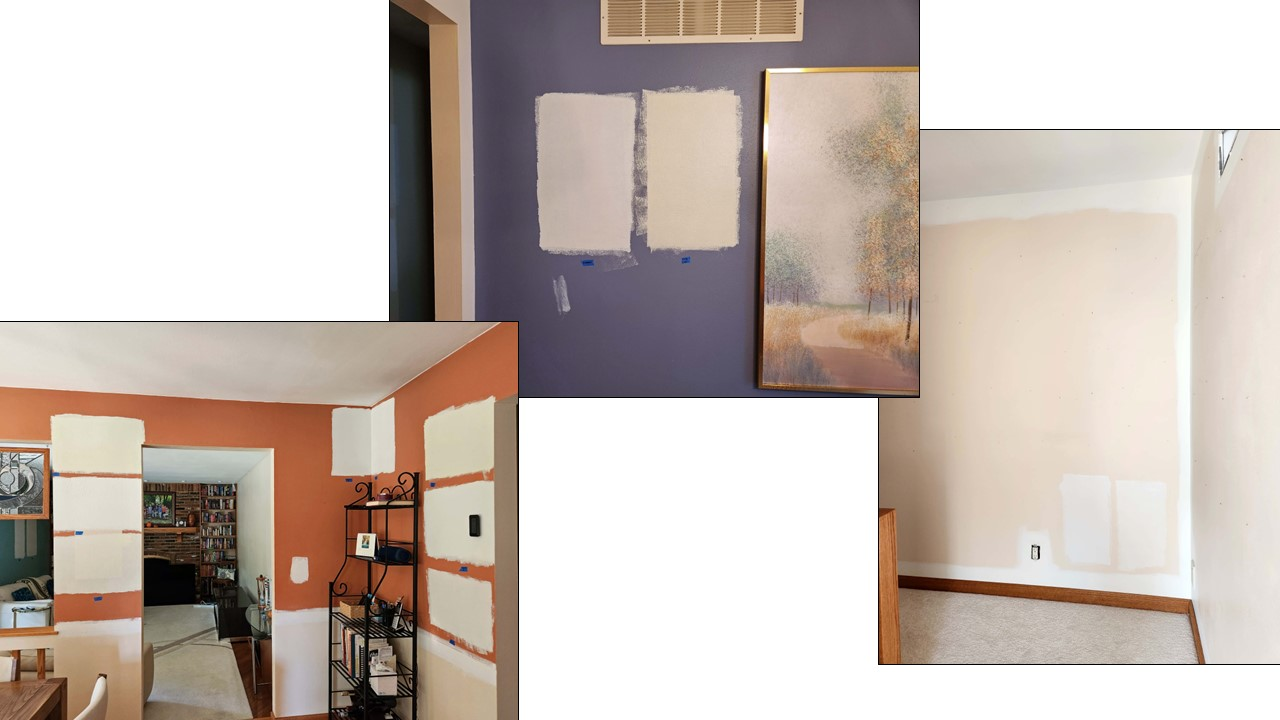
Although the interior designer narrowed our paint color selections to a dozen light, neutral colors, Ted and I still had to choose which of those colors to use and in which rooms to use them. I’m sure there are people in the world who can make this kind of color decision in a snap, but Ted and I are not among them. I painted multiple color swatches in every room on multiple walls in each room to see how different lighting affected the colors. I labeled each swatch with a piece of blue masking tape so we could remember which color it was. It still wasn’t easy for us to choose our colors. Before the painters arrived, I peeled 117 pieces of blue masking tape off the walls. The photos below show how much lighter our newly painted walls will be. Best of all, even though it took 117 wall swatches, we like the paint colors we chose for every room–on the first try!
With the designer’s ideas in mind and the paint colors selected, we were ready to schedule contractors. On an August afternoon, I called an electrician, a painter, and the carpet company, one after another. Shockingly, all three were immediately available. We had walk-throughs and bids from all of them within three days of my call and the electrical team was scheduled to arrive six days after my call. It was time for Ted and me to get to work!
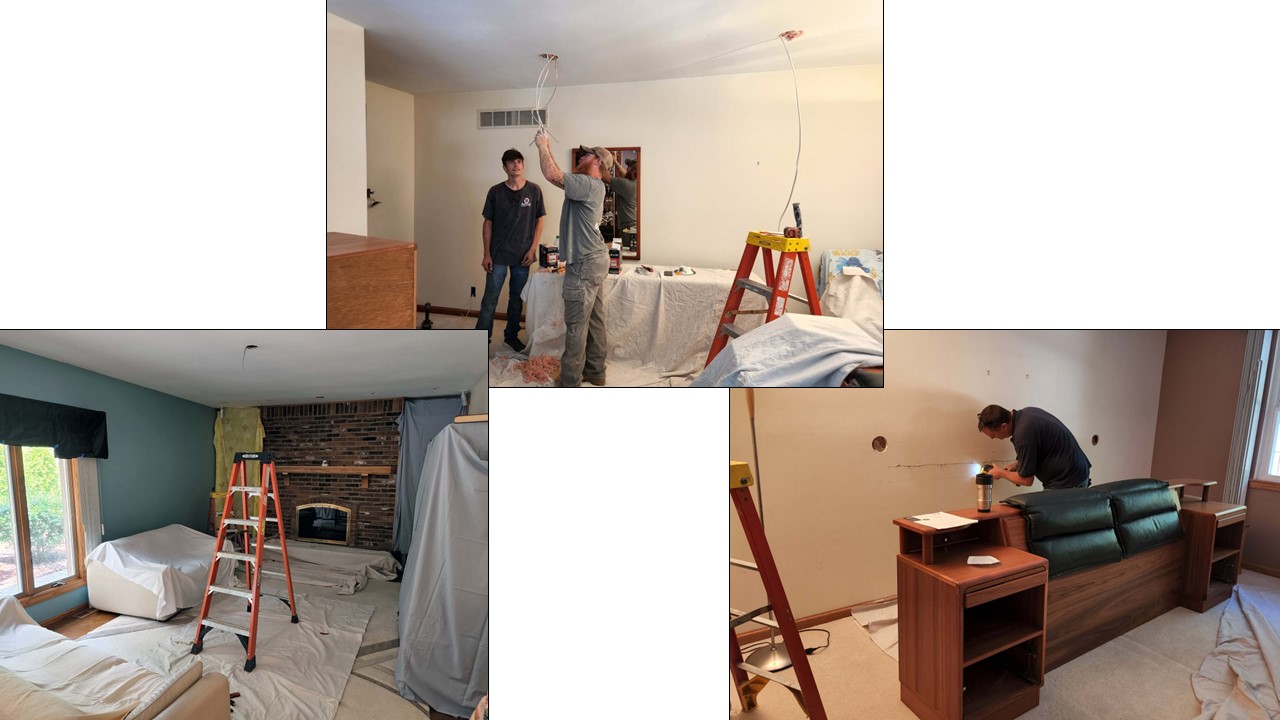
The three electricians needed three days to do their work for us. We moved things out of their way in the six rooms where they needed space for ladders and tools. They installed recessed halo lights in the master bedroom and bath, the kitchen, and the project room. They also installed a light wall of eyeball lights in the family room, and they wired a bar light over my sewing machine in the project room and two bed lamps in the master bedroom. In addition, they moved the ceiling fan from the family room (where we never used it) to the project room (where it always gets warm while I’m working in it) and–43+ years after we bought this house–centered the kitchen table light over the table.
We already had an 18-day cruise planned, starting three days after the electricians finished, so we scheduled the drywall repairman to arrive the day after we returned from the cruise.
The interior designer suggested that we remove the chair rail from the kitchen. We’re planning to replace the kitchen cabinets, so as long as I was removing the chair rail, I pulled off the backsplash above the kitchen countertops too. We might as well have all the drywall repaired and painted at the same time, right? With that mess and all the electrical cuts and holes, the drywall repairman had plenty to do. I think it took him six hours the first day to repair all the damage and to apply the first coat of mud. The following days were shorter–only mud, then sanding.
While Mark was repairing the drywall damage indoors, our exterior doors (ordered in April) were installed. The day after the door installations and the drywall work were finished, Jeff and La arrived for a visit and Kathy, Annette, and Kari’s family joined us for the weekend. The painters and carpet installers were scheduled to begin their work the following week, so as soon as the kids left, Ted and I started packing things up and moving furniture to clear work areas for the painters and the carpet installers.
The painter said he’d be happy to have the walls cleared and everything else in the center of the room, allowing sufficient access to paint the walls; the carpet installers needed the floors cleared; and Ted and I wanted to have the work done one room at a time so that we’d only have to move everything in and out once. To make all of us happy, Ted and I had to clear every wall, floor, and closet in every room on a rotating basis to keep ahead of the painters and the carpet installers. It was like moving, only worse–taking everything (shelves, clothing rods, drapery rods, electrical switch plates, etc.) out/off, packing everything up, and moving all of it out of the room before reversing the process and putting it all back into place. Emptying the closets was the worst. There is a finite number of pieces of furniture in a given room, but there is a seemingly infinite number of items in a single closet! Because our bedroom was also stripped bare, we moved into our basement “guest suite” for the duration of this process. (Now we know what it’s like for the kids when they visit and sleep down there–it’s pretty comfortable with lots of space and a full bathroom.)
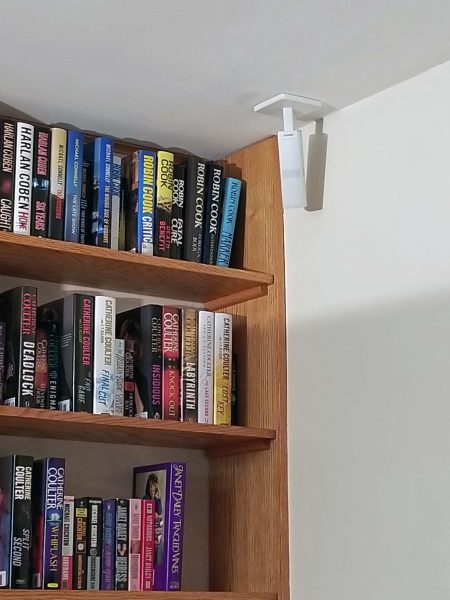
I knew it would be a big job, so I started packing the books first. The five movable bookshelves in the library, plus a sixth one in the living room, needed to be emptied to move them for painting and carpeting. (Note: When Dylan was very young, he was impressed by all the books in a single room. He said the room looked like a library, and we’ve called it that ever since.) Thankfully, I only had to empty the bottom shelf of the built-in bookshelf in the library. I handled every book six times: shelf to floor to box to other room to library to floor to shelf again. Out of curiosity, I weighed one box of books: 50 lb. Multiply 50 lb. x 13 boxes in the library = 650 lb. x 6 moves = 3,900 lb. of books lifted. Nearly 2 tons! The several boxes of books from the sixth bookshelf put the weight total over 2 tons. During this process, I discarded/recycled 106 books that I knew I’d never read again, and Ted decided to get rid of his set of The Encyclopedia Britannica. Now we have more space on the bookshelves, so we can buy more books. 🙂
Ted and I, the painters, and the carpet installers worked well together in a kind of (strenuous, for us) choreographed dance. Before the workmen arrived, Ted and I emptied rooms and put everything into other rooms. Then the painters painted the empty rooms and moved on to an empty, uncarpeted space while the carpet installers worked in the still-empty, already-painted rooms. When the workmen left for the day, Ted and I refilled the newly painted and carpeted rooms, then moved things from unfinished rooms to the newly painted/carpeted rooms, until everything was painted and the carpeting was installed in the bedrooms, hallway, and stairway. The contractors worked from 7:00 a.m.-3:00 p.m., then Ted and I worked from 3:00 p.m.-11:00 p.m. and on weekends.
The painters came with a crew of three: one to paint the ceilings, one to do the cutting in, and one to roll paint on the walls. They averaged a completion rate of two rooms/day. When the painting was finished and we were putting things back into place, we discovered two closets that had not been painted. I contacted the painter on Friday (when we were refilling the closets) and he came back on Monday to paint them.
The workmen always arrived on schedule and Ted and I did a good (dare I say “great”?) job of having all the rooms empty and ready for them so they could come in and get to work immediately. Several pieces of furniture, however, were beyond my ability (i.e., strength) to move. I helped Ted move the 12- and 18-inch bookshelves (about 200-250 lb., respectively) out of the library, but we asked Dean and Dylan to help Ted with the 24-inch bookshelves. We guess-timated their weight at about 300-350 lb. each. The 36-inch and the corner bookshelves felt like 350-400 lb. each, so we left them in the room. The headboard for our bed has four connected pieces and is very difficult to get around corners (it was assembled in place), so we left that as well. By this time, we were getting tired of lifting heavy furniture and said, “Let the carpet installers move that stuff.” Well, surprise! They didn’t want to move it either–they just worked around those pieces in the library and in the master bedroom.
We had the hardwood stairs carpeted in a cap-and-band style. The photo on the right (below) shows one of the custom carpet art pieces we ordered. The carpet art was installed in the family room, living room, dining room, and foyer five weeks after the “plain” carpeting was installed. Those guys were great! They finished the family room carpet first and installed it on Dec.1 so that we could put up the Christmas tree before our kids arrived for a birthday/Christmas visit. The other three pieces of carpet art were delivered and installed a week later–just five days before the kids’ visit.
After the painters and the (plain) carpet installers finished their work, Dean and Dylan came to help put the heavy pieces of furniture back into place and to install some of our new lights. Dylan is learning to be an electrician, so installing our wired bed lamps, the bar light over my sewing machine, and a new ceiling light in the laundry room gave him an opportunity to practice some electrical skills. We thanked the family workers with a pizza dinner and we had a good time together–as usual.
After our Thanksgiving visit with Kathy and Annette, Ted and I combined update work with Christmas preparations and finished everything at 5:10 p.m. on December 12–less than 24 hours before Thom’s family arrived for our family birthday/Christmas celebration. That evening, Ted and I spent time in the hot tub, enjoyed a fire in the fireplace, and watched a movie on Netflix. It felt like a huge weight had been lifted from our shoulders, and it was an especially wonderful feeling because it wasn’t a break; it was finished!
We finally moved from talk to action, and we’re feeling good about that. We knew we’d be working hard on a tight schedule, but we didn’t think we’d be working that hard. We had contractors in the house for 30 days between August 29 and October 24, plus 2 days in December for the carpet art, but Ted and I started the preparations for the contractors on August 22 and didn’t finish putting everything back in place until December 12–92 working days after we first started this update (time out for the cruise, Jeff and La’s visit, and Thanksgiving with Kathy and Annette). Most of our work days were 8-10 hours; too many were 12-14 hours. It was brutal. I don’t remember ever being that tired in my entire life! By the time the contractors finished their work for us and moved on to their next jobs, I felt like I’d used every ounce of energy my body had to give. A side benefit was that Ted lost three pounds and I lost four from all the work we did. The day after the last contracted work was finished, we slept 11 hours and then I crashed again and took a 90-minute nap in the afternoon.
The new lighting is much brighter than what we had, and the new paint and carpets make everything look fresh. Now we can add the finishing touches at our own pace, one thing at a time. Would we do it this way again? Absolutely! Having all the electrical updates, the painting, and the carpeting completed in just over three months was great. Are we glad it’s finished? Even more absolutely!
For a number of years, Ted and I have talked about updating our house and yard. It’s been over 20 years since our last major update, and we’re getting tired of looking at the same old stuff–not to mention that it’s all aging. We decided that 2022 would be the year we’d actually make the update happen. As the song goes, it was time for a little less talk and a lot more action. We decided that, since it was spring, we’d start outdoors so those jobs could be done in nicer weather.
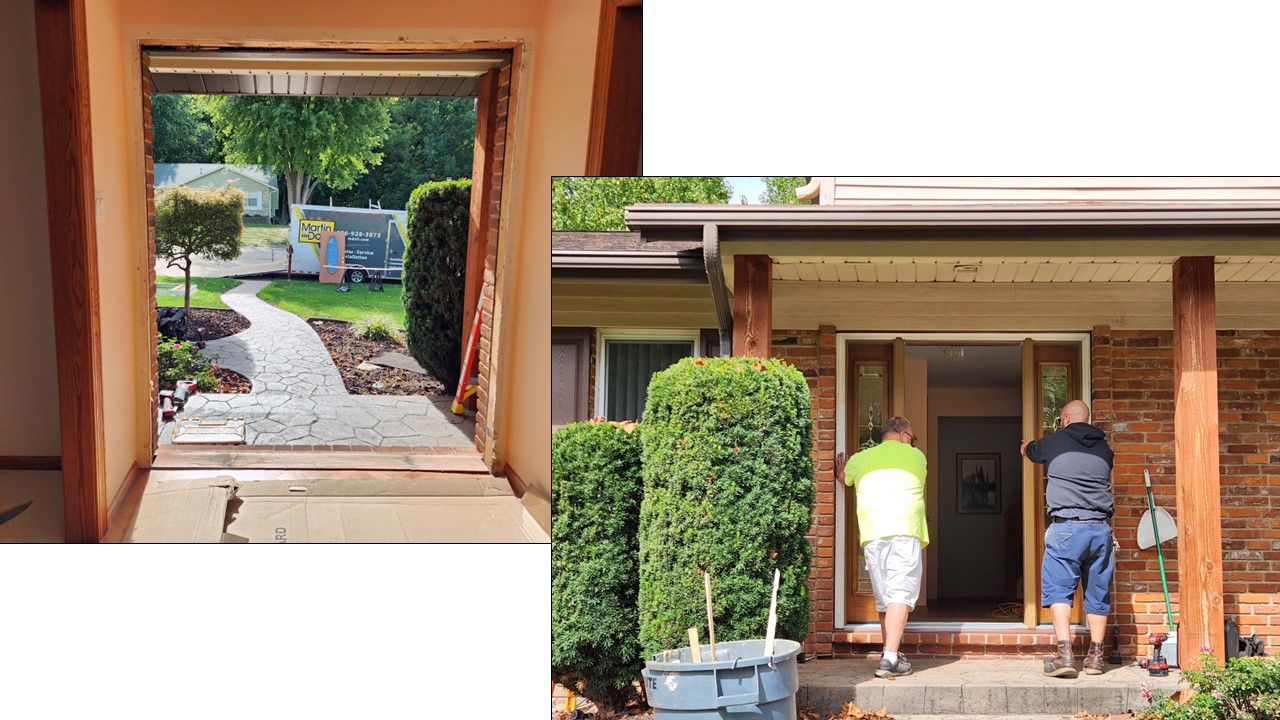
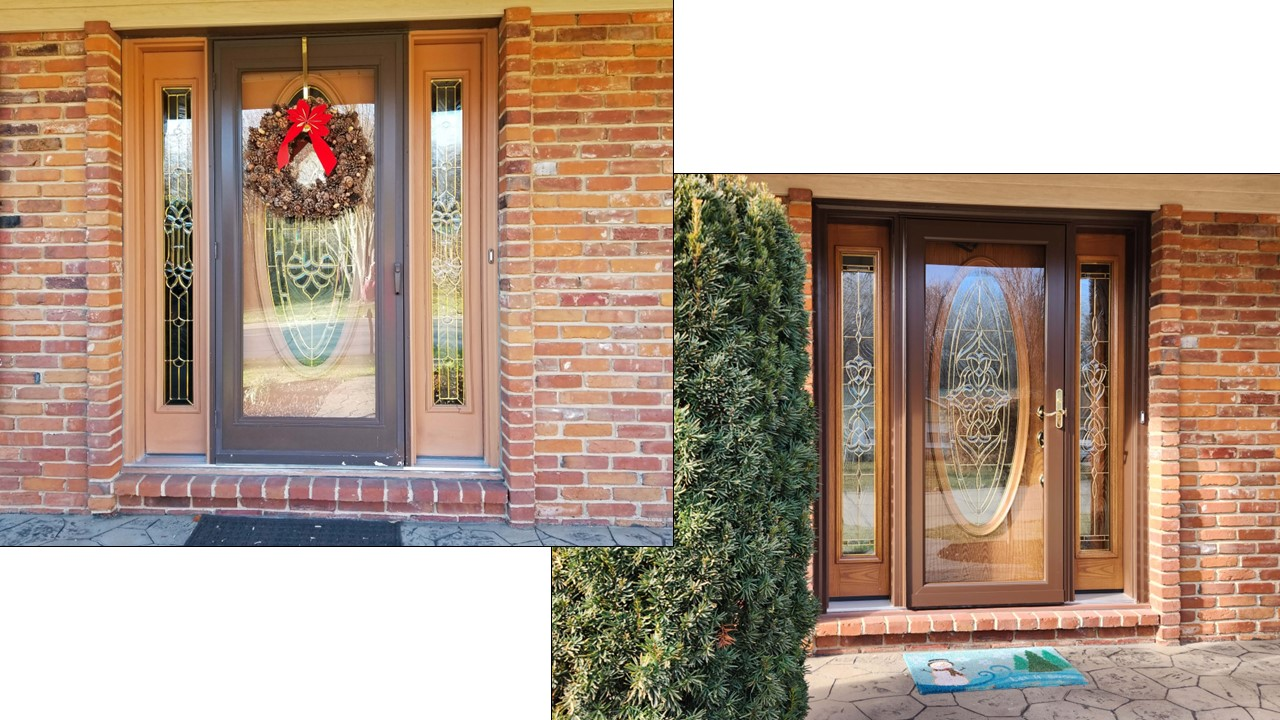
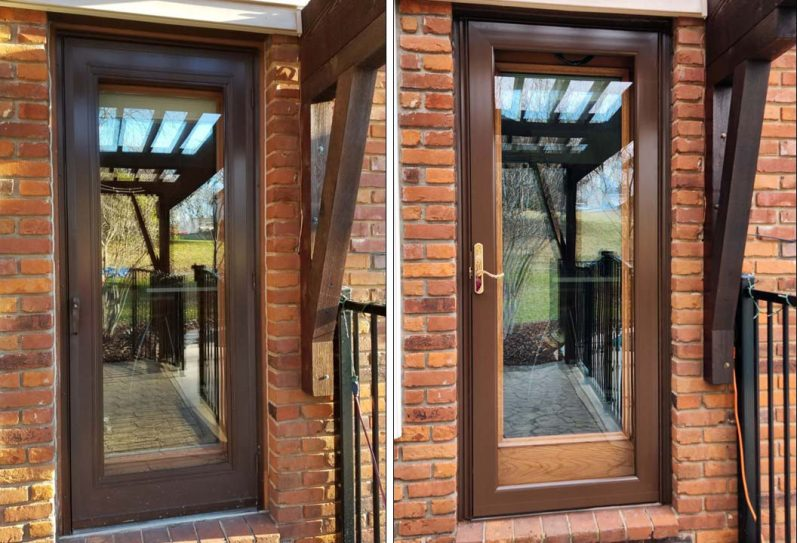
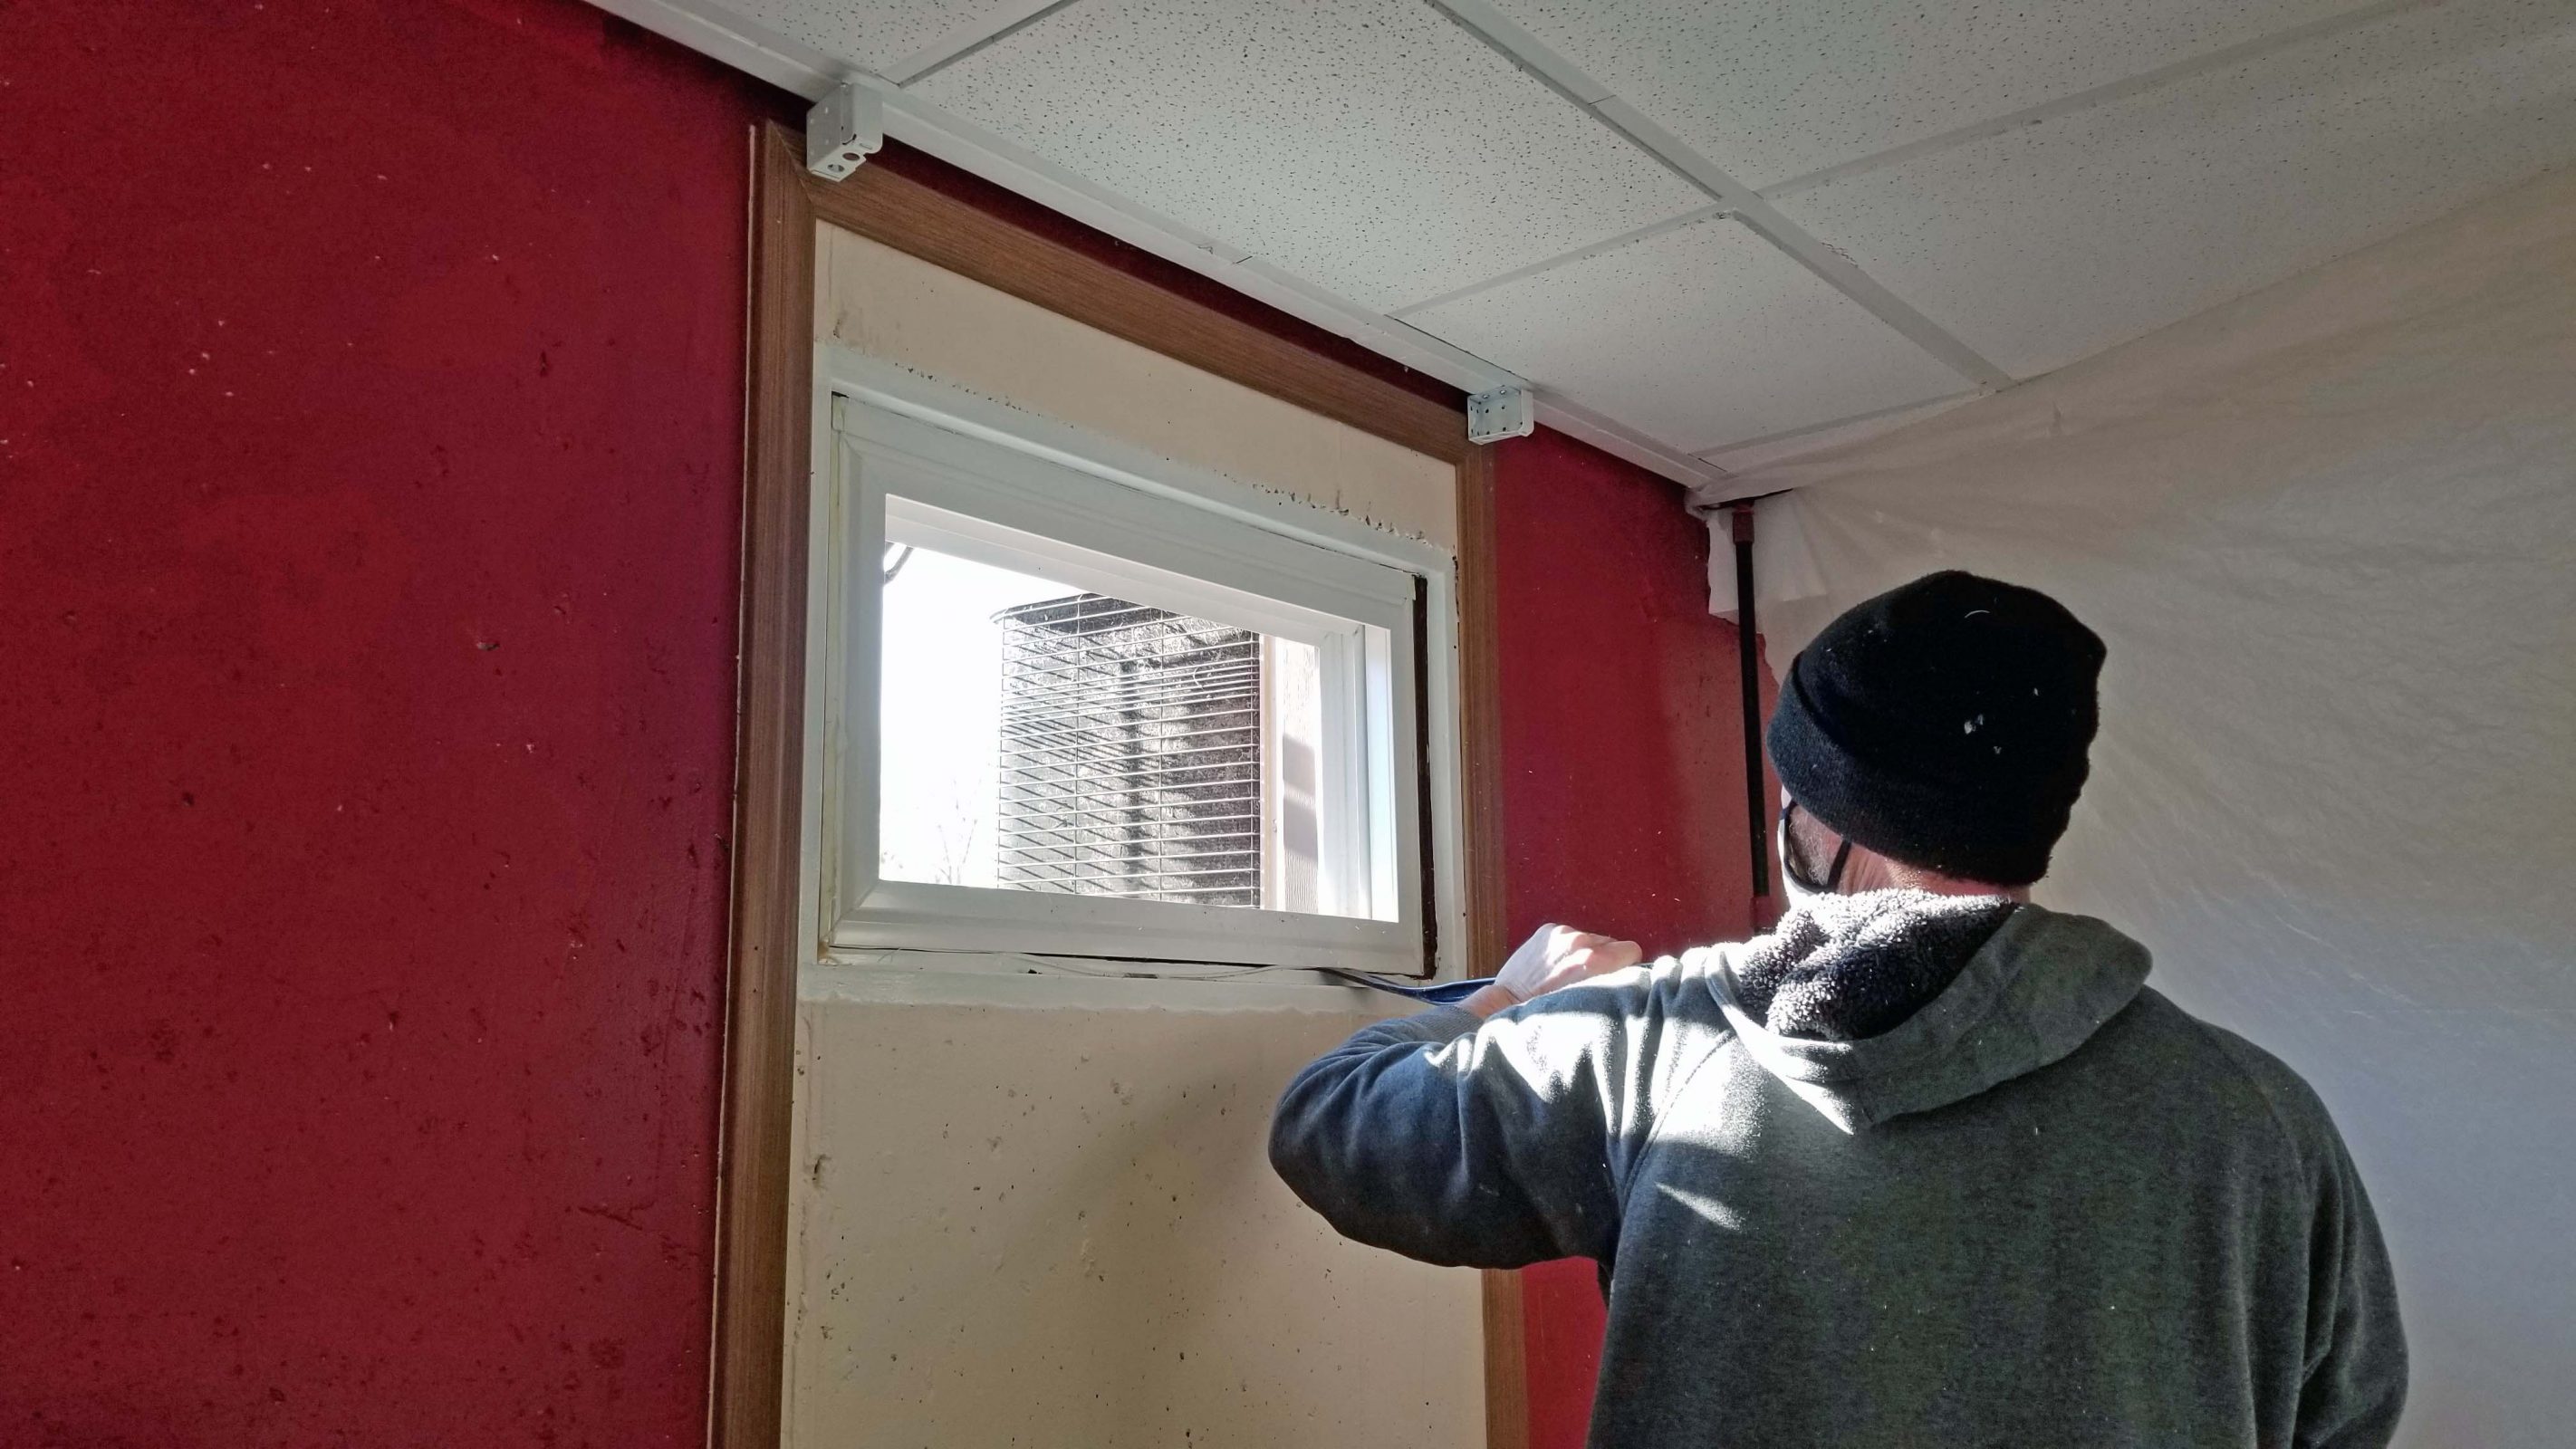
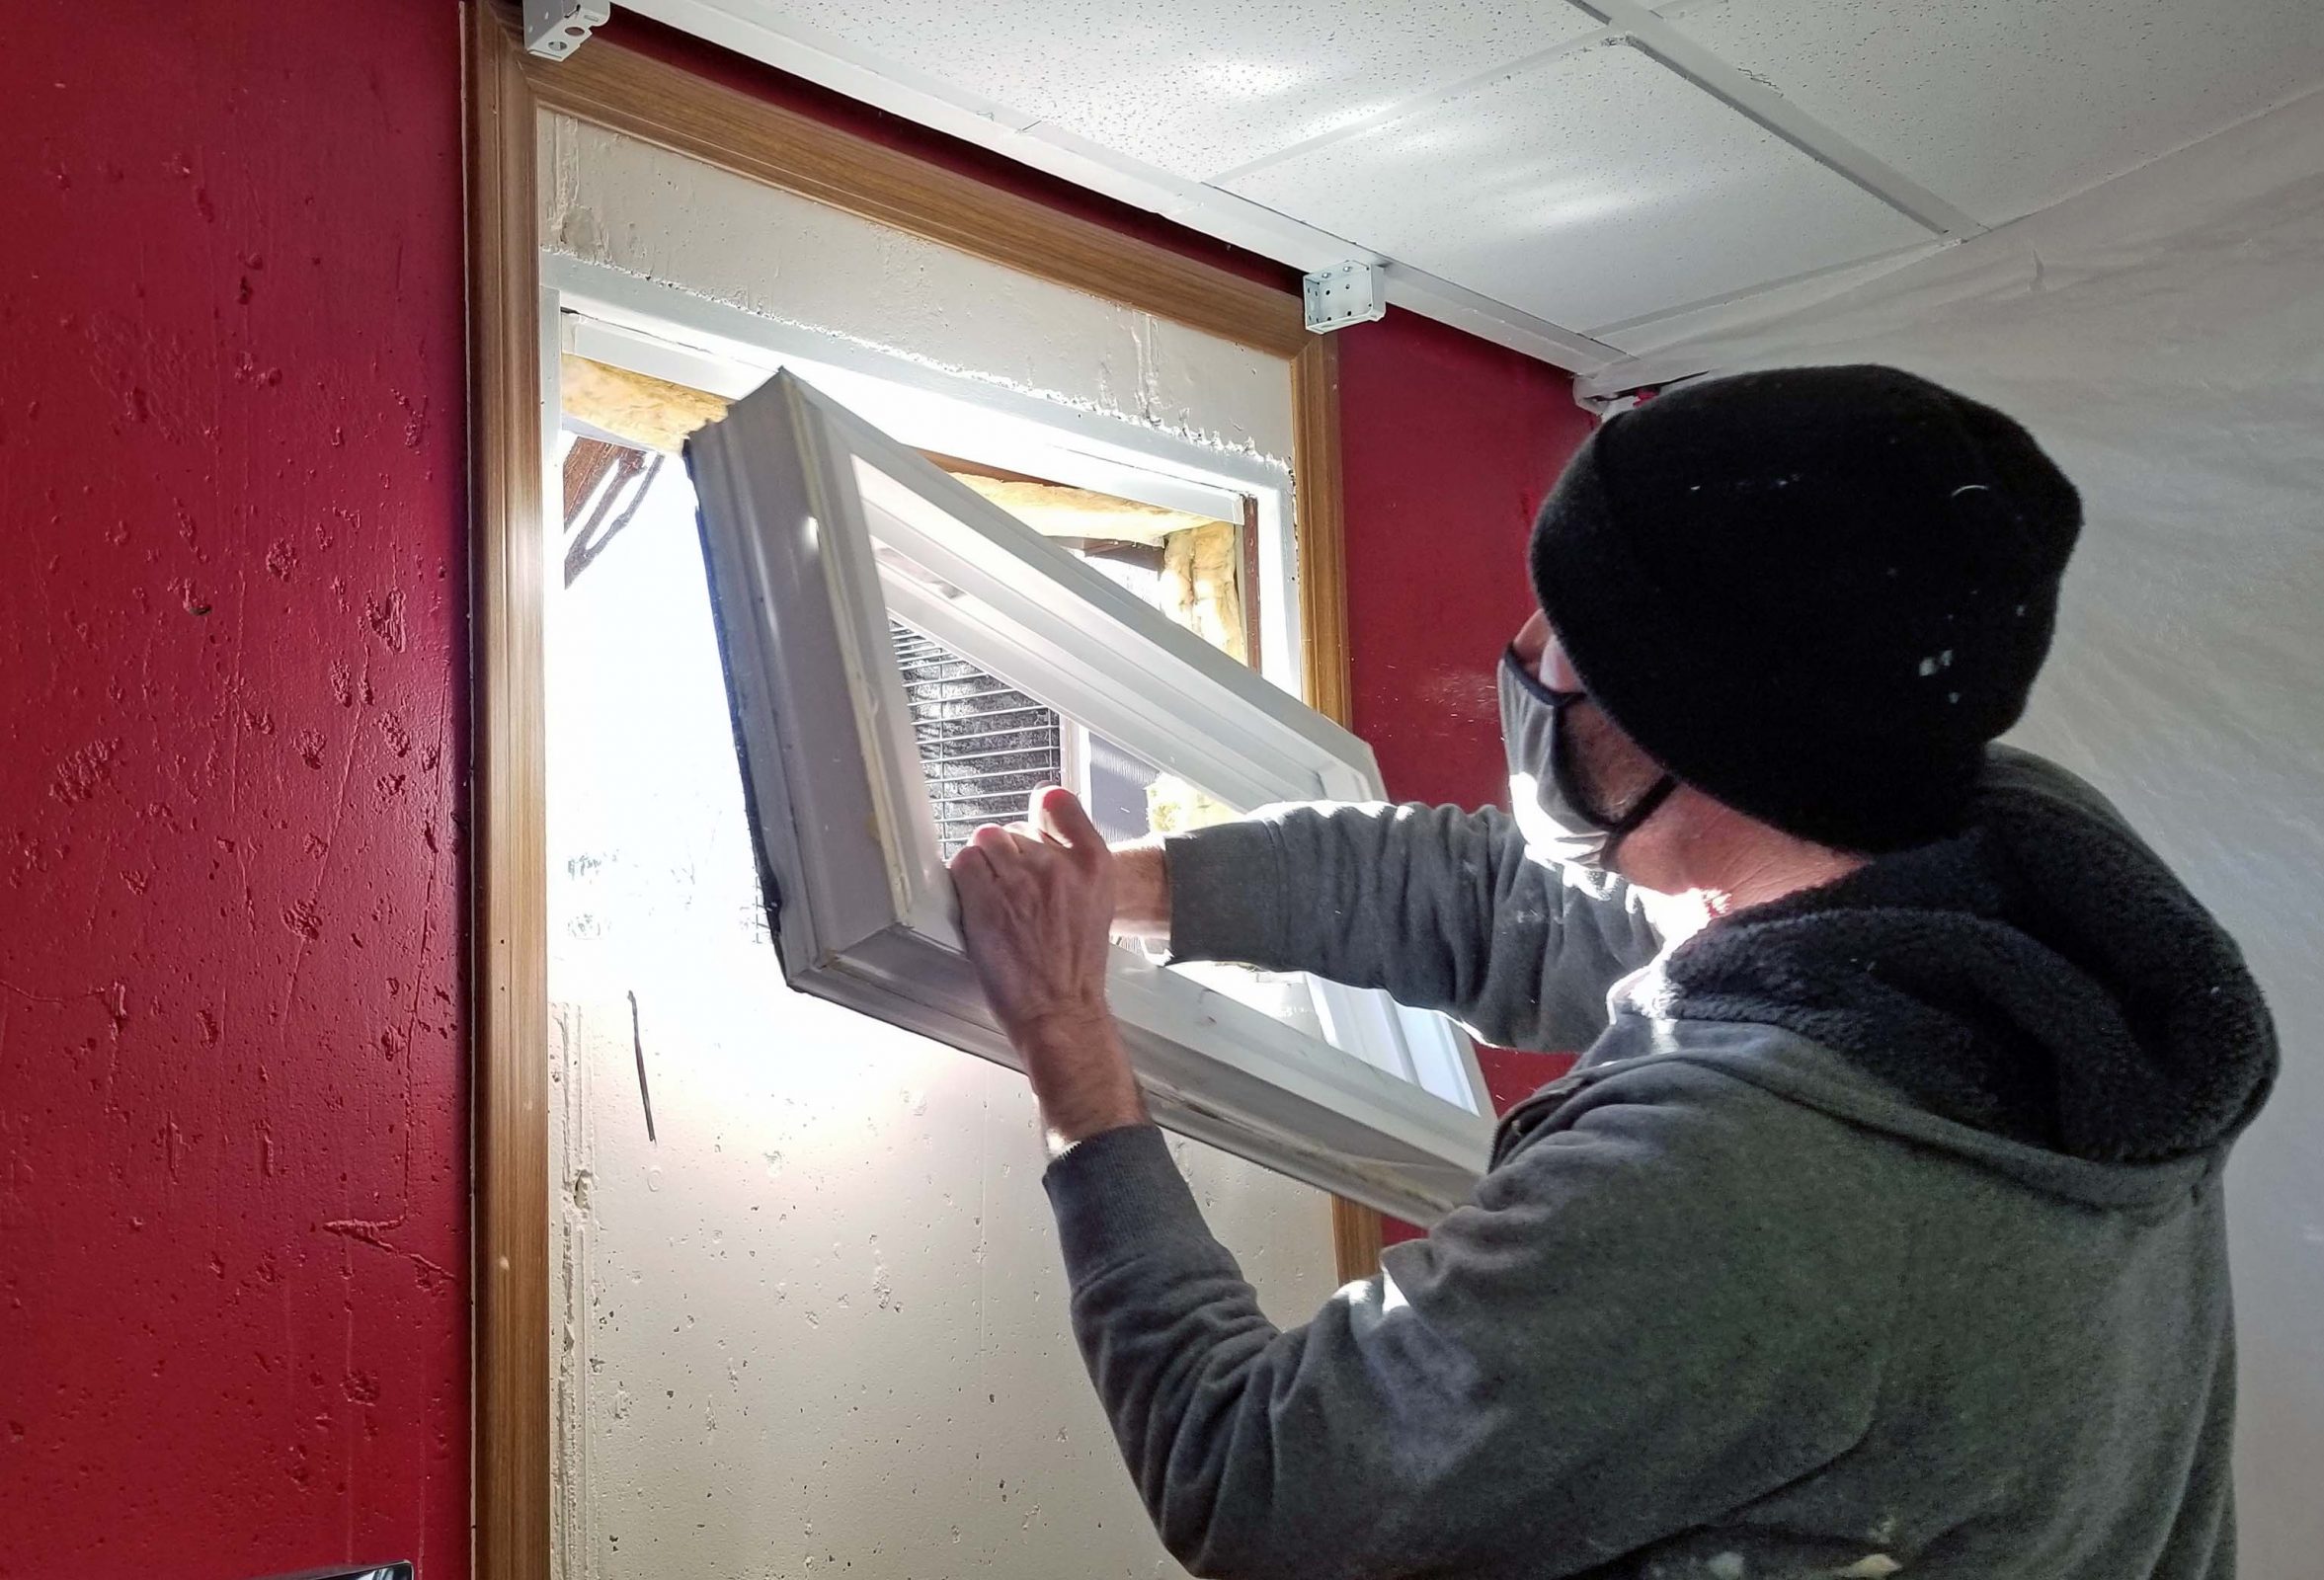
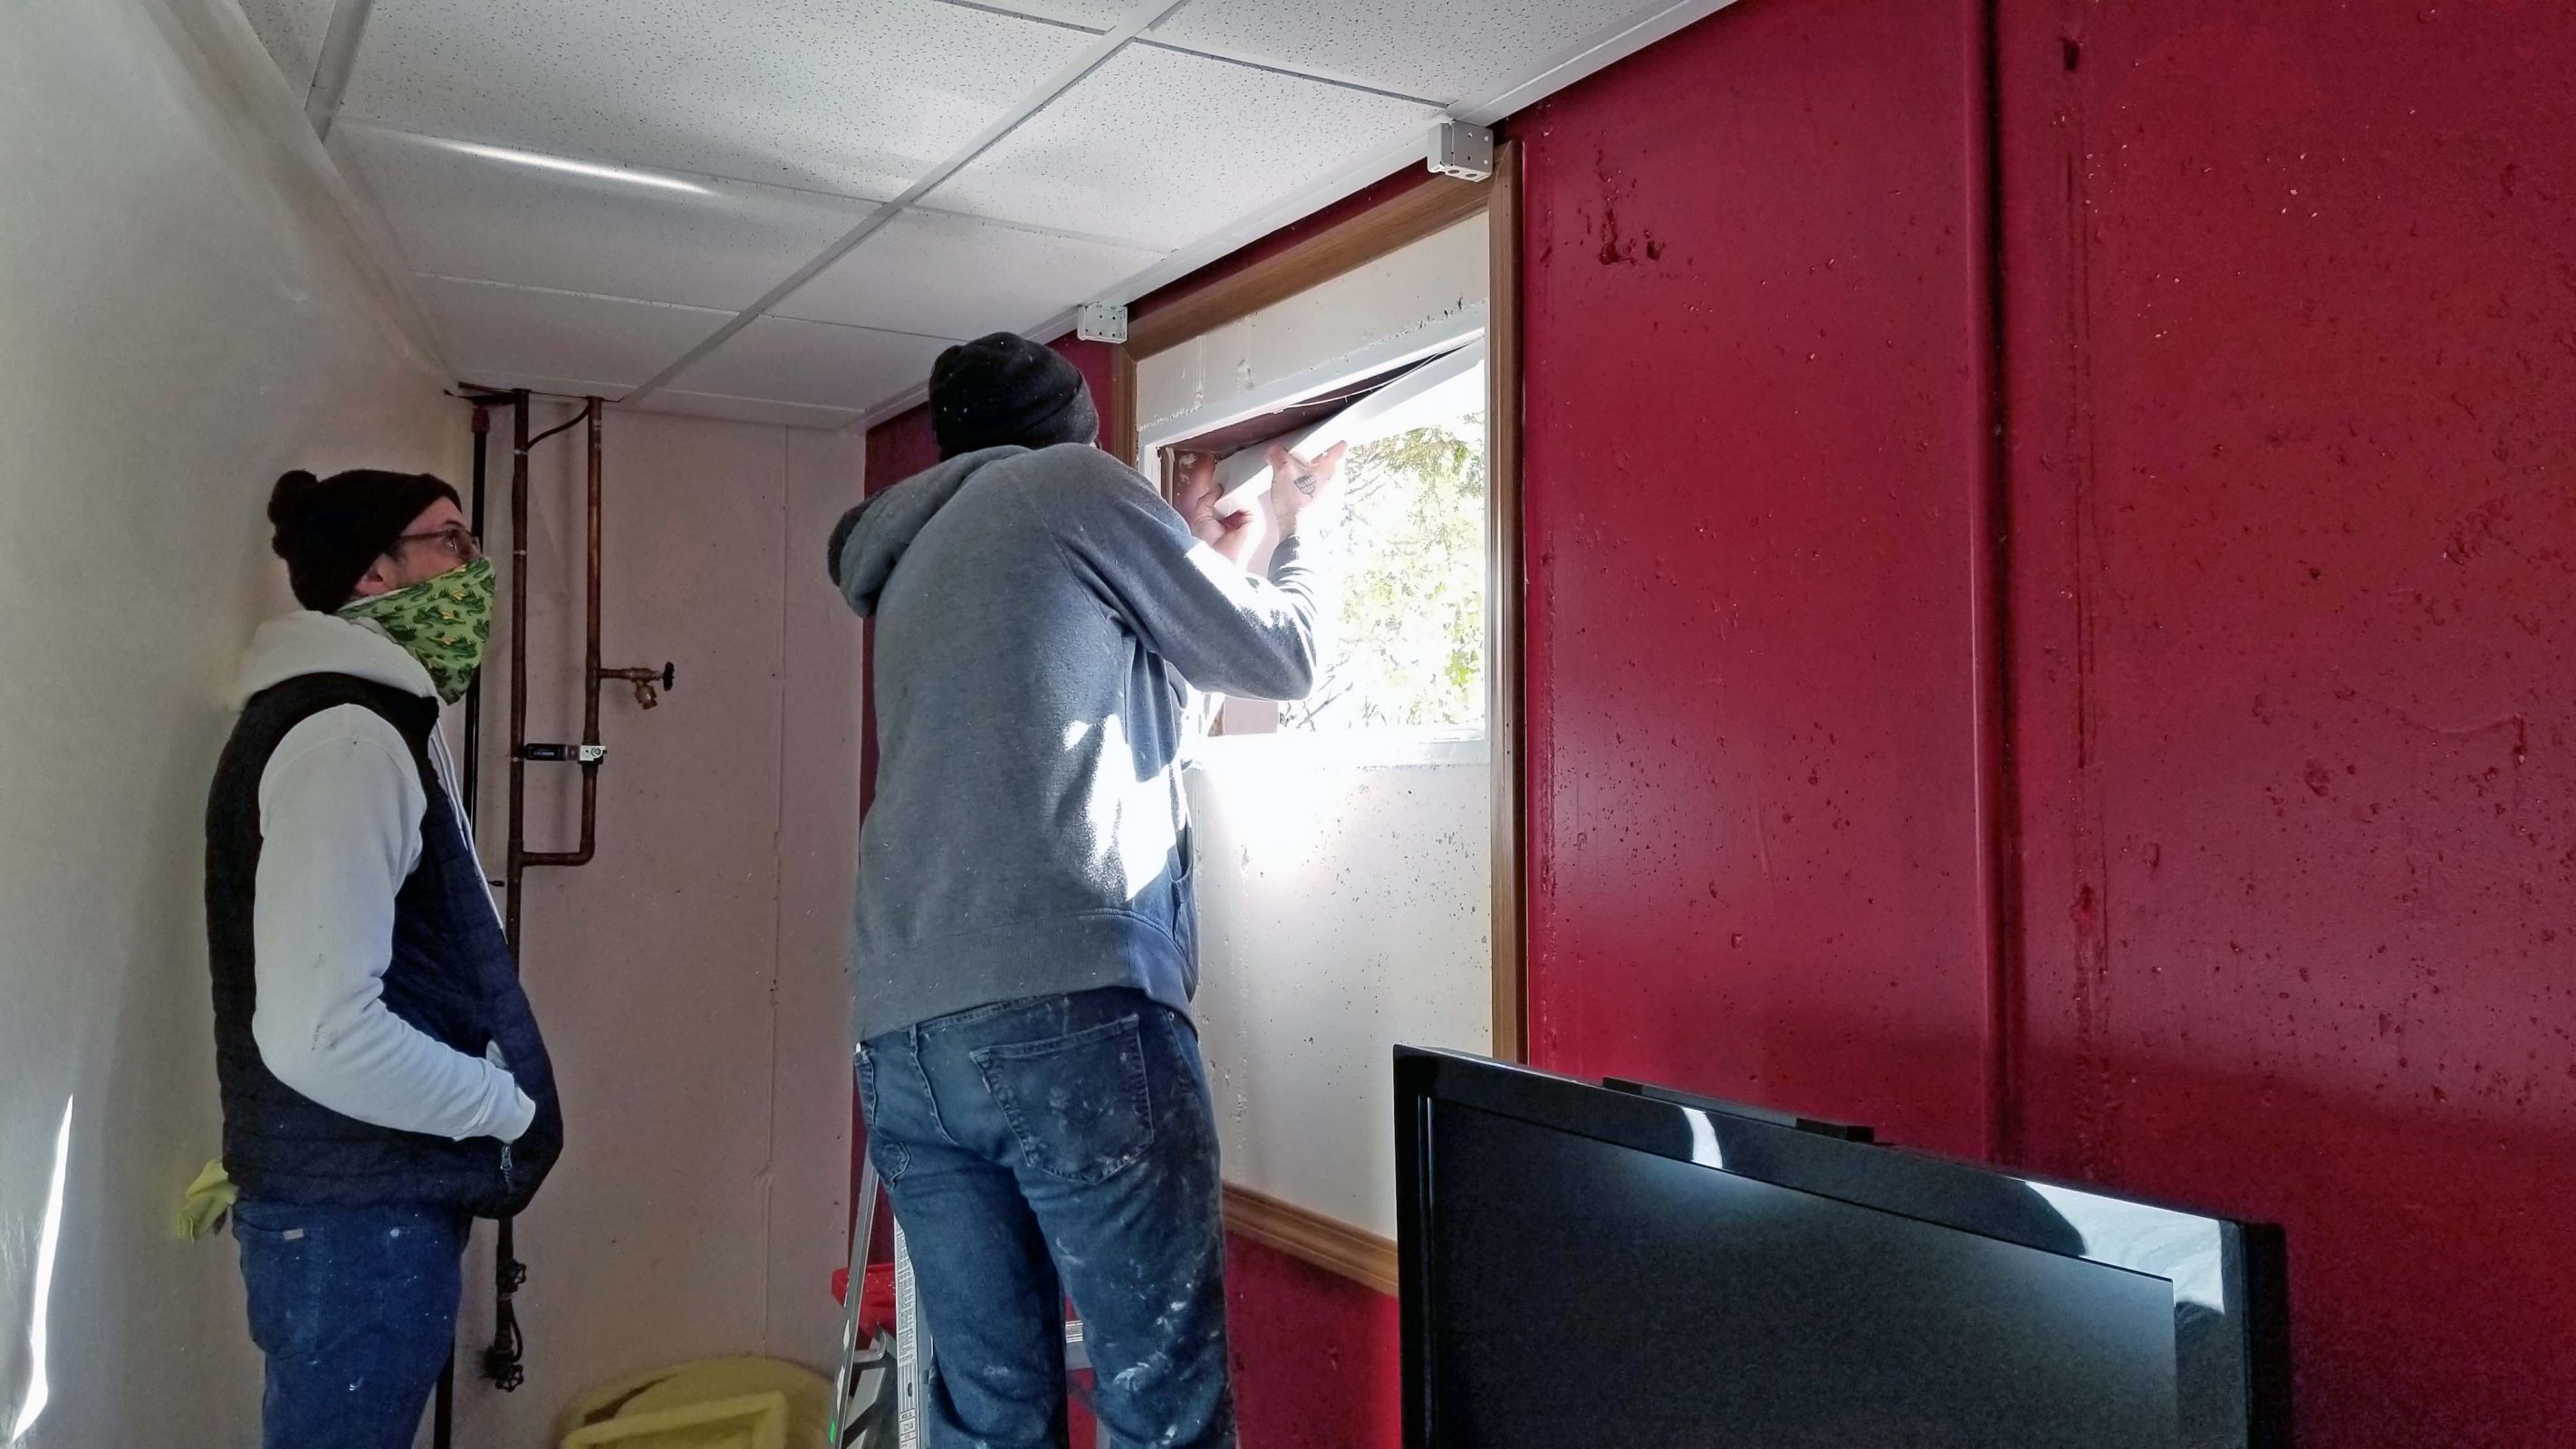
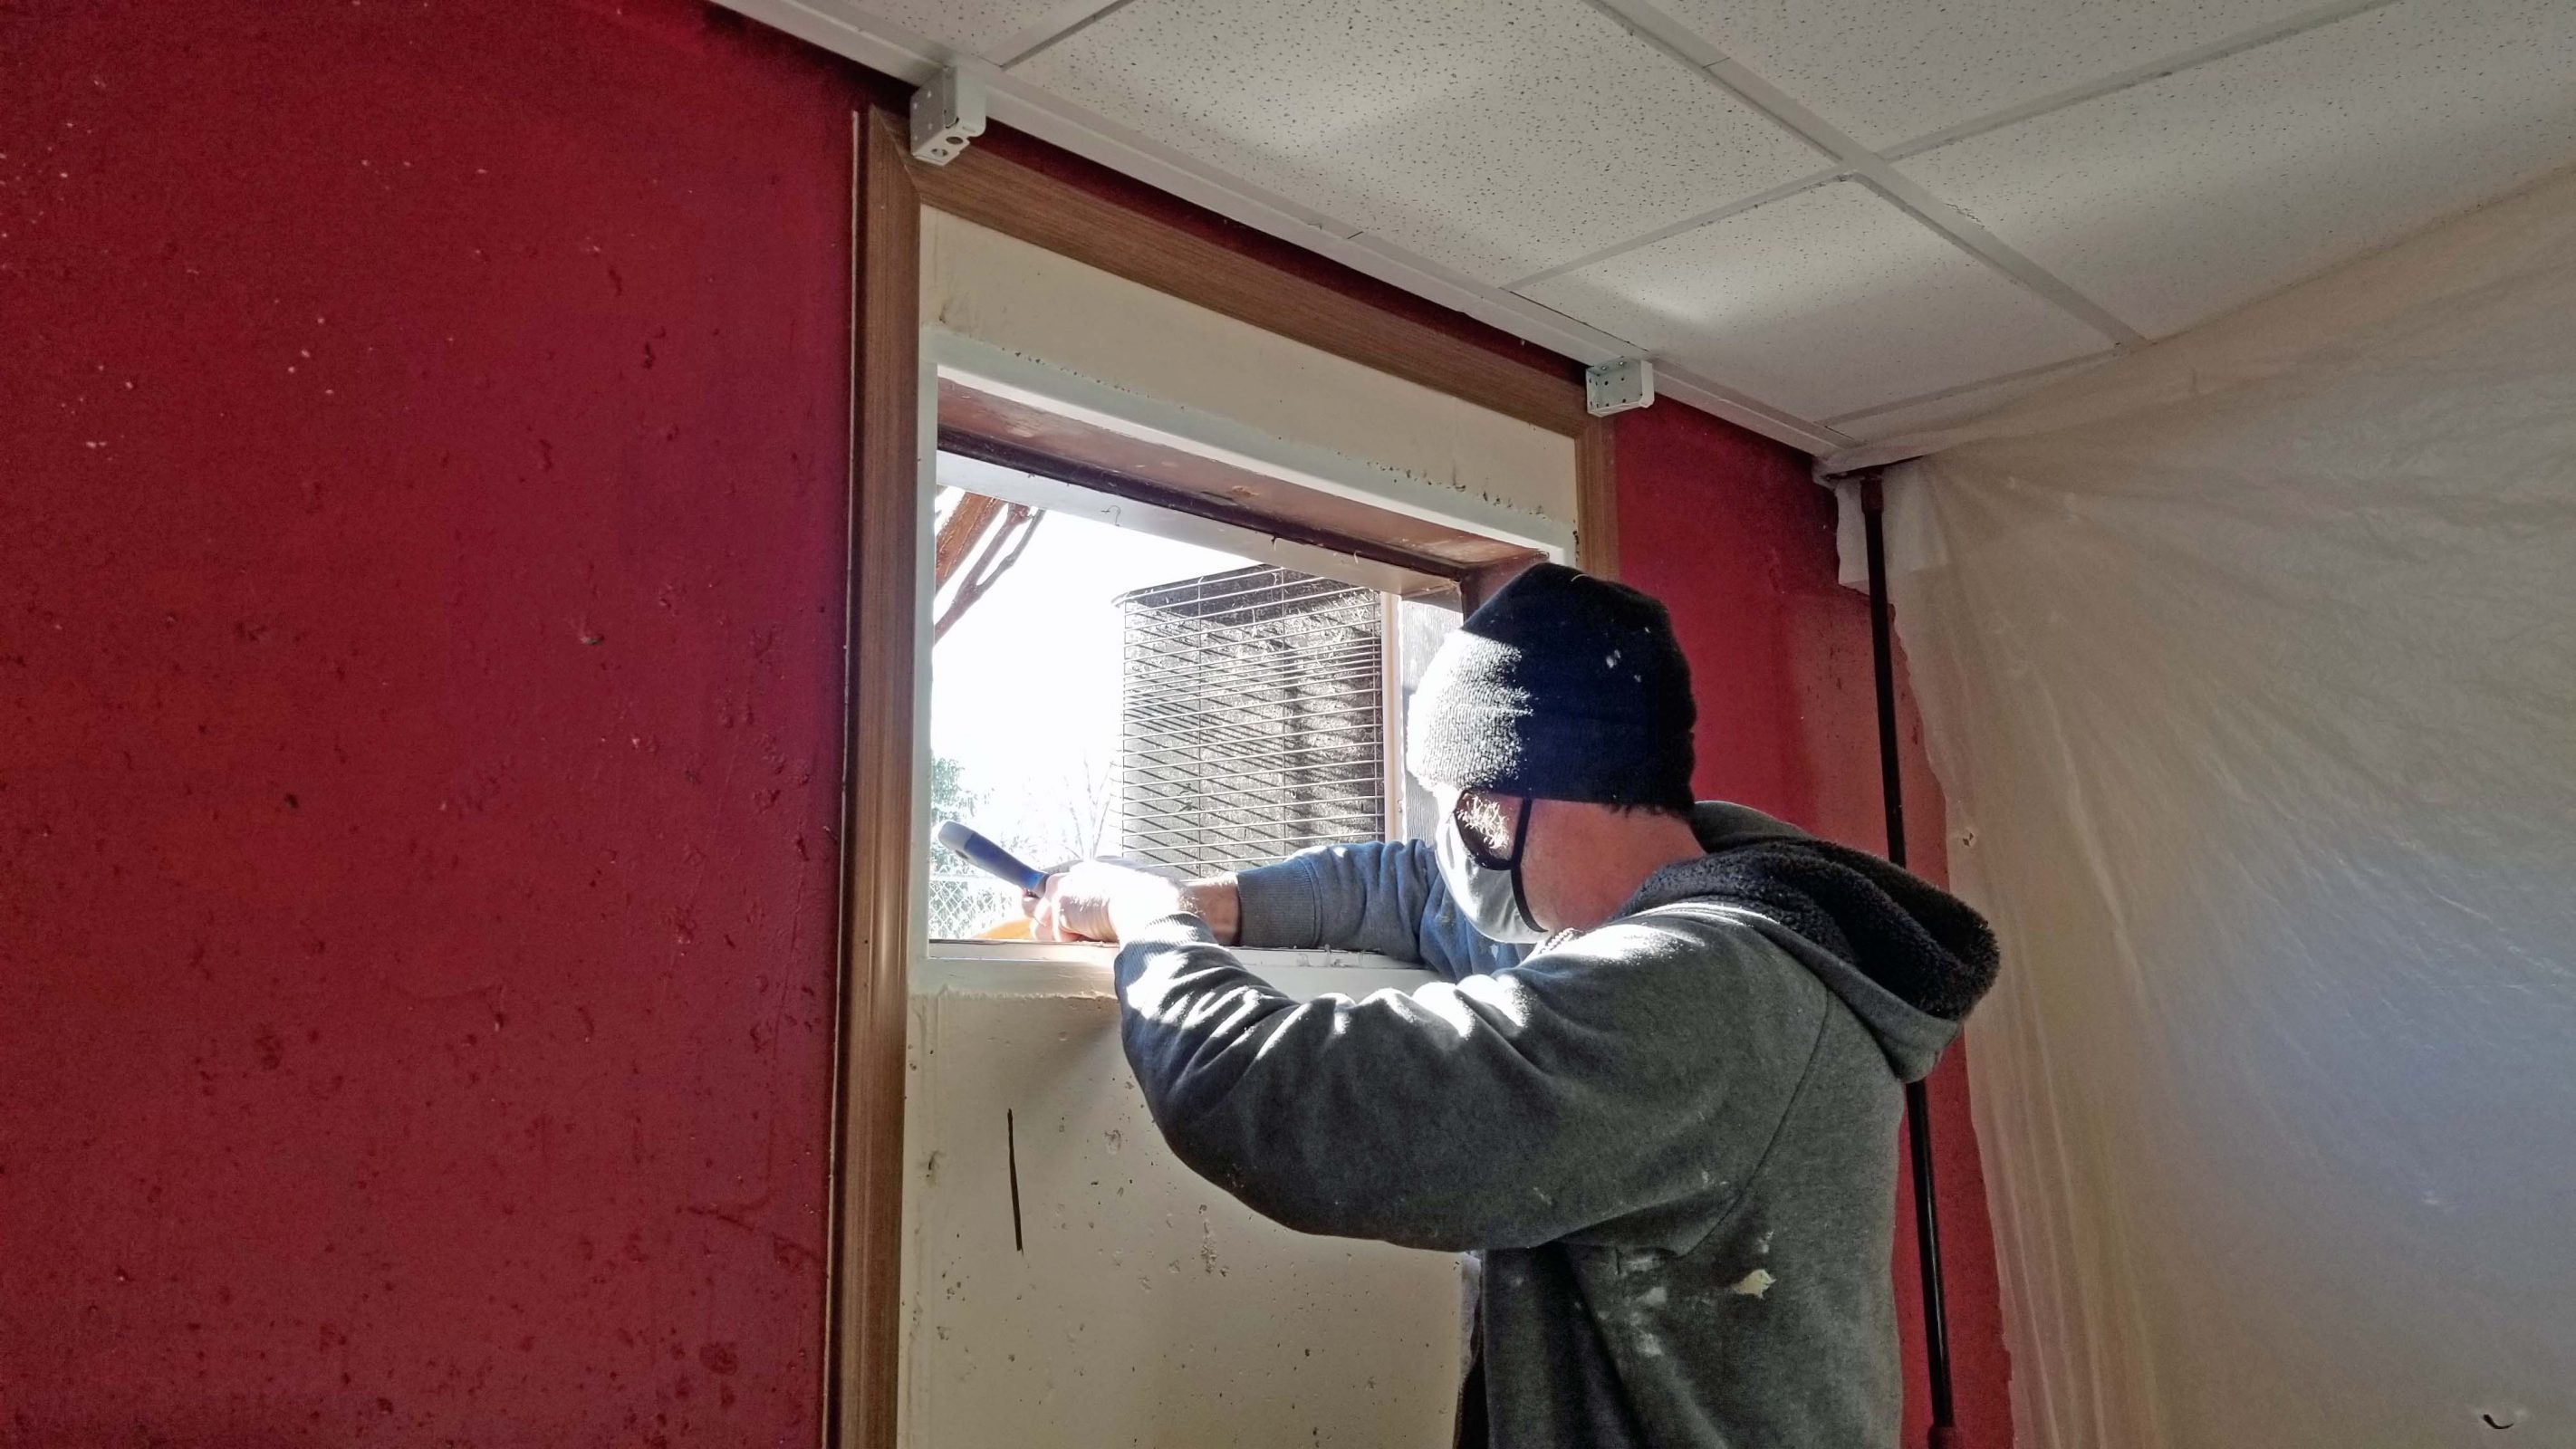
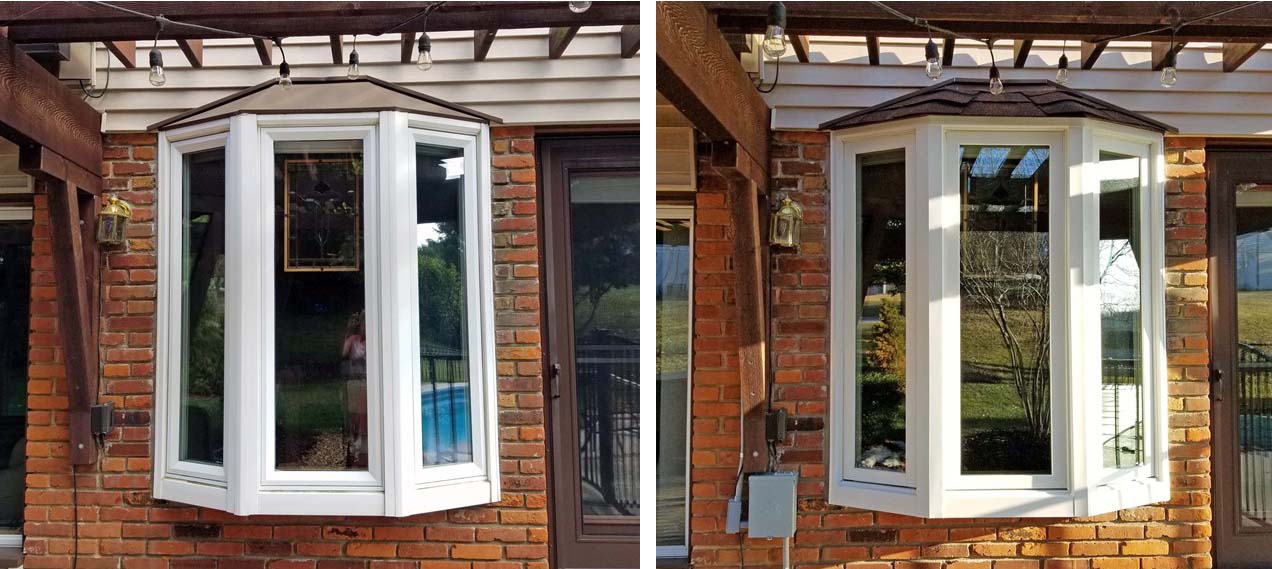
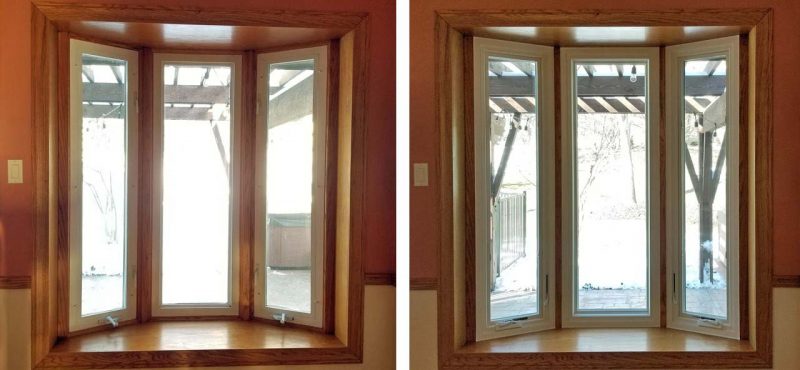
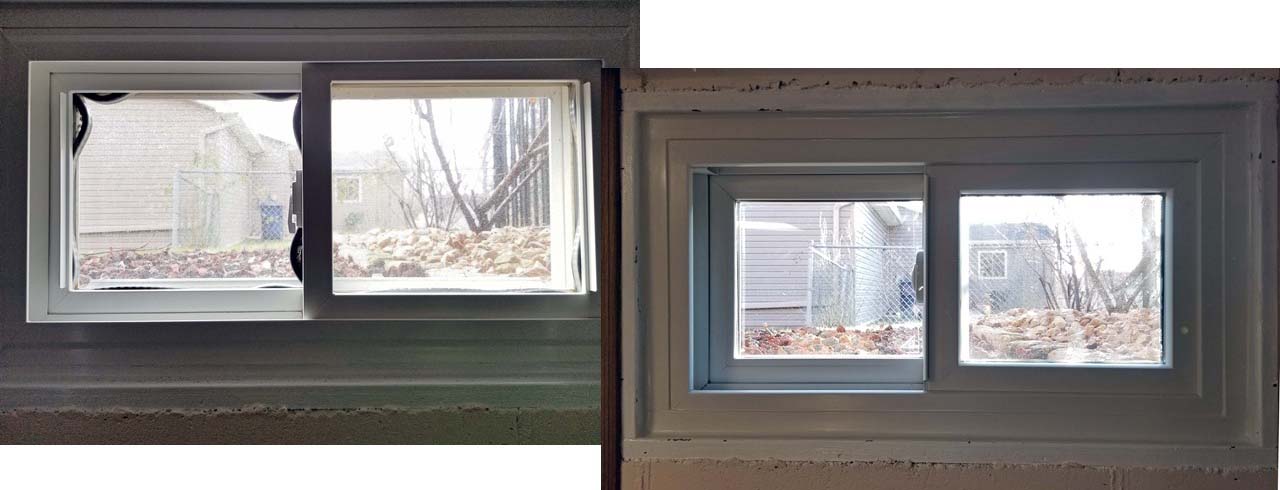
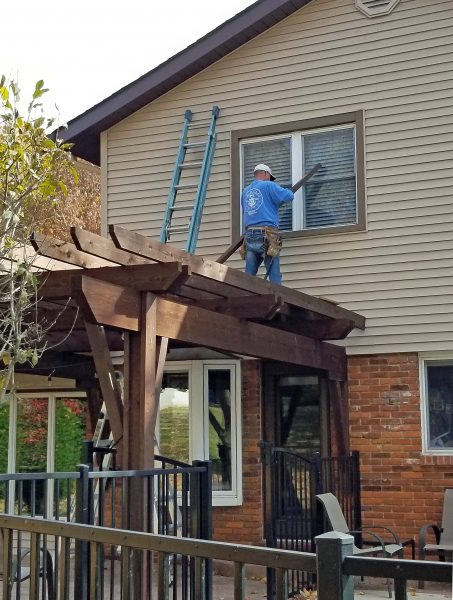
We began by shopping for exterior doors in April. Ours were installed in the mid-1990s and they showed all those years of weathering. We shopped and made our selections, then ordered doors on April 29. The doors arrived only (?) five months later, in time to be installed September 26-27. We planned to re-install our old screen/storm doors because they seemed fine and they fit the new doors. When we saw the new doors being installed, however, it was immediately obvious that the old storm doors would present a very bad look. Check the before (left) and after (right) photos below and you’ll see what I mean. We ordered new storm/screen doors and they were installed on November 29–six months to the day after we ordered the first doors. The pandemic really messed up the supply chains, didn’t it? Not to mention “the Great Retirement” and all the other people (like us) using their “we can’t go anywhere anyway” money to update their homes.
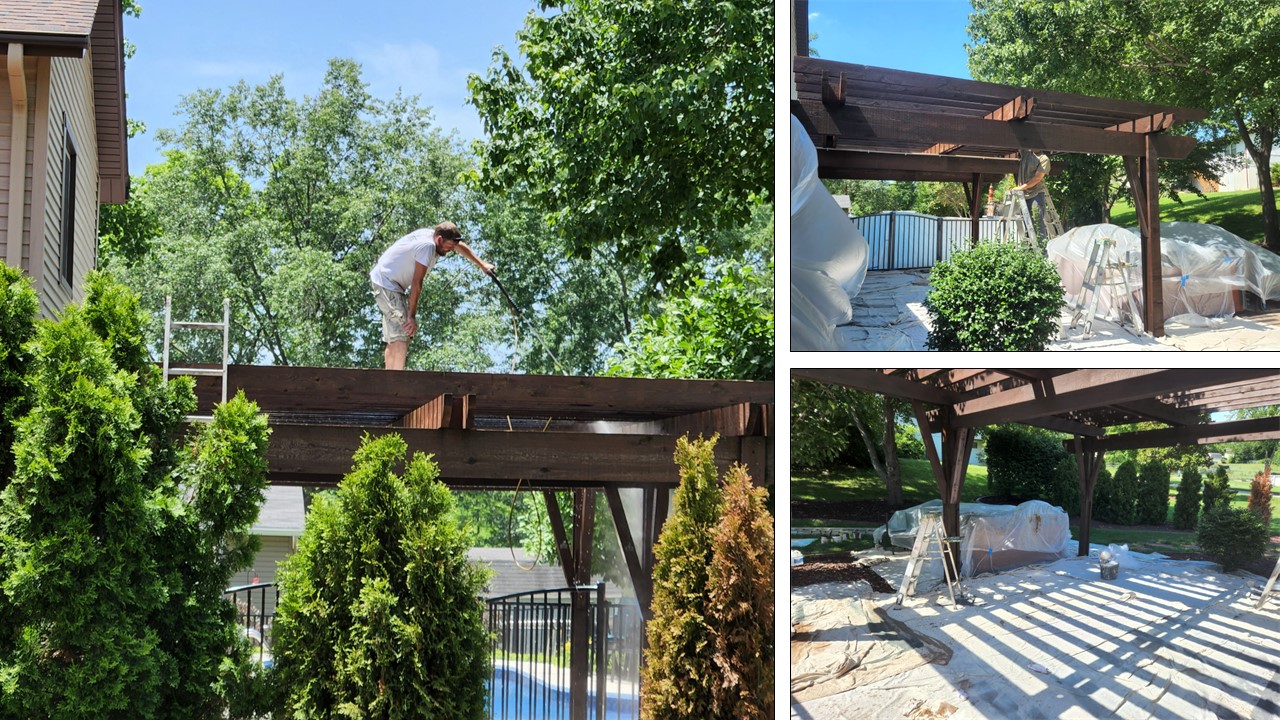
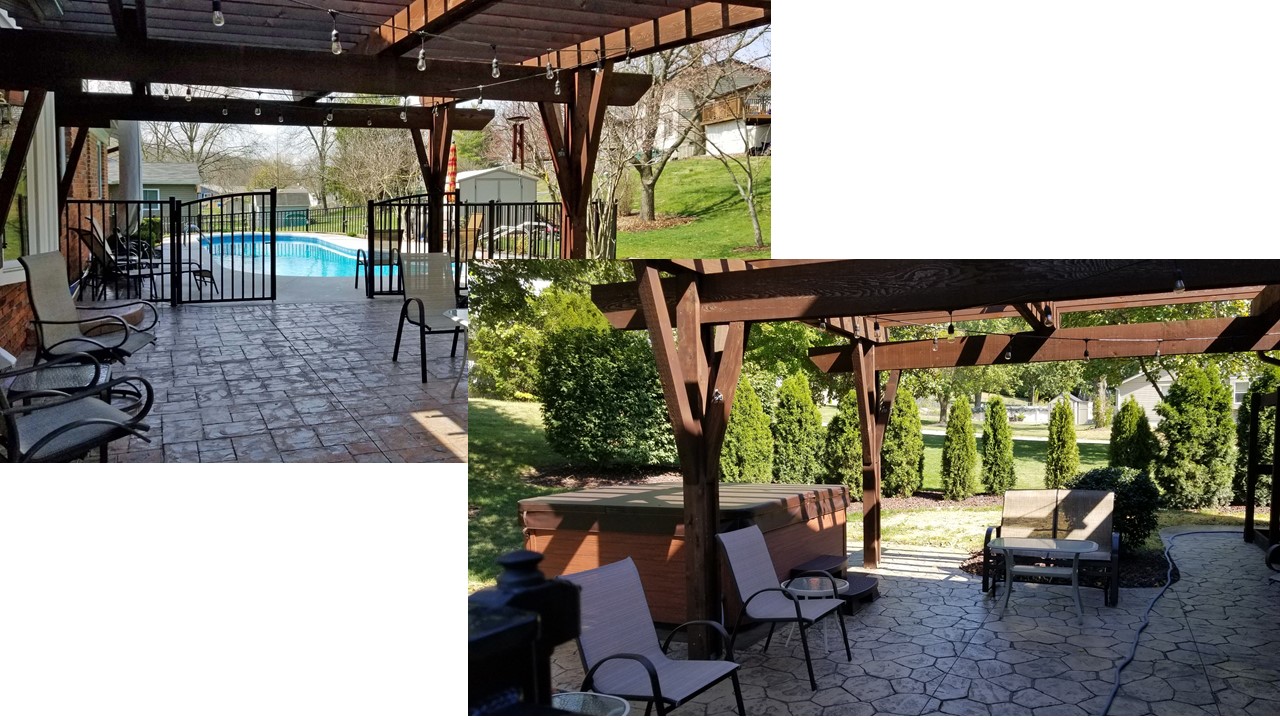
Next, we contacted a company to re-stain our pergola. We’ve stained it ourselves several times in the past and it’s not fun. Now we can afford to have someone else do that crummy (to us) job. We signed a contract for the work in April and, two months later, on June 15, a crew member spent two days pressure washing the pergola. Two more months later, on August 11, a crew of two men spent two more days staining the pergola. It took (again) only (?) four months from the time we signed the contract until the job was finished. The bad news: all summer we sat under the faded pergola. The good news: now it looks fresh instead of faded and we didn’t have to do the crummy (to us) job.
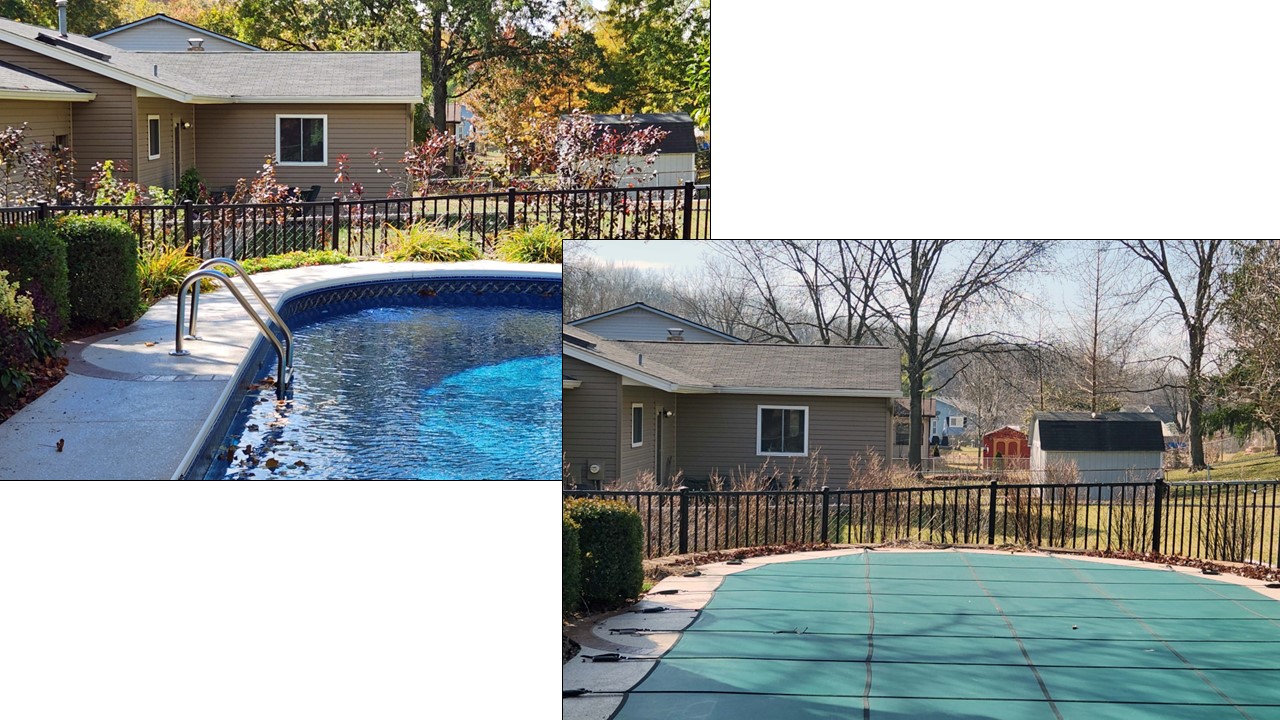
Our final outdoor project was landscaping. We’ve had some struggling bushes for several years. They don’t quite die, but they don’t look good. We decided to meet with a landscape designer to get some better suggestions for hardier plants. For five years, we’ve watched our red-leaved plum bushes struggle to screen our pool (left). The landscape designer suggested fuller, faster-growing viburnum bushes for that area (right).
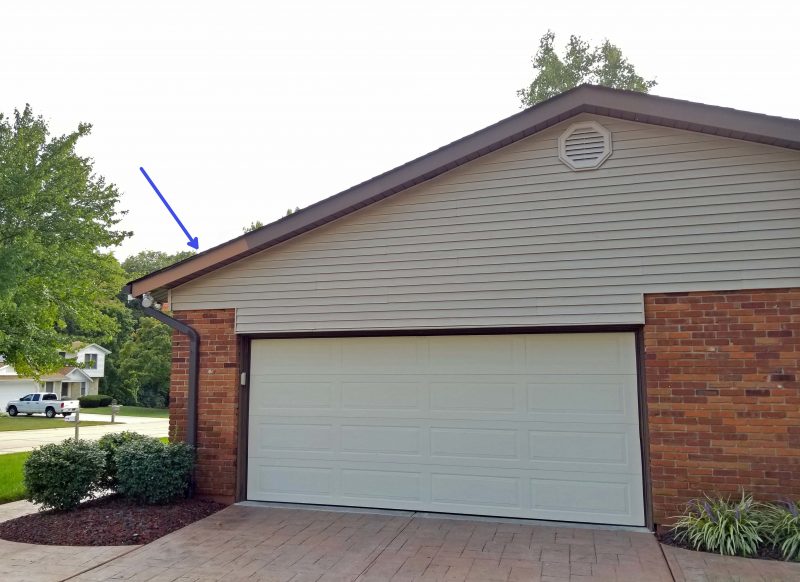
We had three flowering bushes in front of the house for 13 years, and they started to fail as well. Last year, we pulled the worst-looking bush out; this year, the remaining two bushes looked so bad, we cut them off at the base (left). The landscape designer suggested three English laurel bushes for that location. The arborvitae tree at the left corner of the house doesn’t look bad from the front (left), but the entire back half was dead. That tree has now been replaced with a columnar Norway spruce, complemented by the three new English laurel bushes (right).
For about 35 years, we had a privet hedge for privacy in our back yard. We think it aged out, but whatever the reason, it reached a point where it wasn’t filling out any more and it looked like it was dying. We replaced the privet bushes with arborvitae trees and were pretty satisfied until the middle ones died for the third year in a row (left) and several others were beginning to die. The designer said that arborvitaes aren’t very hardy and that perhaps poor water drainage was contributing to a problem in the middle of the hedge. He suggested raising the bed of the hedge and replacing the arborvitaes with hardier boxwoods, so we did (right).
None of the new bushes/trees looks great yet–or even much different than their dying/dead predecessors. Why? Because we contracted with the nursery for the new plants in mid-July, and they didn’t have time to plant them until December 8-9–five months later. All of the new plants were put into the ground in their dormant state, and we’re looking forward to them greening up in a few months.
I mentioned in an earlier post that Ted and I decided it’s time to give the interior of our house a fresh look. The interior designer we hired gave us some very good ideas, and we’ve been following up on them. If all the stars aligned, we hoped we could have at least 90 percent of the work finished before the kids and grandkids come for a December visit.
My assignment today was to call the carpet lady, the electrician, and the painter to set up appointments for walk-throughs and bids on the work. These are post-pandemic times and contractors have been unusually busy for the past three years, not to mention all the labor shortages we keep hearing about. I crossed my fingers and picked up my phone. Here’s how it went.
The carpet lady. She and her design partner will be here on Friday to get a feel for what kind of designs they should plan for us and to measure all the rooms for carpeting. They can install the master bedroom carpet and all the second floor carpeting next week. Yikes! I wasn’t ready for that. Ted and I are fully booked for the entire month of September and we have plenty to do in the remaining days of August. We scheduled carpet installation for early October.
The electrician. He can do a walk-through tomorrow, submit a bid within 24 hours, and finish the work by the end of next week. Yikes! again. It turns out that I called at a serendipitous time. The company had two electricians assigned to a total house gut and remodel–a job that took a year–and they finished it last week. Four other electricians were working on a huge commercial project which also took a year and also ended last week. This means that six electricians are available for new work. We need the electrical work completed before the painter can start, so Ted and I decided to drop everything we’d planned to do in August that wasn’t necessary to keep the world turning, and we scheduled the electrician for a walk-through and a bid tomorrow, with work to begin ASAP after that.
The painter. No problem. He can fit us in around other jobs and finish ours by next week. Now my jaw is dropping, my head is spinning, and I’m feeling a little giddy. The painter is happy to work with the carpet people so that we only need to move the furniture in and out of each room once while the carpeting and the painting are being done. He’ll be here tomorrow for a walk-through and will give us a bid on the spot. We scheduled him for early October with the carpet crew.
After three years of delays, delays, delays on outdoor house work and yard jobs, if we didn’t already have September completely filled, we could have had the entire interior of our house freshened up with new lighting, new carpeting, and new paint by the end of next week. This time, it’s the customer (us), not the contractor, who is delaying two-thirds of the project until October.
Unbelievably, all the stars aligned. 1-2-3, hat trick!
It’s spring, so Ted made his usual appointment to have our air conditioner inspected to make sure we’re ready for the hot July days. Unfortunately, the technician identified a bad leak in the AC unit. The AC is 19 years old and we already repaired a leak in it four years ago, so we bit the bullet and ordered a new one. The furnace was installed at the same time as the air conditioner and is also showing signs of aging, so we ordered a new furnace too. We should be comfortably warm and cool for the next 20 years.
Before the installer arrived, we received a text from the company identifying the technician who would be coming to our house. Other companies have given us the name of the technician we should expect, but this is the first time we’ve received a picture and a brief bio.
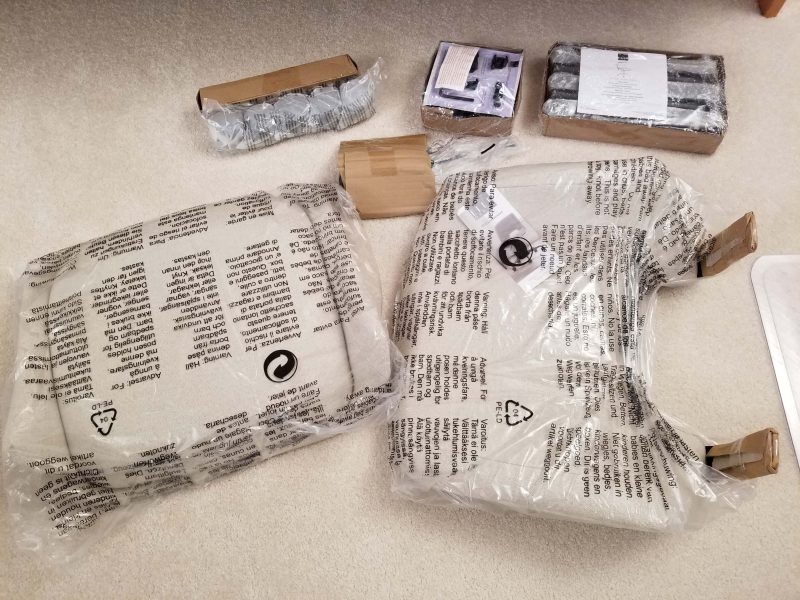
Rick brought a helper with him. The helper set up the air conditioner outside while Rick replaced the furnace and all the indoor conduits, wiring, accessories, etc. There were a lot of boxes and pieces.
It took the guys a little more than six hours to complete their work, When they finished, we had a new AC unit, a new furnace, a new humidifier, a new air scrubber, and a new smart thermostat. They’re not glamourous, but we wouldn’t want to be without them.
You’d think the story would end here, but a few days later, we had a surprise package on our front porch. When we opened it up, we found . . . cookies! We received a dozen chocolate chip cookies and a large insulated water bottle from the HVAC company in appreciation of our business.
We weren’t expecting this, but we remembered the cookies we received from the window company in 2021. Those cookies were so good, I saved the recipe that was included with them. Surprise! Both companies sent the same cookies. This cookie company (in Kansas City, MO) must be successfully targeting businesses to promote customer appreciation. It’s that little added touch that makes you want to call the company for service next time, right? Yum.
About 15 years ago (I don’t remember exactly), I got tired of having our multitude of family portraits in boxes where no one could see them. To get them out of the boxes, I decided to make our upstairs hallway a portrait gallery because: (1) there was nothing hanging on any of those walls; and (2) I didn’t have room for this many portraits anywhere else. I went through the boxes, selected the best pictures, measured and counted them, and bought hundreds of dollars worth of frames ($400+ I think). I framed them and printed identifying labels to attach to the backs of the frames–names, dates, etc. Then I needed a plan to arrange the portraits on the walls.
When Kathy came for a weekend visit, she and I stayed up very late one night, sorting and arranging the framed portraits. We could have quit earlier and gone to bed, but we were really into the project. We measured the hallway walls and laid everything out to scale on the bedroom floors in a variety of ways to construct a pleasing presentation.
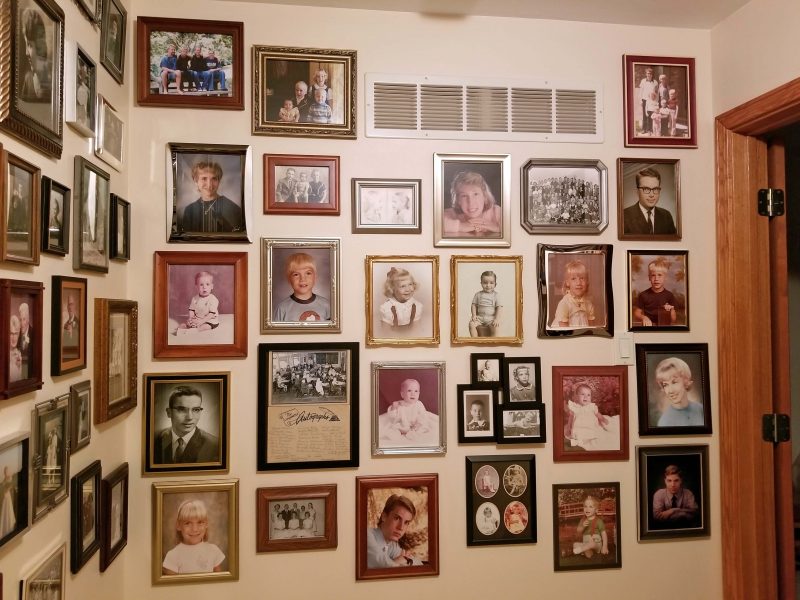
The result of Kathy’s and my planning is that Wall #1, at the head of the stairs, is dedicated to our immediate family–Ted, me, and our four children. These are portraits of all six of us as babies, in first grade, and at high school graduation, as well as a few miscellaneous related portraits of our family and Ted’s and my “entire elementary school” pictures. We went to small rural schools, so there was room for everyone in a single picture.
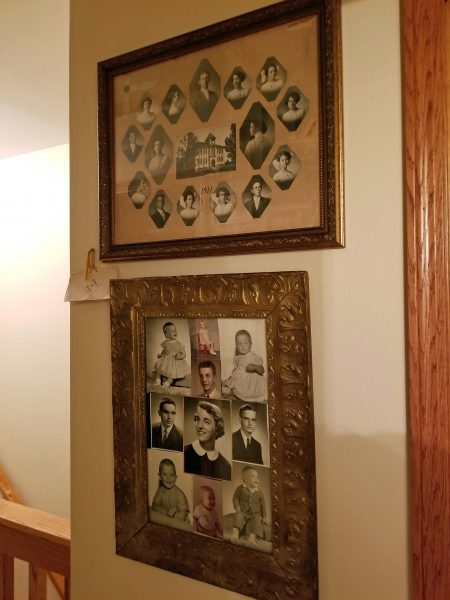
Wall #2, the shortest wall, has just enough room for the two oversized frames in my collection. One is from my Grandma S. and includes the senior pictures of her 1911 high school graduating class of 12 students with three teachers. The other is from Ted’s mom and has the high school graduation pictures of her four children, and the six grandchildren she had at the time she assembled the collage.
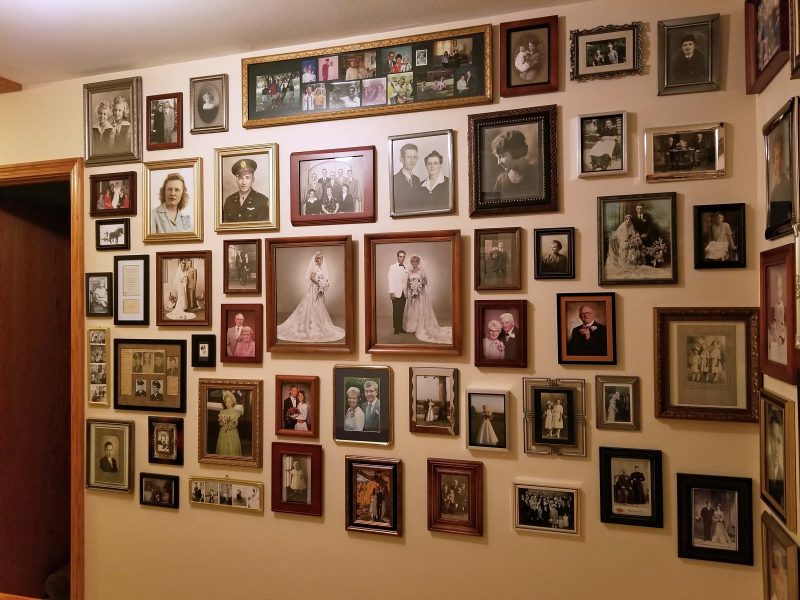
Wall #3, the longest, is the wedding and history wall. I have wedding portraits of Ted’s and my parents, our grandparents, ourselves, and our married children. I also have a number of portraits and historically interesting pictures of our parents, grandparents, great-grandparents and a few other relatives.
Wall #4, the last remaining space in the hallway, is the grandchildren wall. We already had a few grandchildren at the time Kathy and I designed the gallery and I thought there would be plenty of room for all the grandchildren’s pictures on that wall. That wasn’t true. With nine grandchildren, and multiple pictures of some at different ages, I was doing ok until 2021, when Hadley (grandchild) and Ollie (great-grandchild) were born. We already have one grandchild who is married and had a baby, and several others are at a marriageable age and are likely to present us with more great-grandchildren. To make room for Hadley, Ollie, and future additions to the family, Ted and I spent the afternoon today re-arranging the grandchildren wall. We think we left enough space for at least six additional babies before we have to worry about a future adjustment.
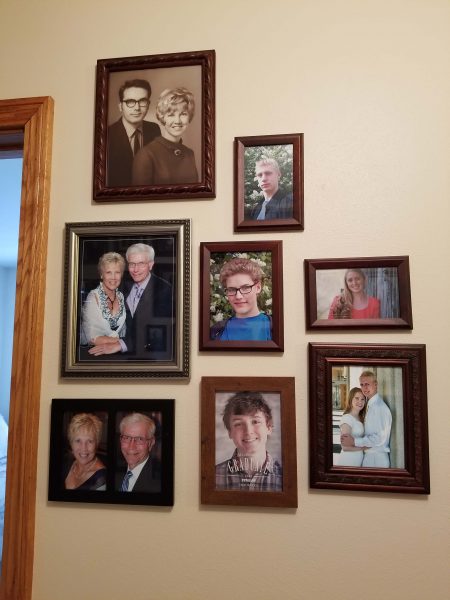
Walls #1, 2, and 3 don’t change much over time because they’re all past history. Wall #4 was good for a long time and has now been compressed to make more space. As our grandchildren began graduating from high school, however, Ted and I realized we needed more gallery space. We decided to start Wall #5 along the stairway. We began with some portraits of ourselves that we didn’t have room for on Wall #3 and then transitioned to graduation pictures. When Alex got married in 2019, we had to find space for the wedding portraits of our grandchildren too, so we decided that, because the stairway wall is pretty long, we can call it the “growing up” family wall. This wall has lots of room for expansion and it gives us something to look at as we go up and down the stairs.
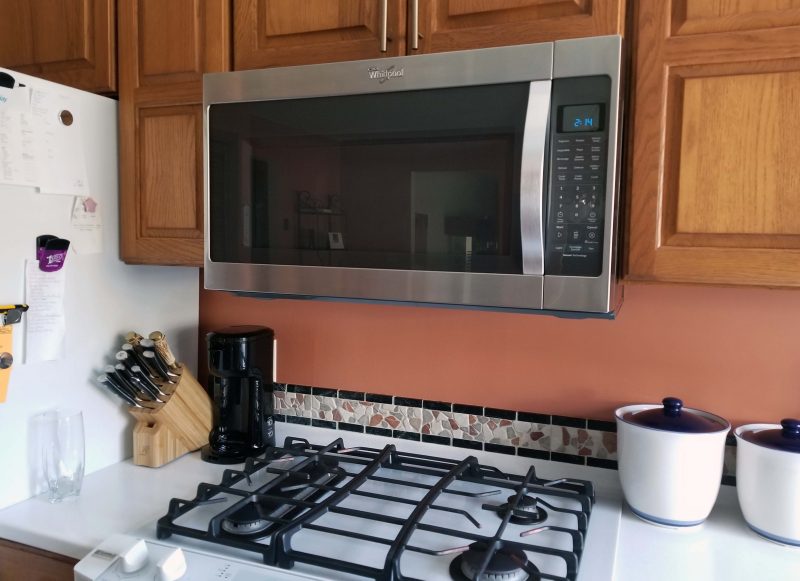
We bought this Whirlpool microwave in February 2017.
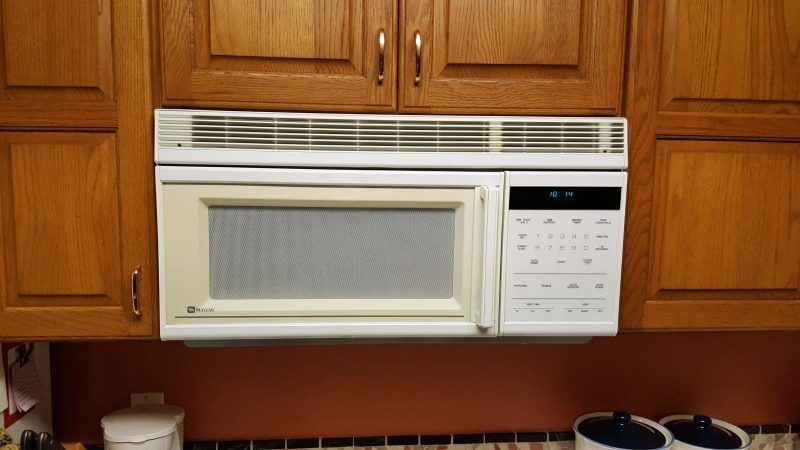
It was a replacement for the Maytag microwave in the photo below. There was nothing mechanically wrong with the Maytag, but it was 24+ years old and outdated. It was only 1.1 cu. ft. in size, had only 850 watts of power, and the plastic parts were yellowing with age. A newer, larger, more powerful microwave sounded like a good idea. Note: I’d like to add that my Maytag washer and dryer are now 26 years old and are still going strong. Go, Maytag!
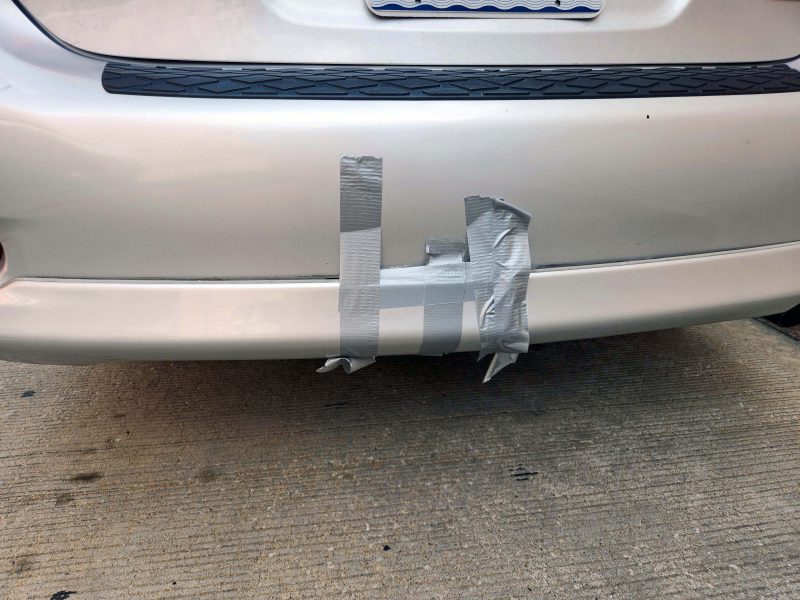
Unfortunately, we either bought a Whirlpool lemon or they really don’t make them like they used to, since the Whirlpool unit only lasted a little more than four years. Last fall, it started working sporadically. We could re-boot it by unplugging it, then plugging it back in, but by November, we were doing that trick nearly every day, so we decided it was time to replace the unit. “Supply chain” is becoming a phrase we’d all like to erase from the lexicon, but it’s a fact of life these days. We ordered a new microwave on November 27, 2021 (naturally, it wasn’t in stock) and it finally arrived, ready for installation on January 14, 2022–seven weeks later.
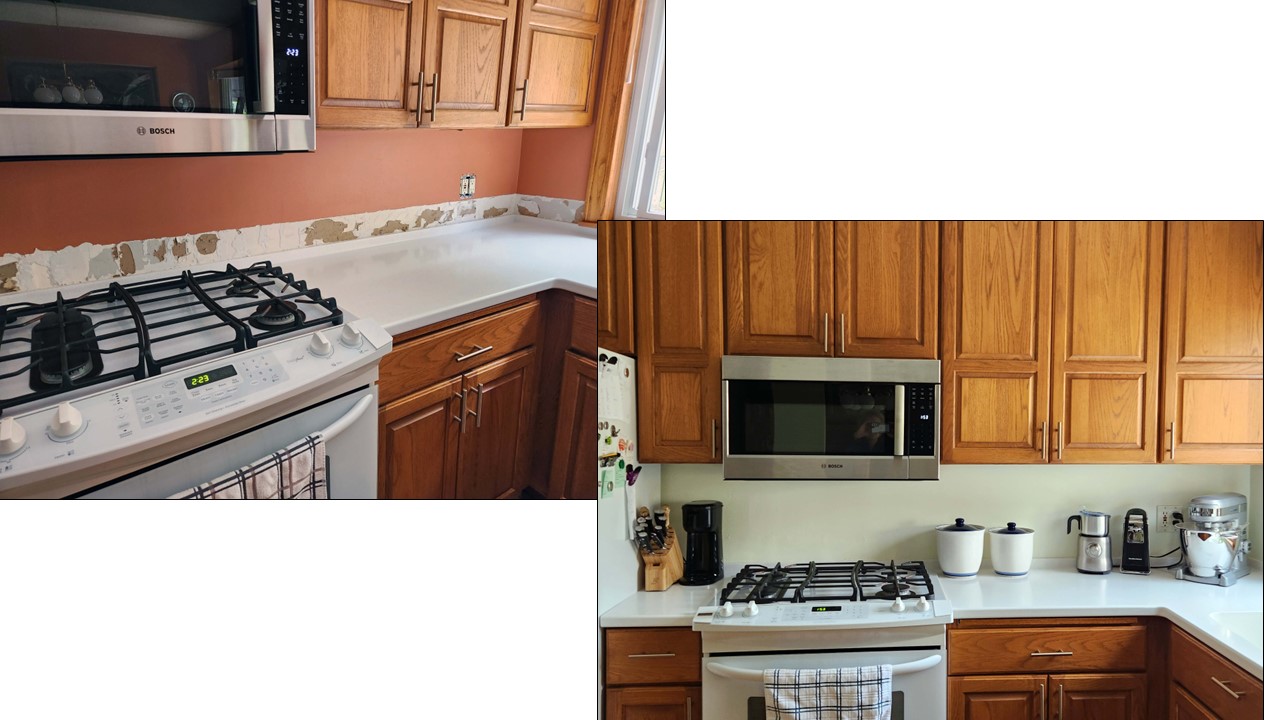
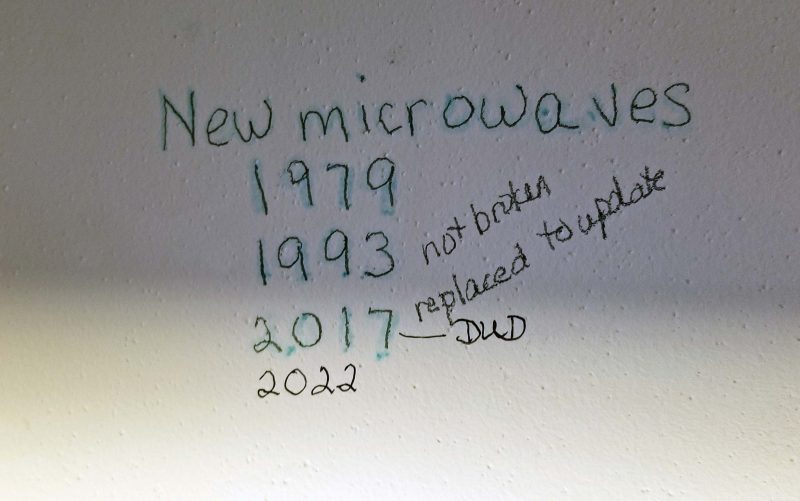
After they removed the old microwave, the installation guys commented on my notations on the wall behind it. When we moved into this house in 1979, microwaves were new and not everyone had one. We updated the kitchen in 1993 and replaced our original 14-year-old microwave with a new model–the white Maytag pictured above. That workhorse was still going 24 years later when we (mistakenly?) retired it in 2017. I noted on the wall that the 1993 Maytag was “not broken” but “replaced to update.” You can see what I thought of the one we replaced it with–the Whirlpool that only lasted a little more than four years. Does “dud” clearly convey my opinion?
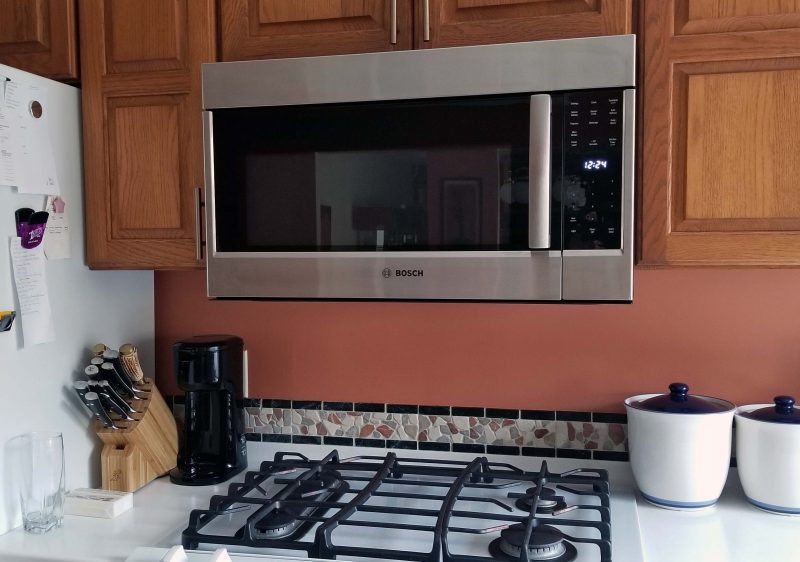
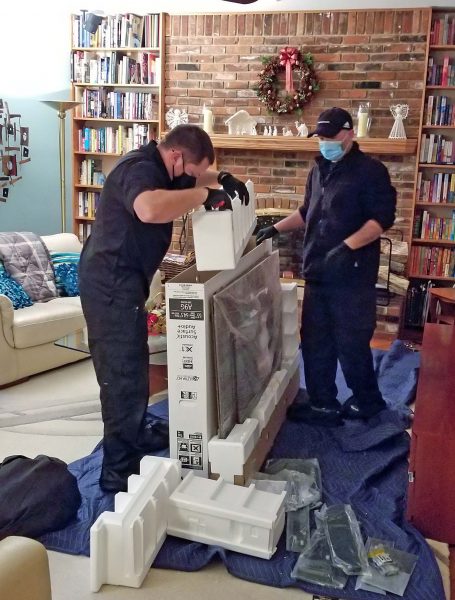
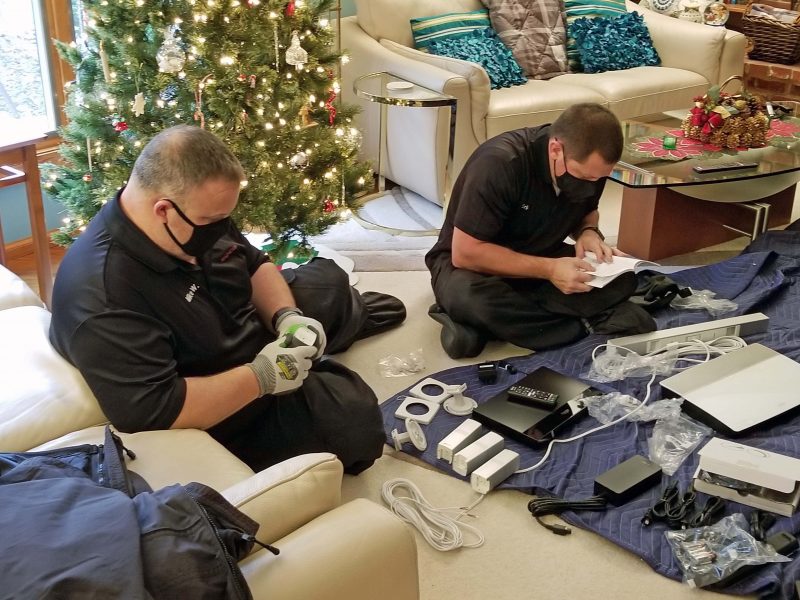
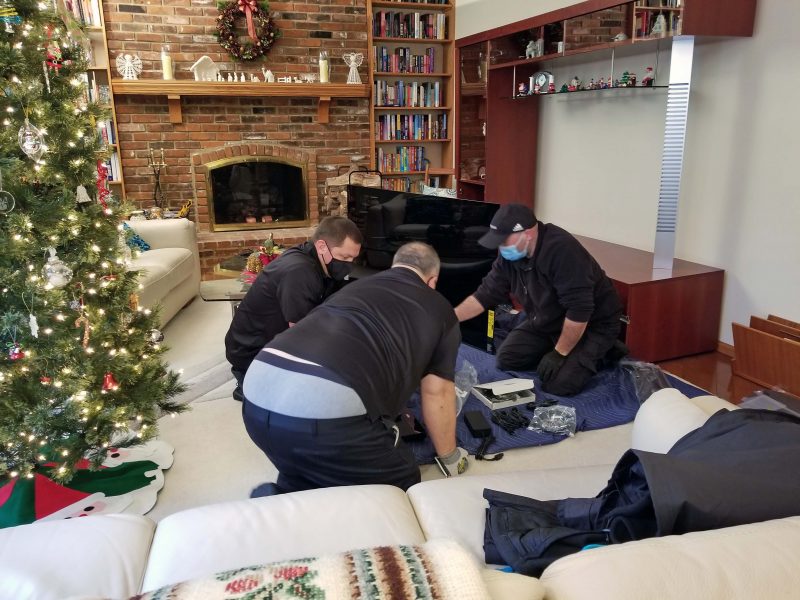
Ted and I installed the Whirlpool, but the new Bosch came with free installation (Total Tech benefits from Best Buy), so we let the pros do the work this time. They finished in 30 minutes–much faster than Ted and I did four years ago. It helped that: (1) they knew what to do without reading the step-by-step installation instructions; and (2) there were two of them to hold the weight of the unit while the third one screwed it in place, compared to only Ted and me working.
Frankly, Ted and I didn’t realize how much we use the microwave until it went completely dead about a month before the new one arrived. Without a microwave, we had to adjust menus to avoid needing the microwave, and we became adept at heating some foods in a double boiler to keep them from drying out in a pot or a fry pan. (A double boiler takes a lot longer than a microwave!) The Bosch looks very similar to the Whirlpool, but everything about it feels more substantial. We’re happy to have a working microwave again and we hope this Bosch model will be good for the long haul.
We run a dehumidifier in the basement over the summer to keep the concrete walls and floor nice and dry in the St. Louis humidity. About ten days ago, we received a letter informing us that the dehumidifier we’ve been happily running 24/7 for six consecutive summers could unexpectedly burst into flame. We qualified for a settlement equal to half the price of the dehumidifier. To claim the money, I had to submit the usual information–name, email address, model and serial number, etc. as well as a photo of the dehumidifier showing the specification sticker, model number, serial number, my name, the date of the photo, and evidence that I had cut the power cord on the device.
I emailed that information to the specified address on (see below) October 17. Today, only seven days later, a check for close to $150 arrived in the mail. That’s the fastest re-imbursement I’ve ever experienced! We’ll buy a new dehumidifier next spring, but we already have half the cost of it covered by this refund. Whoopee!
The exterior of the entire first floor of our house, as well as our beehive-style chimney, is made of antique bricks. (Antique = recovered from a torn-down structure.) Ted and I like the look of the antique bricks, but they’ve been here for 42 years and we noticed there are some bricks in the chimney that appeared to be loose, as well as some on the house that have broken edges from weathering. We called Mr. T, our chimney sweeper, and asked him to check things out and to do whatever tuckpointing is necessary. He replaced the loose bricks in the chimney about a week ago. After an entire week, I happened to look upward to the roofline and saw something on the roof ridge. It’s on the right end of the ridge.
Ted got out his ladder, climbed up on the roof, and removed the half-full can of diet 7-Up. Way to go, Ted!
Last summer, as we biked and biked and biked through the neighboring subdivisions, Ted and I noticed that quite a few homes have planting borders by Curb Appeal. We talked to some of the homeowners and they were all very pleased with the work they had done. In spring, we went to Curb Appeal, made our selections, and signed a contract to have the work done. John, the manager, said they would schedule us when our concrete work was completed because the curbs butt up to the concrete edges in some places and it’s easier to do them last. The concrete work wasn’t finished until September 23, so Curb Appeal scheduled us for the prep work October 1 and installation the following week. It was an interesting process to watch.
Prepping meant cutting away the sod where the curbs would be laid.
HOW TO LAY CURBING
There’s a machine in one of the trucks that mixes the concrete blend. Then it gets dumped into the yellow wheelbarrows you can see in the photo below and taken to where it’s needed. Those wheelbarrows have a little motor (you can see it on the wheelbarrow in the photo above) that is engaged by a lever on the handle. I bet that makes it a lot easier to haul concrete around! One guy shovels the mix into the curbing machine (below) and the machine operator (John) works backward as the machine releases and forms the curbing. The machine also lays two lines of rebar within the curbing as it moves.
After the curbing is laid, the finishing guy smooths it out and gently sweeps off the scraps.
The next step is to cover the curbing with release.
Then the finishing guy takes a roller with a pattern on it and rolls it over the curbing, first in one direction, then in the opposite direction, to create a pattern on the finished curb.
The expansion joints are cut about two inches deep on three sides–front, top, and inside edges.
Then the excess release is blown off. This mess isn’t bad at all. Check the following picture to see how much dust the concrete crew raised.
The guys did a nice clean-up job, raking the lawn and picking up the stray crumbs of concrete from inside the curbing as well.
The final step is to spray a sealant on the curbing and to tape off the area to avoid anyone stepping on it while it dries.
HOW TO LAY STEPPING STONES
When John was here for his final check before beginning the prep work, I mentioned that we didn’t realize we needed a sidewalk from the hot tub to the existing sidewalk at the house until the concrete job was finished and we walked around the hot tub. We can go around the hot tub, a pergola post, and the patio furniture (four turns) to reach the existing sidewalk, but a direct route toward the driveway/garage (no turns) would be much nicer. John said they also lay stepping stones. We checked out his displays and decided that would be even nicer than a regular sidewalk, so John marked where the stones would be placed.
To keep the stones at ground level, the ground had to be dug out along the lines John marked. Then he re-marked the edges for a reason unknown to me.
John (right) and Trevor (left) placed heavy-duty plastic in each hole where a stone would be poured. Then the guy in the center brought the motorized wheelbarrows over and shoveled the concrete mix onto the plastic in the holes. John and Trevor moved the concrete around to fill the holes completely and flattened the tops to ground level.
Trevor sprinkled release on the stones and then pressed a stamp on each one to give it a stone-like texture. When he finished, John used a little blow-torch to melt the excess plastic away from the edges of the stones. I guess, in theory, we could dig down a few inches and lift the stones out of their plastic beds.
Of course, the excess release had to be blown away. Of course, we had to clean the excess dust off the surrounding concrete, furniture, etc. It wasn’t nearly as awful as the clean-up after the concrete work.
Just like the curbing, the last step was to spray sealant on the stones and to tape off the area.
We really like the results and have been getting a lot of compliments from passers-by on how nice the concrete and the curbing look.
This area (curbing around the trees in the left center and around the arbor vitae hedge on the right) looks even nicer now because the grass has come in and the stepping stones are surrounded by green. They provide a great shortcut from the storage shed and the hot tub to the driveway and the garage. That’s one more home improvement job checked off the list.
In March, Ted and I signed a contract to replace our concrete. That contractor backed out in early July and returned our deposit. We signed another contract for the same job and, on August 16, we got The Call: “The crew will be starting the work on your job next week Monday.” It was time to do our prep work–removing and relocating our decorative rock from areas scheduled to be covered with concrete, getting all the outdoor furniture out of the way, moving the firewood, etc. Picking up the rock was the crummiest job. Ted shoveled what he could and I sat on the green gardening mat and tossed all the rock his shovel missed–about a third of it–into the wheelbarrow, which he then dumped into a different (unthreatened) rock bed.
The contractor for the hot tub pad poured a few extra inches on each side so we wouldn’t have to carefully balance the hot tub on the pad. Beginning with the first time we got into the hot tub, we wished we had enough concrete to walk around the hot tub and to slide the cover back without standing in the sometimes wet and (in the winter) always cold grass. We marked a larger area for hot tub concrete. Notice that the beds on each side of the hot tub are bare of rock. Thanks, Ted and Diane.
It didn’t take long to get tired of hearing a jackhammer. When the crew broke up the front porch, the entire house trembled. We might have to watch for cracks in our drywall. When I walked past the dining room door, I noticed a casualty of the jackhammer vibrations.
At the end of the first day, the patio was rubble. Patio party, anyone?
Whenever a concrete truck arrived, the name of the game was “hustle!” A full crew of five guys showed up and everyone moved as quickly as they could. It was impossible to bring the concrete truck into the back yard, so two guys were in charge of toting wheelbarrows filled with concrete from the truck to the patio area. If the guys pushing the concrete into place finished pushing before the next wheelbarrow load arrived, they shouted “Pour!” which I think translated to “Hurry up, we’re waiting for you.” When I complimented the boss on their choreography, he laughed and said, “And we didn’t even bump elbows, did we?” No, they didn’t.
Yes, everyone hustled–except the truck driver. He relaxed while waiting for a wheelbarrow to arrive, then opened the chute to fill the wheelbarrow with concrete. The temperature was in the middle 90s, but this guy didn’t break a sweat.
Dusty opened packages of new stamps and they looked like flowers lying on the lawn. Within minutes, the new stamps were coated with release and looked like the older gray stamps on the left.
Ted and I wanted to watch the stamping process, so we set up a peanut gallery (Howdy Doody reference) for ourselves. In the earlier photo (above), the Christmas-wrapped hot tub looked pretty clean. Not any more. Notice the dust around the crew members as they tamp the stamps into the concrete, forcing the release to poof out in every direction.
The stamps butted against each other like a puzzle. This corner is stamped, and Eddie is putting a stamp marked with texture only–no lines–against the side of the hot tub (upper right). After stamping the texture, Matt and/or Rick used finishing wheels to draw lines by hand in the texture pattern to match the stamps all the way to the edge of the previously installed hot tub concrete.
Ted and I thought the stamping process was dusty, but that was nothing compared to the dust raised when Matt cut the expansion joints. The dust is going higher than the house! This is the day we decided to schedule a power wash company to clean off the house. There’s not much wind, so Dusty (green shirt, standing on the patio at the fence) is visible, even though Matt (using the saw) is not. These guys picked up the broken concrete pieces with bare hands and never wore masks while they worked in all this dust. I can’t help wondering what their lungs look like.
Breaking up the front sidewalks and the driveway was easier because there was room for Matt to use the bobcat. First you lift a section of the sidewalk and break it away from the adjoining sections.
Then you load it onto the forklift.
And then you dump it into the dump truck. The guys filled six dump trucks with concrete rubble plus one trash bag. On this day (and most others) there were trucks with equipment trailers, pickup trucks, and the dump truck parked along the street on both sides of our yard. Add the concrete truck on the days they poured concrete. Our neighbor generously allowed us to park our cars in his driveway for the duration. This was trash day, and Ted and I were looking for a place to put the trash can so the trash pickup guys could find it among all the big trucks. We usually set it where the dump truck is parked. Matt (in the bobcat) saw us with the trash can and said “Put the trash bag in my scoop and I’ll put it in the truck.” Problem solved.
It was disconcerting to open the front door and see a huge concrete truck pulled up to the front porch. Two layers of 3/4-inch plywood covered the area where the truck drove.
There were some concrete glitches. One day, a truck arrived with plain–not colored–concrete, so there was a delay waiting for another truck. The crew filled the time by prepping other areas for the following day. The day the patio was poured, there wasn’t enough concrete to finish the job. The unstamped tan concrete in the photo below shows how much they were short. The tan color is Ted’s and my goal, but the stamped work is currently all charcoal gray with release powder. Matt (the foreman and the owner’s son) assured us that our finished concrete will be tan. It was hard to keep the faith. Unbelievably, people walking by complimented us on how great that gray, powder-covered concrete looked for the week it was curing! Note: Check the dust level on the hot tub now. You can’t even see the hot tub through the (formerly) clear plastic. Picture everything in the yard and on the house similarly covered with release dust.
Here’s Dusty, using the hand wheel to trace all the stamping lines, making sure they are even. I had to take the picture through the window screen to keep out of Dusty’s way.
All the sheet-covered stuff in the left half of the photo below is our outdoor furniture and pool toy shed. When Eddie saw the Star Wars bedsheet, he asked if we have the full set. I told him, “We used to.” It reminded me of a high school field trip Kari’s class took to the Science Center. A Star Wars exhibit was on display and she said everyone was saying “My brother had those sheets.” So did Eddie. The posts on the sawbucks were supporting the front porch roof. As long as they were down, Ted and I decided it would be easy to stain them before the guys re-install them–we just ran a roller over the four flat sides of each post. While we were staining, we noticed that the posts are rotting on the bottoms from sitting on 42 years of rainfall on the porch, so we added “new porch posts” to our to-do list.
The spot where Matt is kneeling has always formed a puddle when it rains, or when Ted washes cars, or when I hose off the driveway. We’ve always had a low spot in the back yard too. Rick (the boss man and owner) suggested a French drain beginning at the low spot in the back yard, then running under the driveway and the front lawn to the street to eliminate the wet area in the back yard and the puddle in the driveway. He connected the driveway drain and both downspouts on this end of the house to the drainpipe. Again, problem solved. In the photo below, Matt asked for a small amount of concrete from the truck and pushed it into place around the drain before they poured the driveway.
Here we have Matt, Eddie, Todd, and Dusty, roughly smoothing the first section of the driveway. They poured the driveway in three parts on three days. The light square in the lower right is the covered drain, safe from the rest of the concrete.
It was interesting to see how the back doorstep was framed. Matt drilled holes for the rebar posts, cut the posts off to be shorter than the finished step, wired them to the frame, and held everything in place with wooden spacers. They’re ready to pour the step.
Lunch break. Most days, the guys had Jimmy John’s for lunch. One day, they skipped lunch because they were busy pouring, smoothing, and stamping a load of concrete. Sometimes they sat in the shade of a tree. On this day, Eddie used the hot tub as a table and the other guys sat on our tipped-over wood rack. The plastic wrapping has been removed from the hot tub at this point. Even with the protection of plastic wrapping, you can see a layer of gray dust on the hot tub cover. For most of the nine days the guys were pouring and stamping, the temperatures were in the mid- to upper 90s and the heat indices ranged from 100-110 degrees. Matt told me that when they removed the protective plastic from the hot tub, they discovered it had melted to itself and they had to cut it off.
After the last pour, two guys stuck around for an eleven-hour day and hosed the loose release off the dry concrete. The sections poured on this day couldn’t be hosed yet. That’s why the end of the driveway near our cars is more gray than that in the lower part of the photo.
After everything was hosed off, the concrete needed two days to dry so moisture would not be sealed into it Then the sealing process began. It took a crew of three most of two days to apply three coats of seal. The seal added depth to the tan color of the concrete. The first coat was thinned with Xylene to remove any remaining moisture in the concrete. The second coat could be applied within 30 minutes, because the first coat dried so quickly. The third coat was applied more heavily and we were advised not to walk on it for 24 hours. We were allowed to put the lawn furniture back on the patio after 48 hours and to drive the cars into the garage after 72 hours.
First, Ted needed to wash the cars. Both were filthy and his water ran black. They are now touchable again. Note: The newly installed drain worked. There was no car-washing puddle in the driveway. Here’s a before and after photo of the old and the new concrete in the driveway.
And here’s a before-and-after look at the concrete on the patio–from terra cotta rectangles to tan flagstones. Rick (the concrete company owner) stained the edges of the hot tub pad to make them look nicer with the new concrete. You can’t see it in the photo below, but it’s dark brown and provides a decorative contrast to the new tan concrete.
With the fascia, shutters, and windows all updated on the exterior of the house last year and with the new concrete this year, Ted and I decided we needed a new mailbox to complete the fresh look of the house. We wanted a brown mailbox mounted on a stained cedar post with gold-toned house numbers. Apparently, most other people want a black or white plastic mailbox and post with black or silver house numbers. We did a lot of shopping. Mission accomplished. The new mailbox looks better than the old one.
The concrete truck, the digging, the release, and everything else that went with the job created an unbelievable mess. It was a huge relief when the power washing guys came and cleaned everything off so that we now have a touchable outdoor space that we can enjoy again. The old concrete needed to be replaced, the new concrete looks good, and Ted and I are so-o-o-o glad this project is finished. Halleluja!
When Ted and I bought our first house and felt “settled,” one of the things I wanted was a set of good kitchen knives. We shopped and bought Gerber knives. After 48 years of use and sharpening, they have become notched at the handle end of the blade. The arrow shows where the blade edge used to be flush with the visible portion of the tang. I decided it’s time for new knives.
I checked all my knives and noted which ones I use a lot, which ones I might not replace, and which other styles of knives I might want. I decided to keep the bone-handled knife and honing steel Ted and I received as a wedding gift because they are so beautiful. And yes, that’s the honing steel I was using when I sliced my wrist.
I liked my Gerber knives, so I went online to see if I could get some more. The answer is “no.” I learned that, in the 1970s, sometime after I bought my kitchen knives, Gerber dropped its kitchen line and now makes only hunting knives. I don’t hunt, so I did some more online research, went to Williams-Sonoma to see what they had to offer, and decided to go with Wüsthof. I kept the wedding gift knife and the Miyabi rocker knife I bought several years ago and added eight new knives. I treated myself to a new knife block as well. Of course, the supply chain is still out of whack from the COVID pandemic, so I only took one knife home with me. The rest trickled in, one knife at a time, over a period of three months. (Don’t you just love the supply chain?) Each knife arrived over-packaged. Does Wüsthof have only one size shipping box? On the other hand, none of the knives had shipping damage.
The new knives are amazingly sharp! Wüsthof sharpens its knives to a 14-degree edge; most knives are sharpened to a 15-degree edge. That single degree of difference is definitely noticeable.
Now that I have new knives, what shall I do with the old ones? I asked Kathy and Kari if they were interested in them. Kathy already has a set of knives and a knife block, but Kari said my old knives will be better than what she currently has and she’ll take the block too. That was easy!
When I removed the knives from my old block to replace it with the new one, the old one looked pretty bad. That’s not surprising, since it’s 48 years old and has been used daily. You can see how putting the knives and the honing steel in and out created wear on the openings, and how the finish at the bottom edge is worn from years of wiping the countertop beside the block.
I felt badly about giving something that looked so worn to Kari, so I decided to refinish the block for her. It was easy to sand the finish off with my power sander. You can see more damage on this side of the block where it rubbed against the side of the refrigerator for many years. The bare wood shows where I’ve partially sanded the block.
When I had the block sanded clean, the wood was beautiful. I finished the sanding portion of the project with a 600 grit sandpaper, and that made the surface feel as smooth as glass.
The next step was stain. I almost hated to put stain on the wood because the bare wood looked so pretty. I debated leaving the natural finish but, in the end, I went with a wiping stain and rubbed it in as much as I could.
When the stain dried, it was time for varnish. I tried spray-on varnish for the first time. I wanted only a thin coat of varnish, and I thought it would be easier to apply a thin coat with a spray than with a brush. Luckily, we just bought a storage shed. Ted suggested we use the shed box to form a wall to catch the overspray.
The spray varnish dried to touch in about five minutes and was thoroughly dry in four hours. With such a short drying time, it was possible for me to spray all sides of the block right away, rather than waiting a day to do whichever side had been on the bottom. When the entire varnished block was dry to touch (roughly 30 minutes), I fed a wire through the honing steel opening and suspended the block from two nails in a ceiling joist to finish drying. I hung the drying block over a step stool so that if the wire hanger failed for any reason, the block wouldn’t have far to fall.
And here’s the re-finished block–not looking shabby–for Kari. I haven’t re-finished anything for a few years, so this was fun for me. Now Kari and I both have updated kitchen knives and blocks.
I’ve mentioned before how much I’m enjoying the little hibiscus tree I bought for the summer. It was worth every penny for the joy it brings with its daily blooms. The blooms only last one day, but it’s always covered with buds. They begin to open when the sun rises and they begin to close at dusk. The following day, they self-deadhead and drop to the ground. We usually have 4-6 blooms at a time but, one day, we had eight and today we set a record of nine blooms. I’m planning to buy another hibiscus tree next spring.
The severe thunderstorm that struck our area a few days ago destroyed our pool toy storage shed, so we had to buy a new one. Assembling the new shed provided us with an afternoon outdoor project in beautiful weather, so it was (mostly) fun.
The basic shed assembly wasn’t too tough. There were eight pieces: a floor, two side panels, two back panels, a roof, and two doors. I like putting things together and Ted is a Master Assistant when I’m working on stuff. He let me do most of the assembly work while he handed me tools like a surgical aide and held pieces in place while I joined them together.
Everything was pretty straightforward except attaching the doors and finishing the roof. The black metal hinges on the doors (photo below) snapped into place and then required a bolt through each hinge for extra security. With one of us working on each door, I think Ted and I spent more than 45 minutes trying to get those 6 bolts screwed into place. We managed to get the top and bottom ones in tightly, but eventually gave up on the middle ones. It looked and felt like the metal exit holes for the bolts were smaller than the diameter of the bolts. We could see the ends of the bolts in the holes, but we couldn’t make the bolt threads turn their way through those holes. We finally made an executive decision to let the top and bottom bolts do the heavy hinge work on the doors and to let the snapped-in-place middle hinges go along for the ride.
It was easy to snap the roof onto the two hinges on the back panel, but we wondered what would prevent the front of the roof from blowing upward in a breeze. The pictures and directions for finishing the roof were confusing, but we finally figured out how to position the steel support bar in the surface maze of the roof. The roof locking piece was more of a mystery. Eventually, we found a place on the roof where it would fit and a notch on the side panel that would hold it and lock the front of the roof to the top of the side panel. Now it won’t flap up and down in the wind.
With everything feeling secure and looking good, we put the shed on our flat dolly, wheeled it into place, and added the pool toys.
All set! It looks good and it’s guaranteed for 10 years. We had a good run of 11 years on the old shed, which is now at the recycle center, preparing for its next life.
While we’re here, look at how the storage shed fits into the corner of the chimney and the house. The storm winds pulled the old shed out of this nook, ripped off the padlocked doors, turned the shed around, flipped it over, and threw it into the open area in the right center of the picture, all while keeping the pool toys inside. Mother Nature is a crafty old gal!
According to Alfred Lord Tennyson, “In the spring, a young man’s fancy lightly turns to thoughts of love.” A homeowner’s fancy, on the other hand, turns to thoughts of outdoor spring clean-up. That’s what Ted and I have been doing for the past few weeks.
We had a new pool liner installed.
We had a new pool pump installed.
We drained and cleaned the hot tub.
We had the air conditioner inspected and cleaned.
We had the irrigation system turned on.
We bought a redbud tree to replace the maple tree that was removed last summer. The nursery planted it, but Ted and I removed grass from around the tree and replaced it with weed-resistant fabric and decorative rock.
We planted flowers. I shopped for and selected flowers while Ted ran other errands. I fell for a hibiscus tree (center, ahead of Ted). It won’t survive the Missouri winter, but it should be gorgeous all summer.
We hauled the lawn furniture out of the storage shed and washed it.
We took the covers off and chased the bugs out of the outdoor umbrellas.
I washed all the dirt off the concrete while Ted put things away.
We’re finished and ready to relax in our backyard resort while we let our fancy lightly turn to thoughts of something else.
We had a new pool liner installed a few weeks ago and we thought we were ready to swim. Then, one day while Ted and I were working in the pool area, we noticed that the pool surface had a lot of leaves on it. They should have been sent to the skimmer, but we discovered that hadn’t happened because the pump wasn’t running. I couldn’t get it started, so I called the pool company. The service manager (Jim) told me “That doesn’t make sense. I’ll come out and look at it.” He tried everything in his bag of tricks, but nothing started the pump. He told us he’d be back the next day with a new pump.
Jim and his daughter came back the following day and replaced the old pump in about 30 minutes. Now that we have a new liner and a new pump, we should be good for at least ten years.
The arrow points to the old pump. The new one is in the box on the right.
Three years ago, we planted an arborvitae hedge. The trees on each end are doing very well, but the trees in the middle don’t want to grow. One tree died in the first year and was replaced under the warranty, but now we have four trees in the center area that are failing. The difference in size between the trees on the ends and those in the middle is obvious. You can’t see between the end trees, but there’s lots of space between the stubby center ones–just where we want the privacy. The trees were all planted at the same time except for the totally brown one, which was replaced after the first year. The replacement lasted about 18 months. That spot in the ground has now killed two trees in three years. When we ordered this round of replacements, the landscaper suggested having the crew overdig the holes and put in new soil.
The landscaper’s suggestion made us think a soil test might be a good idea. I thought we’d have to go through the county extension service, or at least a nursery, to get an expert to perform a soil test. I shouldn’t have been surprised, but when I searched online for someone to do a soil test, I discovered that soil test kits are available at–where else?–Wal-Mart.
This is the stuff included in the testing kit. As I set out the instructions, the soil samples, the test tubes, the chemistry tablets, the distilled water, and the color chart, I felt like Bill Nye the Science Guy. All I needed was safety goggles. It brought back memories of high school chemistry class when we did experiments on Fridays.
Soil testing isn’t hard, but it’s definitely time-consuming. It took me about four hours to test six soil samples. The results showed that our troubled center section of arborvitae trees could use some pH and a lot of nitrogen, and our magnolia trees could also benefit from some nitrogen. Ted bought some nitrogen and treated the magnolia trees. The landscaper’s plan to add new soil might solve the arborvitae problem, but I guess we’ll have to test the new soil to find out.
Last week, we needed to get our pool ready for the scheduled installation of a new liner. The first step was to remove the winter pool cover. Ted estimates the cover weighs about 80 pounds, not counting the water it picks up as we drag it over the pool to remove it. I think his estimate might be low. I had already washed the driveway so we could spread the cover out to hose it off before we pack it away until late fall. Our neighbor, Will, saw us washing the pool cover and said, “Oh, no! If you guys are opening your pool, it’s going to snow next week!” Hahaha.
While the cover lay drying in the sun, we started draining the pool. With the pump pulling the water out through a two-inch hose, that took about 5 hours. While waiting for the pool to drain, I power washed the winter dirt from the pool deck and the patio, and hosed off the sidewalks and the front porch. Ted brought out a few more pieces of lawn furniture for the nicer weather, then mowed the lawn.
With a new liner coming, we wanted the pool steps and the upper edge around the pool to be sparkling white. It’s much easier to clean the edge by standing in the pool than to kneel on the pool deck, leaning over the water to scrub it. Since the pool was empty, Ted got to work.
If you’re a long-term reader, you might be thinking, “Didn’t they just put in a new liner a few years ago?” You’re right; liners should last at least 10 years. Look at the top edge of the liner in the photo above. It looks like there’s a dark border, but that’s not a border; that’s how much the liner faded in 3 years. When the pool guy saw that, he said it should have lasted much longer (say, 10 years), so he activated the warranty to save us a chunk of money on the new liner and on the installation labor. A closer look at the liner in the photo below clearly shows the fading. It also shows why Ted is scrubbing dirt off the top white edge.
The pool crew arrived bright and early the next morning. They cut around the bottom edge of the liner and removed the bottom piece, then released the sides, and carted it all away. There was some clean-up to be done before dropping the new liner. Hard objects and / or deep depressions under the vinyl liner can result in puncture holes, so a complete and detailed vacuuming and some touch-up fill work were needed.
Two hours after the crew arrived, they had the new liner dropped and they were making some final adjustments before working out all the wrinkles and installing the jets, the light, and the drain covers.
The guys started filling the pool before they left and told us to turn off the water when it reached the bottom step. The next morning, they came back to adjust any remaining stubborn wrinkles that had been pushed ahead of the water. After that, we were “go” to fill it all the way. With two hoses running, it took 16 hours to fill the pool to the top. One of the pool crew guys came back the next day to install the ladder and the railings, to turn on the pump, and to check the equipment to make sure everything was running well. We are now ready for the 2021 swim season.
Meanwhile . . .
Having a new hot tub means having one more thing to clean up in the spring and in the fall. We’ve been enjoying the hot tub for almost six months, so it’s time to freshen it up. That job turned out to be a lot more time-consuming than we’d expected.
The obvious first step was to drain the hot tub. It sounds easy and there really isn’t anything to do except connect a garden hose to the hot tub drain. BUT, first you have to bring the water temperature down from that lovely, relaxing 104 degrees. The owner’s manual suggested 24 hours, but the overnight temperature dropped to the low 40s, so cooling the water wasn’t a problem–we just took the cover off and let the night air do its thing. The water was more than cool enough by morning, so while the pool was draining, we connected a garden hose to drain the hot tub. Draining it took a surprising 5 hours–the same amount of time it took to empty the pool, which has about 34 times more water than the hot tub. We did not see that coming! Talk about a setback in your schedule! The pool’s two big drains, its pump, and its two-inch drainage hose work a lot faster than a 5/8″ garden hose counting on gravity to do the work.
When the hot tub was (finally) drained, I started cleaning it while Ted cleaned up the pool. It sounds amazing when the literature and the salesman tell you that your hot tub has 6 gazillion jets. “Ooh, aah,” you say. “Is that the most we can get?” It’s a different story when you have to remove every jet to clean it. My sore fingertips felt like I unscrewed and pulled out about 6 gazillion jets, but I reasoned there probably weren’t more than 120. Hah! When I finished, I counted them and came up with only 62 jets–half of what my fingers “reasonably” felt like I had removed.
The jets had to be soaked in a vinegar/water mixture for 3 hours to remove any built-up residue in them. The two extra large jets that provide an awesome foot massage didn’t fit well in our pail and dishpan with the other jets, so we put them in the pail after the first load of jets was finished soaking. As a result, the total soak time was 6 hours. We opted for the extended time because we’d already used 1.5 gallons of vinegar and we didn’t feel like making another trip to the grocery store for more vinegar to do only two more jets.
While the jets soaked, I scrubbed. The pool store sold us some awesome non-sudsing cleaner for the tub surface. I just sprayed it on and wiped it off, and it left the surface as smooth and clean as if it had never been used. No hard scrubbing needed. I bet it would work great for cleaning the bathroom.
After removing and washing the headrests, I moved on to the exterior of the hot tub and wiped down the sides to get rid of the winter grit. The final cleaning task was to wash the cover and apply a coat of protectant to help prevent premature fading and weathering. That was pretty simple too–just time-consuming. Aren’t you impressed that Ted’s pictures show me smiling while I work? I feel like a TV ad. The truth is, the job wasn’t awful, but I’m good with only needing to do all of this twice a year, and we both feel that way about the pool too.
At last, I could put the garden hose inside the hot tub to fill it. It filled in about 45 minutes, but it wasn’t warm enough by evening to relax our sore muscles from all the work of cleaning the pool and the hot tub.
After spending two days getting our waterworks cleaned up for the summer season, there’s a change in the weather forecast. After a high temperature of 75 degrees today, tomorrow’s forecast includes falling temperatures, rain possibly mixed with up to one inch of snow, and an overnight low in the mid-20s. More of the same is predicted for the following day and night, except the temperatures might be a few degrees warmer. Will was right. It’s been a week since we opened the pool and we’ll probably see some snow tomorrow.
Ted and I signed contracts for four major home projects in 2020 and learned immediately–with our first contract–that nothing was going to be finished quickly.
Hot tub: 22 weeks. Signed contract June 13; installed November 13.
Replace fascia and paint shutters: 16 weeks. Signed contract August 26; finished December 14.
Update home media: 10 weeks. Signed contract November 4; installation complete January 14.
Replace kitchen bay window and basement windows: 22 weeks. Signed contract August 31; installation complete February 2.
Our 2020 house projects are finally finished. When we started, we had no idea it would take so long; by the time we finished, we’d come to accept long delays as the 2020 way things are done.
Ted and I checked off our final major home project of 2020 last week with the installation of seven replacement windows. We think our basement windows are at least 35 years old, and the seals have been broken for several years. We didn’t worry too much about them because–hey!–it’s the basement. But when the 20-year-old seals on the three kitchen bay windows began to loosen, we decided it’s time to replace windows.
Our family room window wall is an Anderson window. It’s 35 years old and still going strong, so we went with Replacement by Anderson for these windows. They are so precisely custom-made that a specific employee came to the house to take measurements and to verify that our bay window was properly hung from the header by cables so it wouldn’t collapse from the weight of the new, heavier windows. If it wasn’t properly built, we would have had to rip out the entire structure and replace it.
Five-and-a-half months after signing the contract and paying the deposit for the windows, John and Rob came to our house and got to work on the installation. They started with the bigger job: the three bay windows. Here’s how you replace a bay window:
First, you build a little plastic room to use as your work space. John told me this serves several purposes: (1) It provides a measure of safety during the COVID pandemic; (2) it helps contain the construction mess; and (3) it prevents the rest of the house from getting too cold. It was 15 degrees when the guys arrived and when they left, the temperature was just over 30 degrees. You can see Rob inside his plastic work space. Note: It was over 90 degrees on the day we ordered the windows.I’m just sayin’. 2020 and all.
Window removal began with John and his sawzall, cutting around the frame of each window. John was the boss-man of the job, so he did the cutting.
Rob’s job was to direct John to stay in the window lines and not cut the wood trim inside. You can see John’s sawdust on the window seat.
After cutting all the way around, Rob pushed and John pulled to remove the window.
After removing all three windows, the guys got to work and scraped out every tiny bit of old caulk. They even dug in the cracks between pieces of wood to remove caulk. John commented more than once that it was really strong caulk, so I think he had to work harder than usual to remove it.
Rob gets a little break while John unpacks a new window. You can see John’s reflection in the family room window.
Before putting the new window in place, John checked all four sides of the wood framing to see if they were level and square. He told me that in the 17 years he’s been installing windows, this is the first time he’s ever seen window frames that were perfectly square and level. Ted and I have always said that the contractor who remodeled our kitchen–including the change from two sash windows to a bay window–did a fantastic job. The structure was not only built for strength, but it was built level and square as well and fastened with caulk that wasn’t meant to let go. You’d think my dad had done the work! (My mom always said that my dad had everything so securely fastened that if a tornado ever picked up our house, it would fly away in a single piece.)
I was watching the guys push the new windows into place and was so impressed by the fit that I called Ted outside to look. I didn’t think he’d be able to imagine such a perfect fit if he didn’t see it for himself. The windows slid exactly into place on all four sides. The guys tapped them with their hands to push them all the way into the frames. Then John measured and measured and measured to make sure all the edges on all four sides of all three windows were properly positioned. If a measurement was off, the guys tapped that part into place and then John measured everything again. This took as long as scraping off all the caulk. Maybe longer.
The side panels open, but the center window is stationary, although it doesn’t look stationary in this photo. It conveniently hangs from the top before it’s fully installed, so John could screw the sides of the window frame into the wood structure. He told me that once he snaps that panel into place, it’s locked forever.
After deconstructing their plastic COVID/work room, Jason and Rob picked up their mess, swept the patio, and vacuumed the kitchen floor. Meanwhile, Jeremy (John’s brother) took over and installed the outside trim pieces around the windows.
John and Rob returned the following morning to do the basement windows. They didn’t have to saw around these windows to remove them (concrete walls, not wood), so the job was easier. It took over six hours to replace the three bay windows, but only about two hours to install the four basement windows.
First, the guys built another COVID-safe work area. See the plastic wall behind Rob? Again, John measured and measured the frames, but this time it was before he removed the old windows.
After removing the sliding glass panels, he hauled out his trusty crowbar and pried the old frames loose so he could easily remove the old window.
Then he pulled off the trim. Rob doesn’t have to work too hard, does he?
Unfortunately, the caulk on these windows was also very strong caulk, so scraping it all off kept John and Rob busy for awhile.
When our house was built, it came equipped with standard hopper-style basement windows. In the 1980s, we replaced those with sliding windows, but the steel window frame set in the concrete is designed for hopper windows. That meant John had to put a shim on the top edge of the frame so the sliding windows would fit properly. Our old sliding windows also needed a frame adjustment when they were installed.
After that, John could set the new window in the frame. Again, he had to measure, measure, measure to make sure the window was level and square and also perfectly centered in the steel frame.
After the window was properly positioned, John and Rob stuffed insulation around the edges.
The last part of the job was putting on the trim to cover all those open spaces. Then the guys de-constructed their plastic room, cleaned up the basement, and loaded their tools in the truck.
We chose window styles similar to our old windows, so there’s not a remarkable difference in the appearance of our new windows, but they are definitely very, very nice. The new windows provide such good insulation that they qualify for an energy tax deduction.
When we told our fascia contractor that we were going to replace the bay window, he suggested putting a shingle roof over it instead of the vinyl we currently had. We agreed, so he added it to his contract with us. His crew was here four days after the bay window was installed. It took a little over half an hour to put shingles on the little roof.
The shingle roof isn’t a big change, but we think it presents a more “finished” appearance than the previous vinyl roof.
There are some minor differences–definitely improvements–on the inside of the bay windows. (1) There is only one lock lever on each new side window, instead of the two we had on the old ones. (2) The handles to open the side windows (on the right) snap into the frame instead of sticking out (on the left). As I result, I needed to take the side blinds to the decorating center today to have them re-strung so they will drop all the way down to the window seat like the center blind instead of stopping at the protruding handles. (3) The new side windows open to about 140 degrees instead of 90 degrees, so we’ll be able to catch breezes from all directions. The new frames are a little wider too, so there is less wood trim around each window. I think that makes the new windows look a little bigger, even though the glass area is the same size as the old ones.
The new basement windows also have a nicer lock and a very smooth operation. Overall, though, the most noticeable difference is the absence of those ugly broken seals on the old windows (left).
Next: new valances for the new kitchen windows. I’ve already ordered the fabric. Stay tuned if you want to see them.
For many years, I’ve been experimenting with ways to view Ted’s and my vacation pictures on our big TV screen instead of crowding around my PC or looking at them on a tablet or phone. Over time, Jeff engineered several ways to access my PC to show the files on the TV, but I always had trouble duplicating what Jeff did to make it work. He’s far more intuitive about which key to click than I am, so the menus became mysteries to me and nothing seemed to work after Jeff went home.
One of my requirements for our new entertainment system was the ability to view my computer files on the new TV. Of course, it’s much simpler with a smart TV than with our 20+-year-old plasma TV. We have a new, more modern universal remote for the entertainment system and the installation team programmed the new remote to access my laptop. They named it “PC” on the menu–it’s shorter than “laptop.” I was told that when I scroll down and select “View PC,” five different things happen among the TV, the sound system, and my laptop, enabling my laptop screen to be duplicated on the TV with sound. Great!
The installer walked me through the buttons on the remote and the steps to access everything before he left. Hours later, when Ted and I decided to try looking at vacation pictures, everything worked on the first try. The sound system is the hub of our new set-up, so I had to (1) connect the laptop to the sound system, then (2) click on “View PC” on the remote. And there we are–ready to leave home and head to the Southwestern U.S. in 2017.
I can operate my laptop with a nifty mini keyboard (2″ x 6″) that Jeff gave me for Christmas many years ago. Jeff’s intent at the time was to allow me to control the pictures on the TV from the comfort of the sofa. The keyboard requires two-finger typing because the keys are so tiny, but I only need to use the mouse pad and the arrow keys to change pictures or picture files or to select the “slide show” mode. It works great and does everything a full-size keyboard can do–just as Jeff intended when he gave it to me. The installer said he’s never seen such a small keyboard. Thanks, Jeff.
Just a click of a right arrow brings up the next picture. This is one of the venues at the Polynesian Culture Center (PCC) on our 2018 trip to Hawai’i.
It was really nice to sit comfortably on the sofa to view the large pictures. We enjoyed it so much that we scrolled through three trips last night. Wishes do come true; sometimes, it just takes a few years.
For many years, I’ve done little sewing beyond an occasional minor mending job. This year, however, was different and I used my sewing machine a lot. As a result, I discovered I need some new things in my project room: (1) a decent chair for my sewing machine; and (2) a plastic mat so I can get in and out of the chair without having to come to a half-stand to lift it out of the carpet pile. It was time to shop.
The box informed me that this is not an ordinary chair–it’s a “task chair .” It has “delicate curves,” an “inset” seat design, a “sculpted base,” and (wow!) matching “mobility casters.” Wouldn’t it look odd if the casters didn’t match? Without mobility, would they cast?
I started by taking the parts out of the box. (Duh!)
An hour later, I had a comfortable chair ready to roll on my new plastic mat.
We spent thousands of dollars this year to spruce up the exterior of our house and what did we get? A fresh-looking house.
We spent thousands of dollars this year to install a hot tub and what did we get? An awesome hot tub.
We spent thousands of dollars this year to update our home media and what did we get? Great sound and a sharp picture on a big screen.
We spent thousands of dollars this year to replace windows with broken seals and what did we get? Cookies! We’re still waiting for the windows, but the cookies are really good! Happy new year!
Ted and I decided to update our home entertainment as a Christmas gift to ourselves this year. Everything was scheduled for installation on December 16, but we all know how the COVID supply chain works. Our Christmas gift was delivered and installed today, just in time to celebrate New Year’s Eve tomorrow night.
Step 1: Cut the cable and change from AT&T’s slow (24 mbps) internet to Spectrum’s 400 mbps internet so that we can stream more quickly on our new TV.
Step 2: Install an eero mesh WiFi extender system to improve WiFi reception in the family room, on the patio, and upstairs. Our modem is at my desk on one end of the front of the house. As a result, WiFi is often noticeably slower in the family room, on the patio, and in my upstairs project room–all of which are on the back side at the other end of the house. Here’s a picture of one of the eero units.
Step 3: Replace our old (18-20 years) sound system and plasma TV with a new sound system and a larger, smart TV. That happened today.
Our installation team included Mike, Chris, and Eric. They work together every day and have their jobs down to a system. Chris worked on the TV installation while Mike and Eric focused on the sound system. In the end, everything was correctly integrated. In the photo below, Eric (left) and Chris are unpacking the TV. It’s standing in the styrofoam packing on the right side of the box. Look how slim it is!
The Bose sound system we selected is a brand new model. Eric had to read the manual and direct Mike to do the assembly. The system is similar to previous models, but a few things have changed. The guys made sure they did everything right the first time.
It took all three guys to verify exactly how the sound system needed to be connected to the TV.
Author’s note: After this conference, I was pretty sure Mike’s pants were going to drop when he stood up. Thankfully, they didn’t, but I’ve noticed this year that worker men (as Thom used to call them) have new underwear that doesn’t slide down when they bend over. Thank you!
Moving on, Chris finished the TV hookups while Mike and Eric installed the speakers. It was a symphony in job coordination. That’s probably a bit of hyperbole, but the work was very well done in a clearly team-based manner.
When the installation was finished, the guys (mostly Mike) went through every set-up menu so that all Ted and I have to do is press the power button and choose what we want to watch or listen to. That took some time, but it was included in the service contract. When everything was working, they showed us which buttons to press and how to operate the entire system. They even showed me how to connect my laptop to the system so that I can access my files from the TV. After many years and many different ways of trying, we can finally sit in the family room to view our photos easily on a big screen. If I want to, I can even do computer work on this system because the new TV acts like a large (63-inch) monitor. I don’t want to. This is my space for relaxing and computer work takes place at my desk.
Check out the visible changes in our family room. The guys told us Bose likes to give you a lot of cable. Our previous sound system was also a Bose, and it had a lot of cable. I’m going to cover the bottom portion of the glass in the display case door to hide the cables in the new setup.
The sound system and DVD player yesterday:
The sound system and 4K UHD Blu-ray player today:
Behind the TV yesterday:
Behind the TV today:
The speakers yesterday:
The speakers today:
The 50-inch Panasonic plasma TV yesterday:
The 65-inch Sony OLED 4K smart TV today:
It feels good to be technologically up-to-date. What will we watch tonight?
You get used to how your house looks and don’t pay much attention to it over the 25-year period of time since you installed new siding and shutters. It looks like your house and there are no broken windows, missing shingles, or large pieces of anything hanging from it, so it’s fine. One day last July, however, I came home and looked at the house from the car window. “Ugh!” I thought. “I didn’t realize the dark brown trim had faded this much!” I dragged Ted outside to verify the fading.
A few pieces of roofline fascia blew off in various windstorms over the years and we had it replaced. The color match was good when it was new, but after a number of years, you can’t get exactly what you installed, so the new pieces faded to different shades of brown than the original fascia. The arrows point to the replacement pieces.
We immediately made appointments with three companies and, in August, we signed a contract to update the fascia and the shutters. We opted to have the shutters repainted rather than replaced because they are in good shape except for the fading. When Jerry started removing the shutters, I asked if he minded if I took a picture. He said, “No, but wait a second. Get the back of my shirt in the picture,” so I did. Call JB Exteriors if you need them. The name and phone number are on the shirt.
After 25 years, there were a lot of vacant mud wasp nests behind the first-floor shutters and there was a lot of dirt behind the upstairs shutters. I power washed the mud off the bricks and Ted went up on the roof to wash the siding. The arrow points to some remaining dirt Ted is heading for.
Our name made it to the top of Jerry’s work list by November–only three months after we hired him. Jerry is the boss, so Don got tagged to do the job. He set up his equipment beside the driveway, put his ladders in place, and went to work.
The painter was backlogged, so the shutters were installed last week–five weeks after the fascia work was finished. Now our house looks fresh again and all the fascia and shutters are the same color. It took from July until December to go from meeting the contractor to finishing this relatively small job. It sounds like 2020, doesn’t it?