Just so Ted and I could see the difference after we finished our interior update, I took “before” pictures around the house. Now that we have “after” pictures as well, it’s good to see that all the work was worth it.
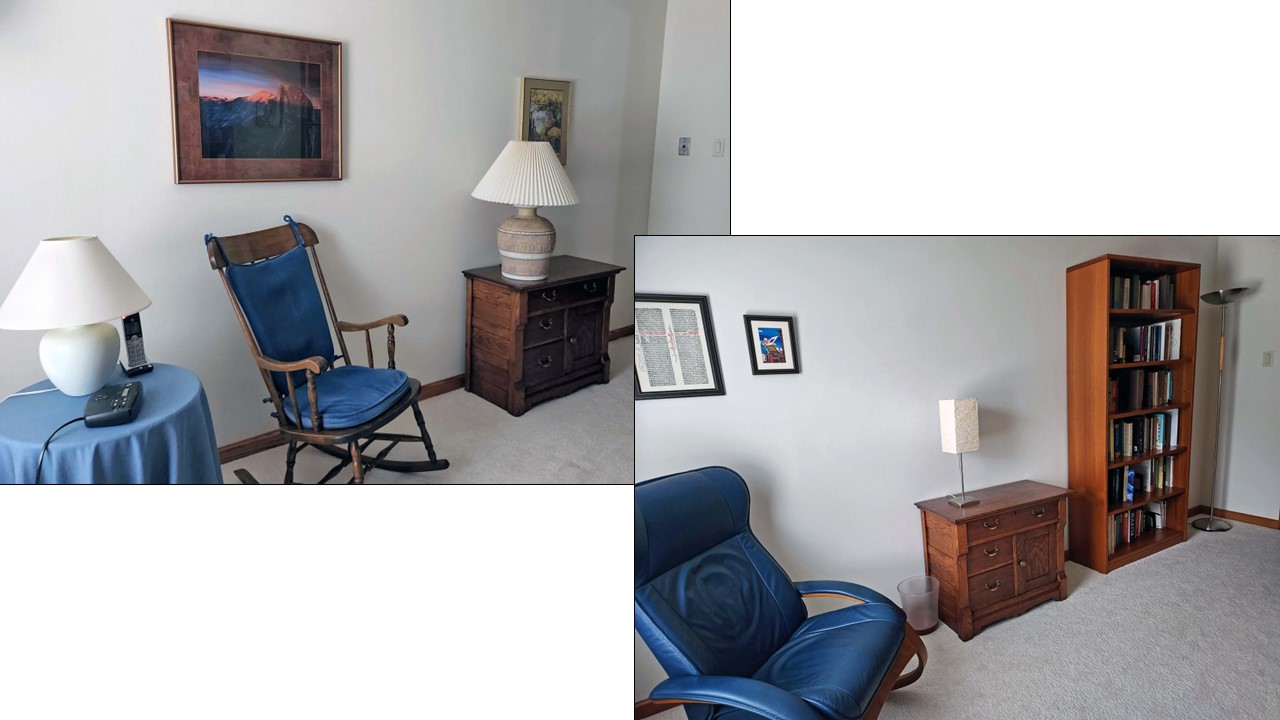
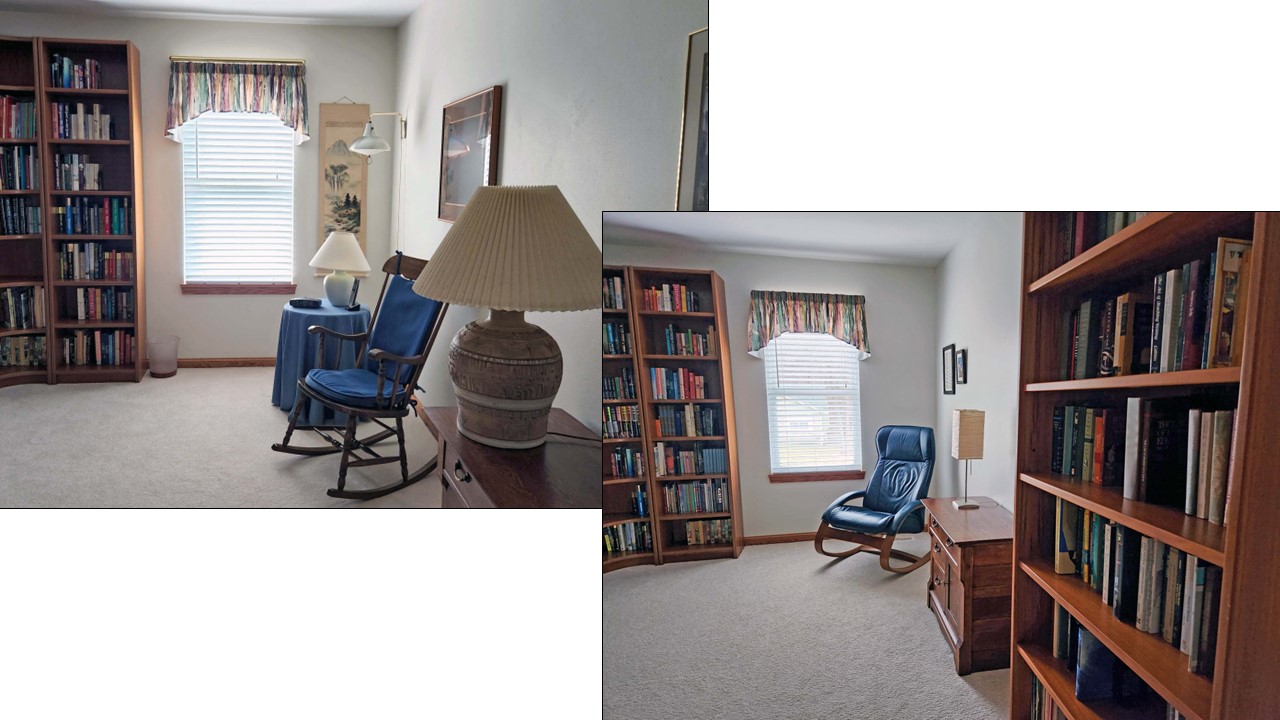
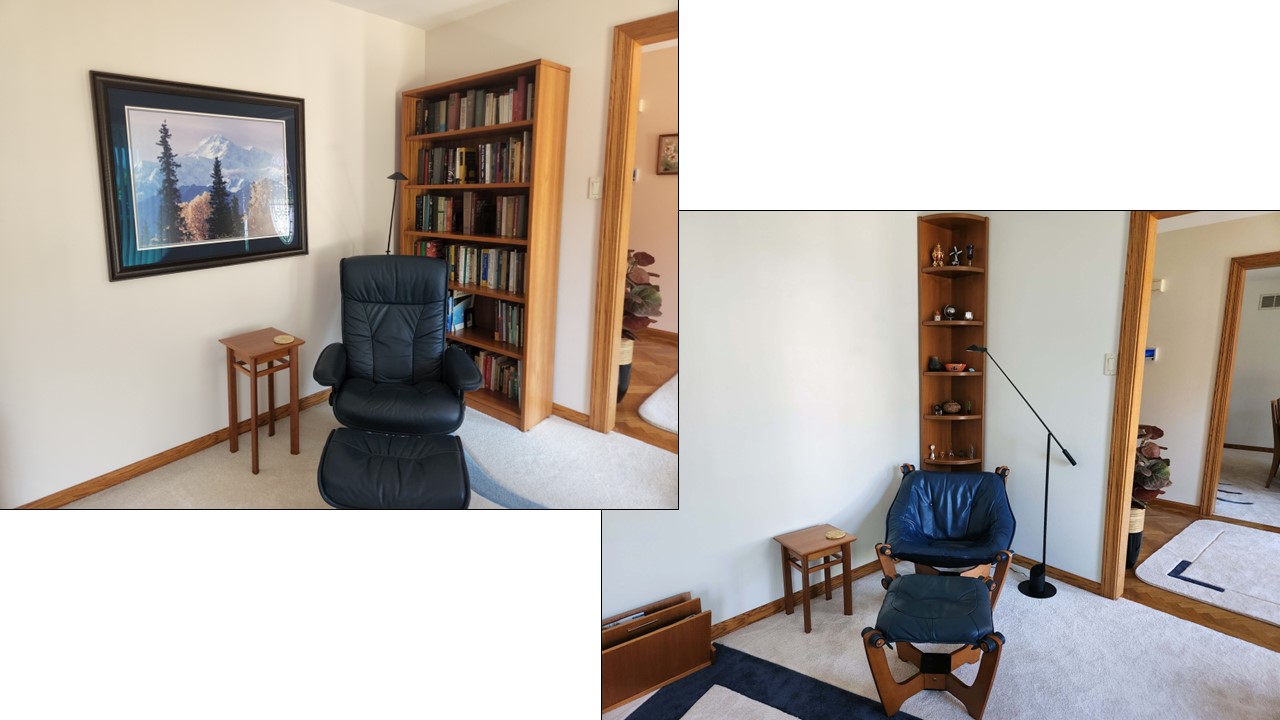
LIBRARY
When I was in grad school, I kept my textbooks and research materials on a bookshelf in the living room near our computer so that I could easily reference them. I’ve only occasionally looked at a few of those books since I finished my last advanced degree in 2005, so it seemed logical to move that bookshelf to the library where the other bookshelves live. Here’s the library before and after we made the update changes. The washstand originally belonged to my great-grandparents. Ted and I bought the rocking chair unfinished when we were expecting Jeff. I finished it and made cushions for it. The big clay lamp is no longer with us. “Before” is on the left; “after” is on the right.
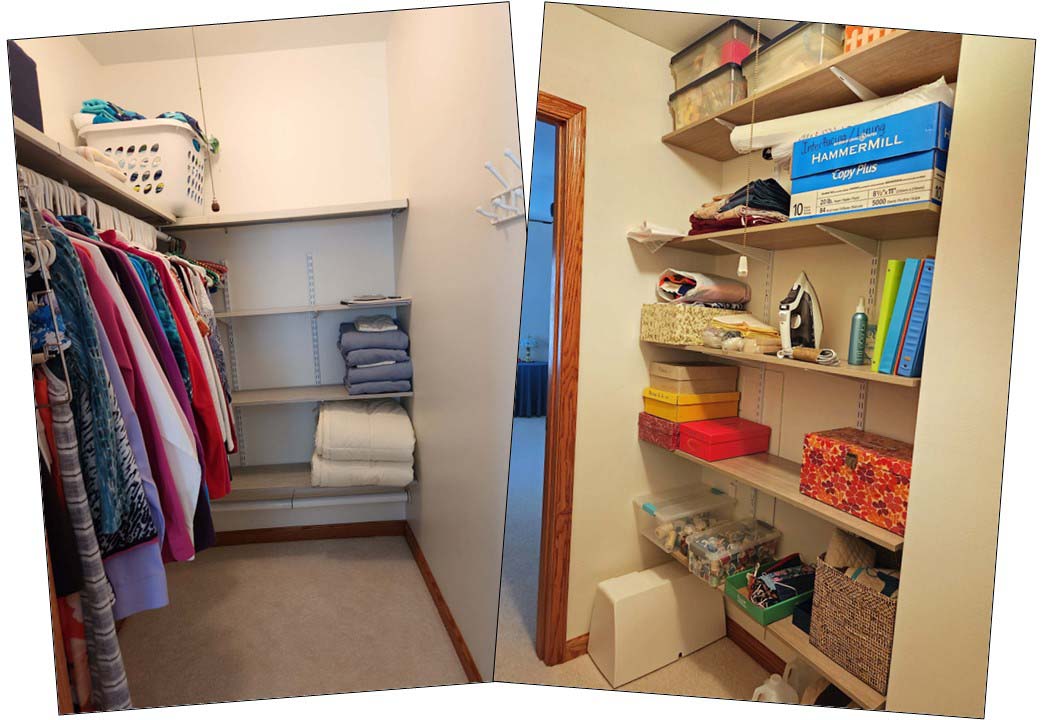
CLOSETS
Emptying the closets for the painters gave us a chance to throw things away, to give things to Goodwill, and to remove/reorganize some shelving. As a result, our closets have 17 fewer shelves and empty spaces on the remaining shelves. (We got rid of a lot of stuff!) You can see that the closet shelves on the left are pretty bare. That closet used to have three more filled shelves–one above the current shelf over the clothing rod, plus two additional shelves on the back wall. The closet on the right is in the project room. We removed the unneeded clothing rod and the six smaller shelves that were on the side wall (pictured) plus four shelves from the back wall. Then we filled the side wall with these five new, longer shelves. I love it! Now I can easily find everything I need when I work in that room.
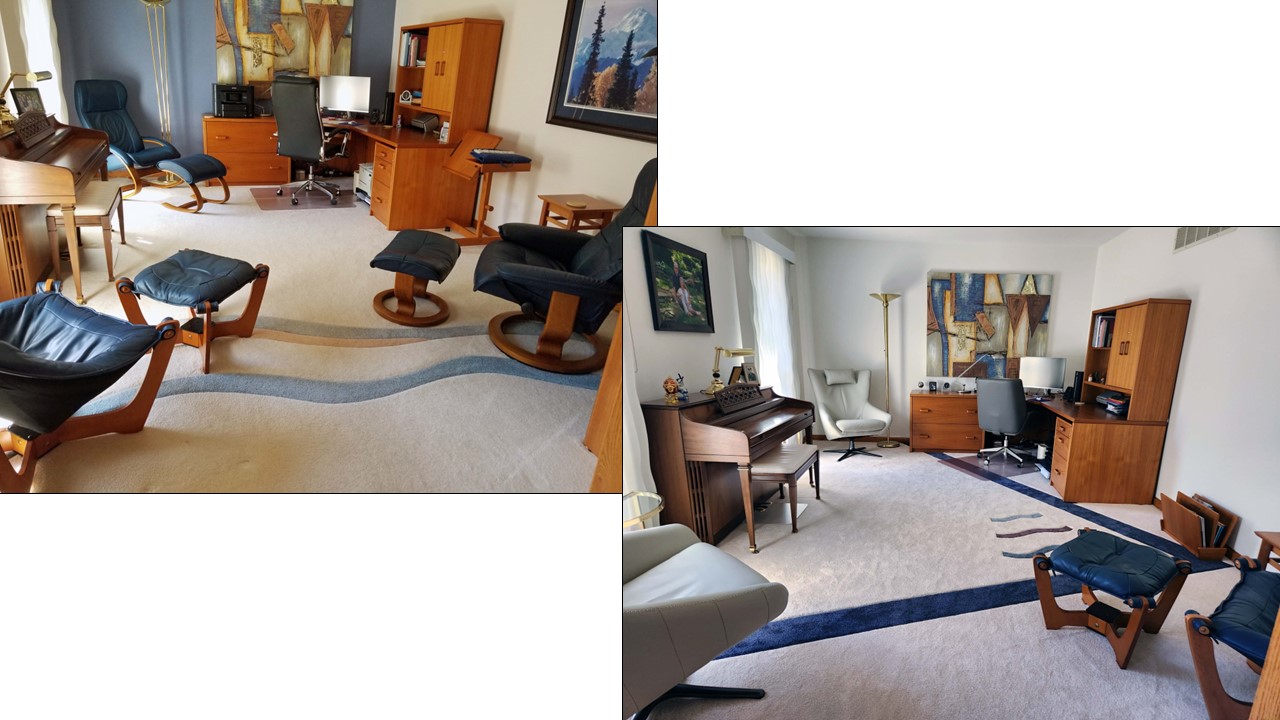
PROJECT ROOM
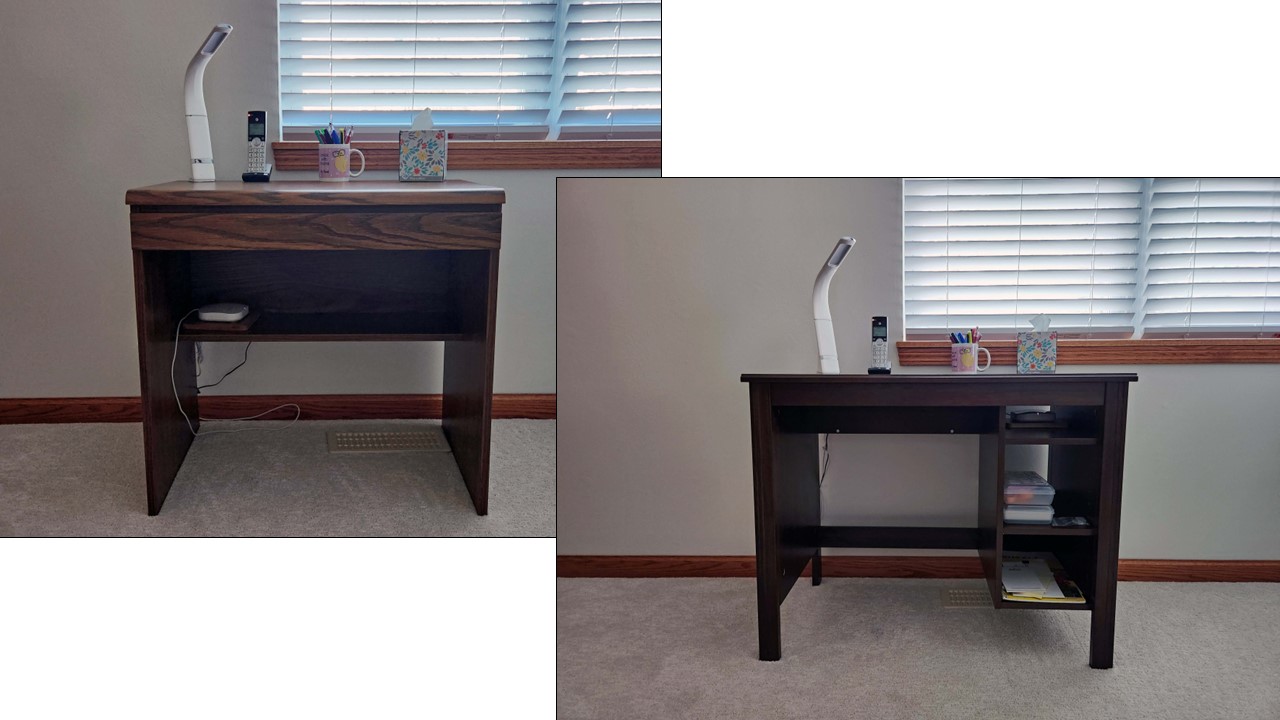
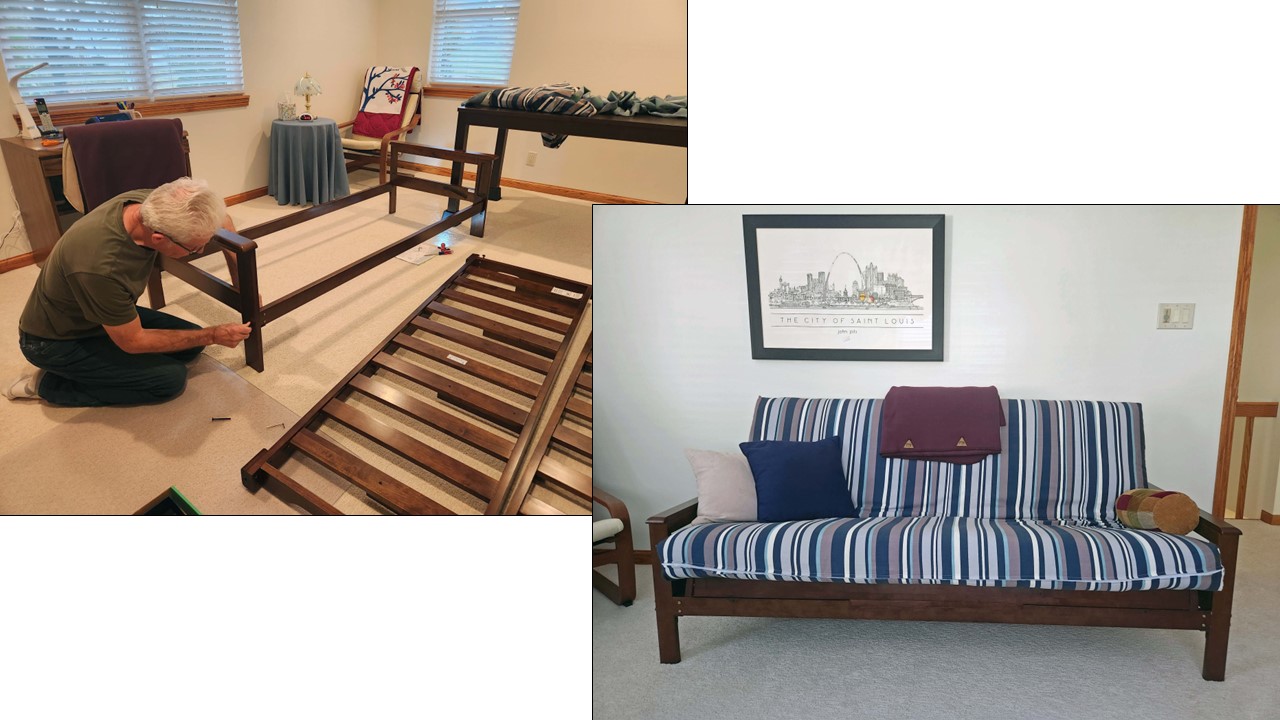
The desk on the left has a new life–probably as firewood. I started shopping for a desk to replace it in January 2020. There isn’t room for a full-sized desk because of the extendable work table beside it, and I don’t need a full-sized desk anyway. I only need some shelf space (or a drawer) for a few office supplies (to make sketches and to calculate measurements for projects) and a surface large enough to hold my serger. It’s surprisingly difficult to find a desk in a 30-35″ size that includes a drawer or shelves, but I found one I liked at IKEA. Unfortunately, it was out of stock, like everything else in 2020. Every few months, I checked the website, but it was always out of stock. Two weeks ago, I checked the website for the umpteenth time, and there it was! Only 36 months later! Ted and I went to IKEA, picked it up, and retired the old desk.
We also replaced the futon in the project room, which doubles as a guest room when needed. The old futon served us well, but the mattress had become very hard over the years and the frame didn’t match any of our current furniture. The new mattress has inner springs, so it will be more comfortable for us to sit on and for guests to sleep on, and the frame matches the other furniture in the room.
After the contractors left, Dean and Dylan installed the bar light above my sewing machine. I just finished a sewing project and the bar light works well. It’s also much cooler than the 1980s pole lamp with its 300w halogen bulb.
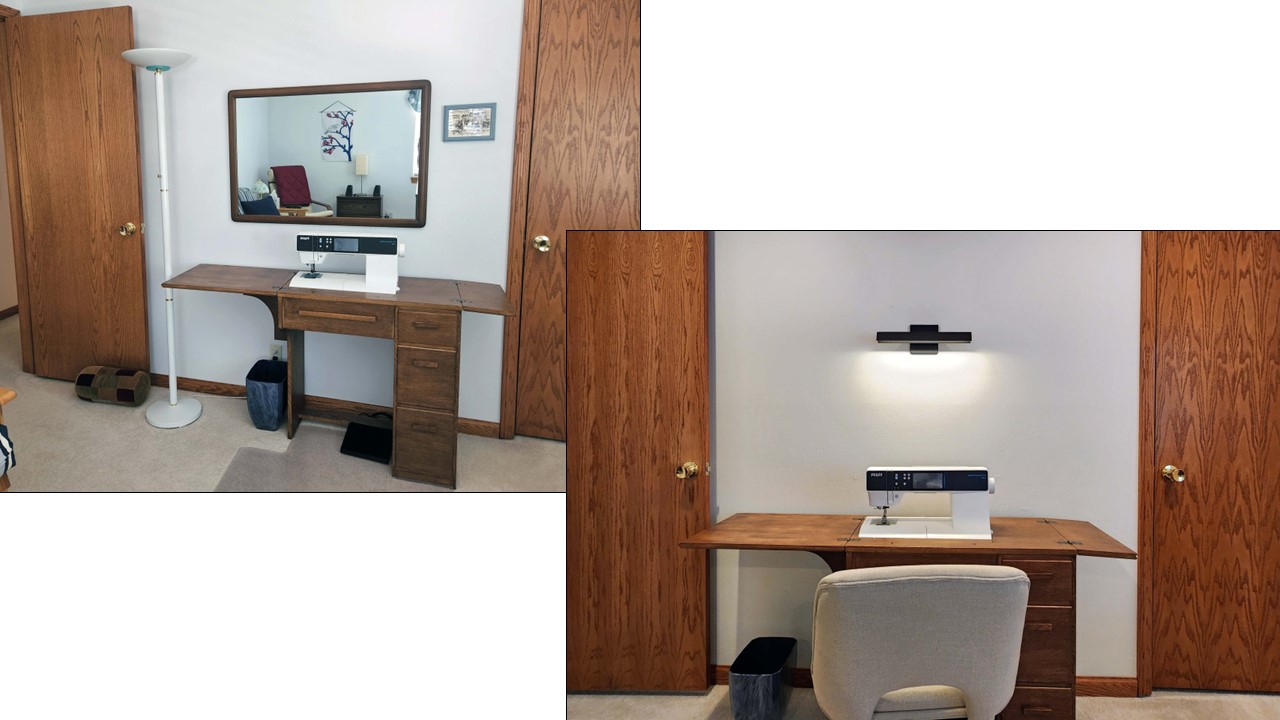
In the photos below, you can see the project room before and after the new desk and desk lamp were added and after the ceiling lighting and ceiling fan were installed. Now I don’t need the box fan that’s hiding in the corner behind the table (left).

GALLERY
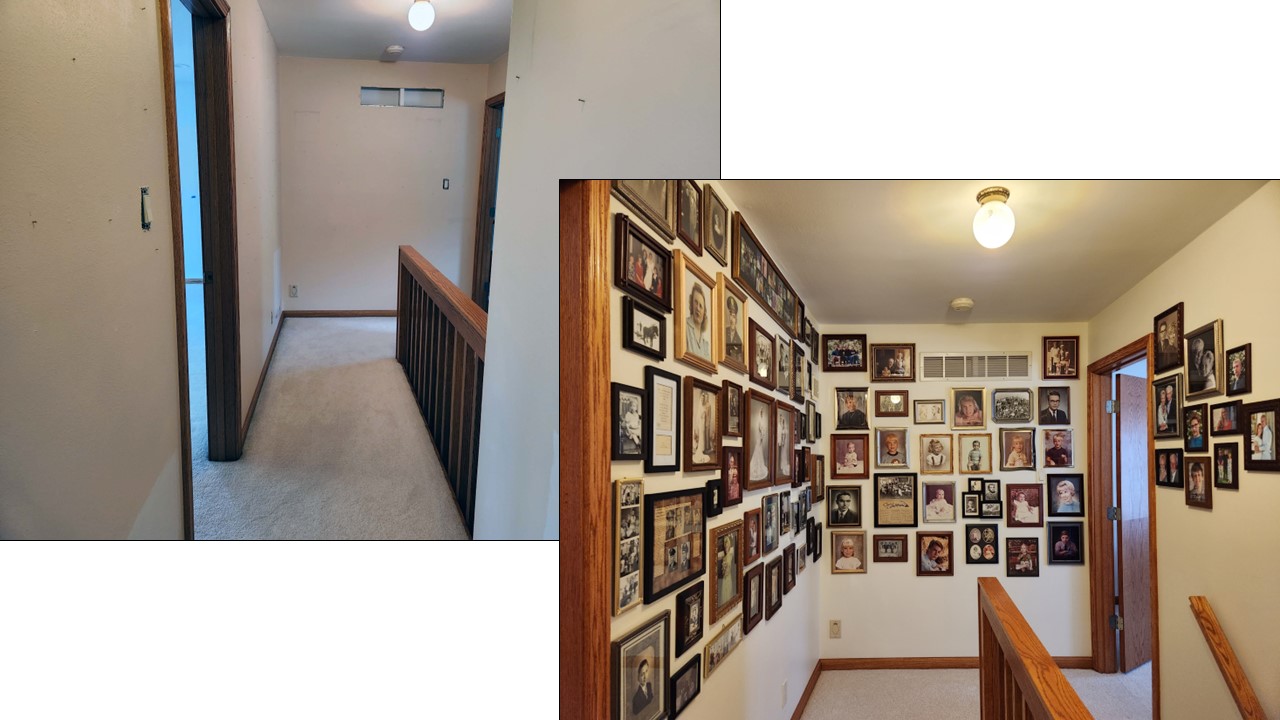
There’s a code for homeowners to use for professional painters: leave the nails in the walls if you’re going to re-use them and don’t want the holes filled. You can see place-saving nails in the photo on the left. That made it much easier to re-hang the 100+ photos in our gallery/upstairs hallway. In case you’re counting photos, there are two walls of photos that don’t show in the picture on the right.
STAIRS
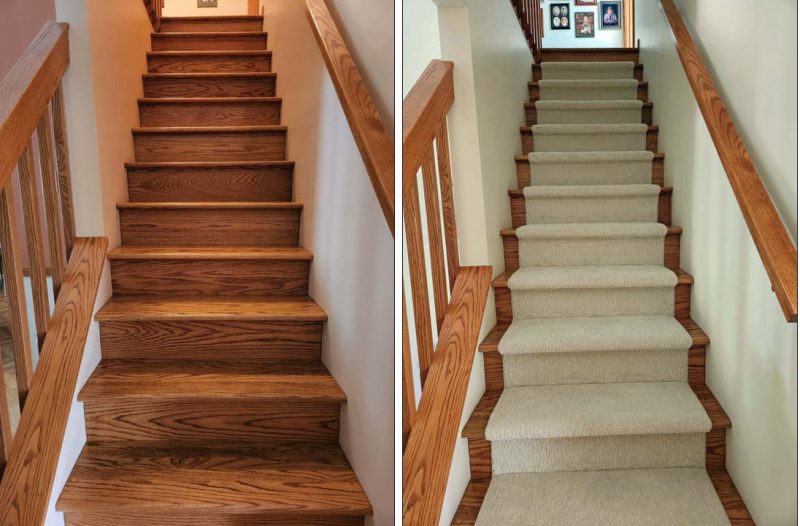
The carpeted stairs are much safer than the slippery hardwood stairs were. We didn’t want to eliminate the look of hardwood completely, so the carpet folks suggested a cap-and-band style of carpeting on the stairs. We like it.
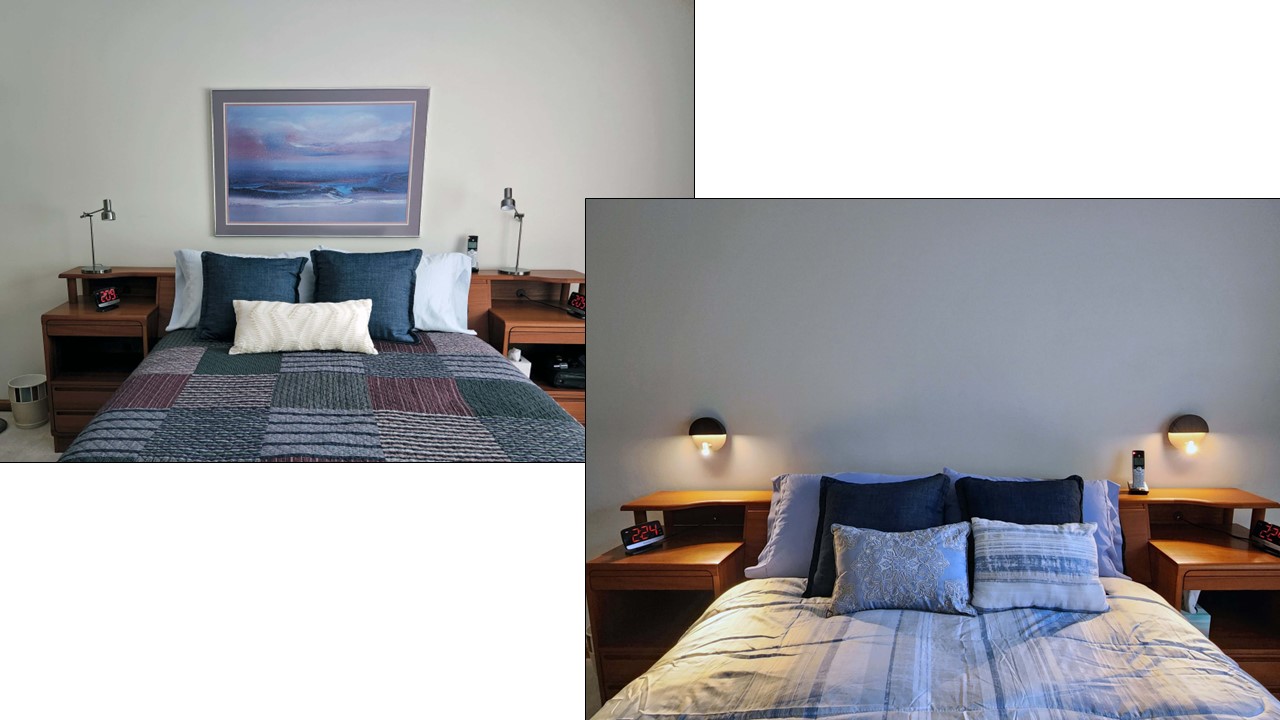
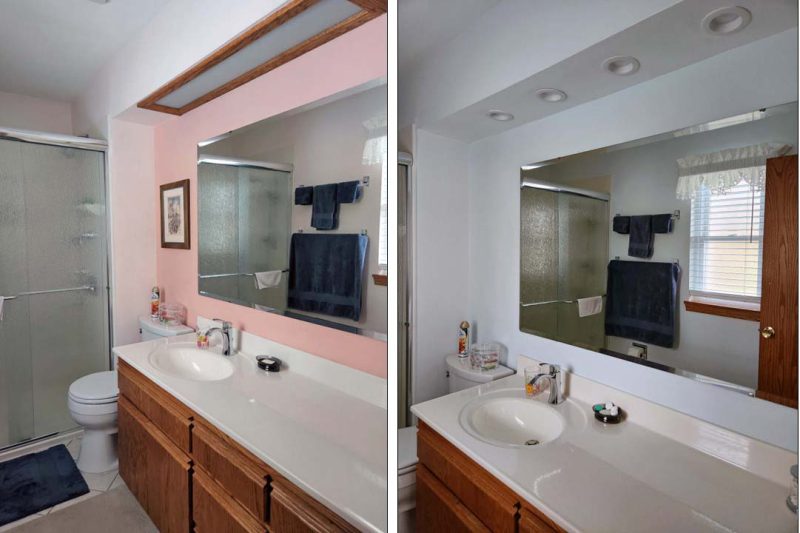
MASTER BEDROOM AND BATHROOM
Here’s our bedroom with our old Wal-Mart bed lamps and with the new wired bed lamps. Ted and I extend our thanks to the professionals who installed the wiring and to Dean and Dylan who installed the lamps.
The master bathroom has always had a fluorescent light above the sink. We changed that to recessed halo lamps. They look a lot more modern, and that’s what an update is about, right?
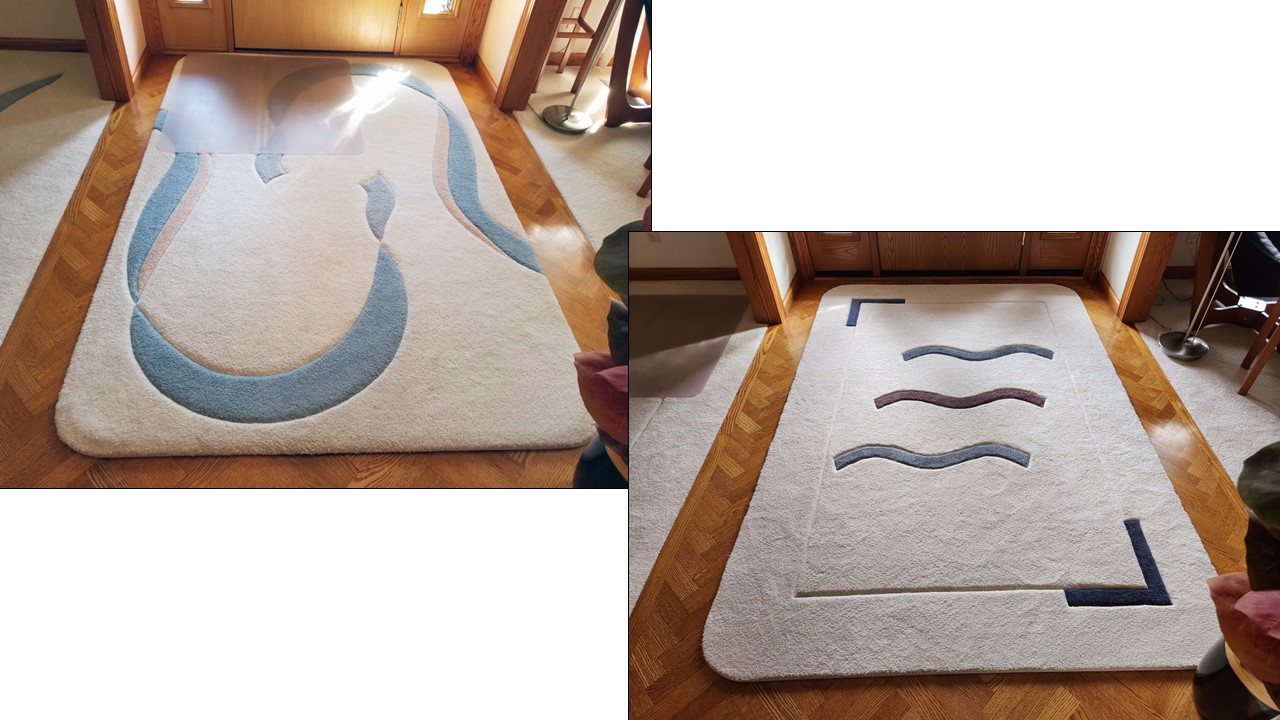
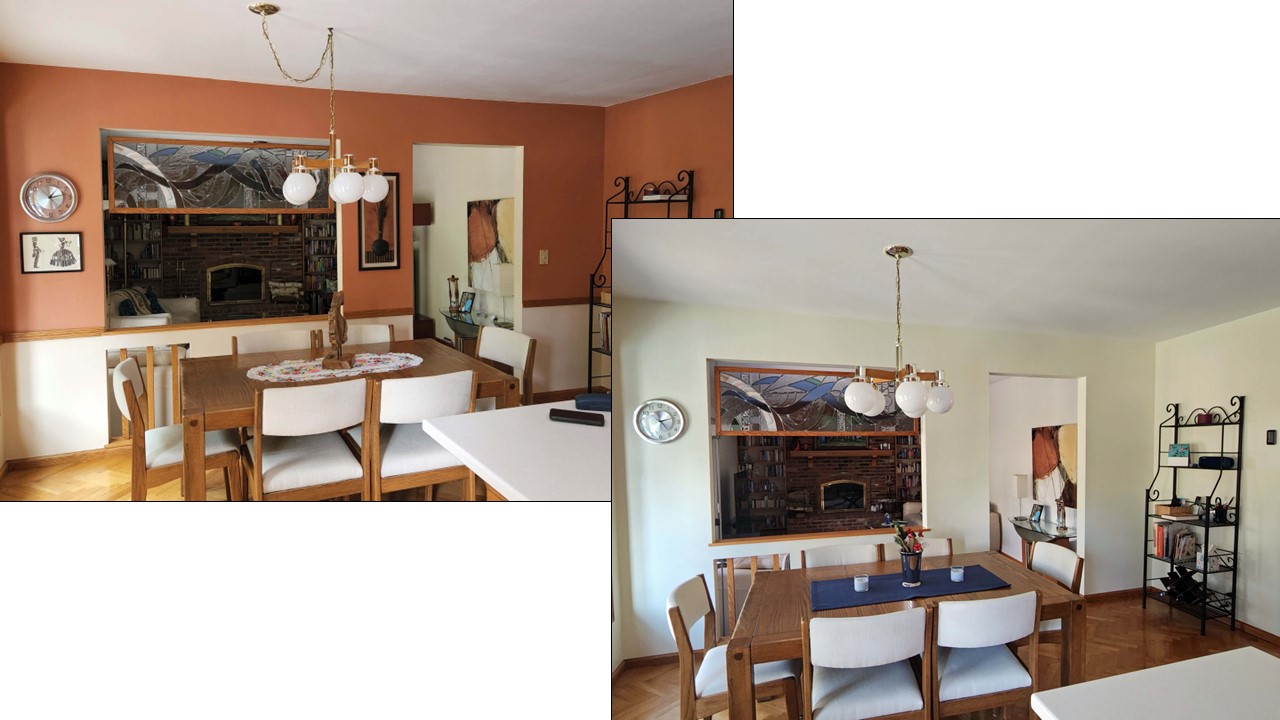
DINING ROOM
Our last update (20+ years ago) included carpet art in the living room, dining room, foyer, and family room. We loved that look, but were ready for new colors and a different design. Here’s the new carpet art in the dining room (right).

LIVING ROOM
We removed two of the blue leather chairs and footstools from the living room and replaced them with off-white chairs. Without all that footstool clutter, the new carpet art shows well. We bought a smaller desk chair and also replaced the bookshelf with a much smaller display unit. Lighter paint and chairs, fewer footstools, and smaller pieces of furniture opened up the room very nicely.
FOYER
When we mentioned replacing the carpet art, our listeners always remarked that it didn’t look like it needed to be replaced. Closer inspection easily shows how faded the colors had become. Some of the peach-colored art in the foyer carpet (left) was nearly colorless from sunlight shining through the front door. It really was time for an update.
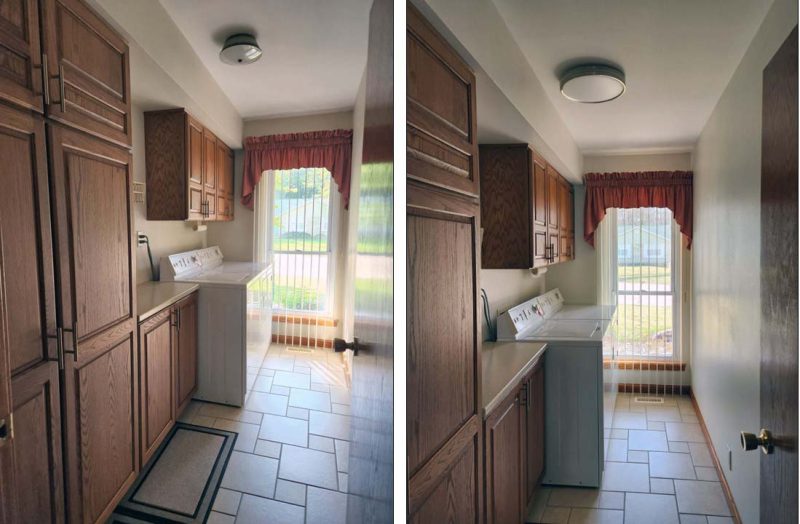
LAUNDRY ROOM
The photo on the left shows the laundry room ceiling light installed by our builders. I never liked it, but we don’t spend a lot of time in the laundry room, so we never bothered to replace it. Now it was time. Thanks again, Dean and Dylan, for helping Dylan gain experience for his future career.
KITCHEN
The holes and gashes in the kitchen ceiling from installing the lighting, and the damage above the countertops from ripping off the ceramic tile backsplash gave the drywall repair man a chance to show off his camouflaging skills. The newly painted ceiling and the wall above the countertops look much better now. We’ll replace the backsplash after we have new cabinets installed.
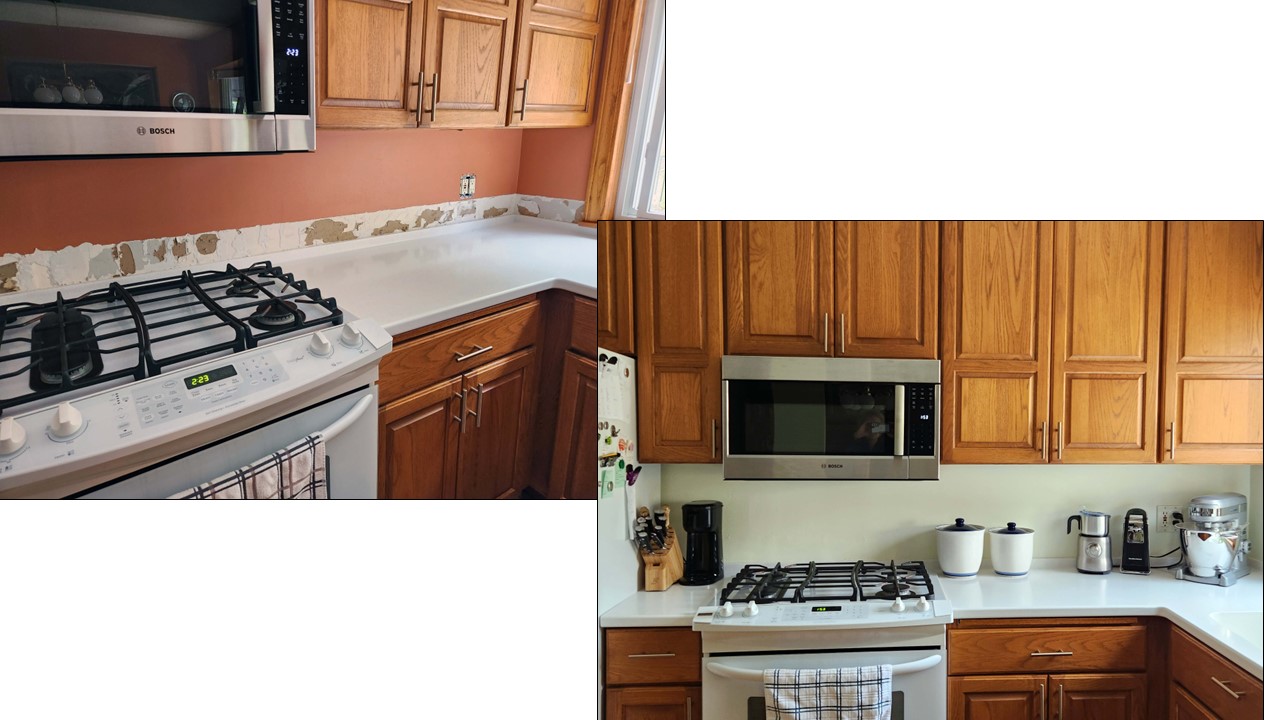
Our kitchen originally had a fluorescent ceiling light in the work area (left). We replaced that with recessed halo lights. We always used warm fluorescent bulbs, so the kitchen didn’t have a blue glow, but the halo lights provide much better lighting–and they’re dimmable, if desired.
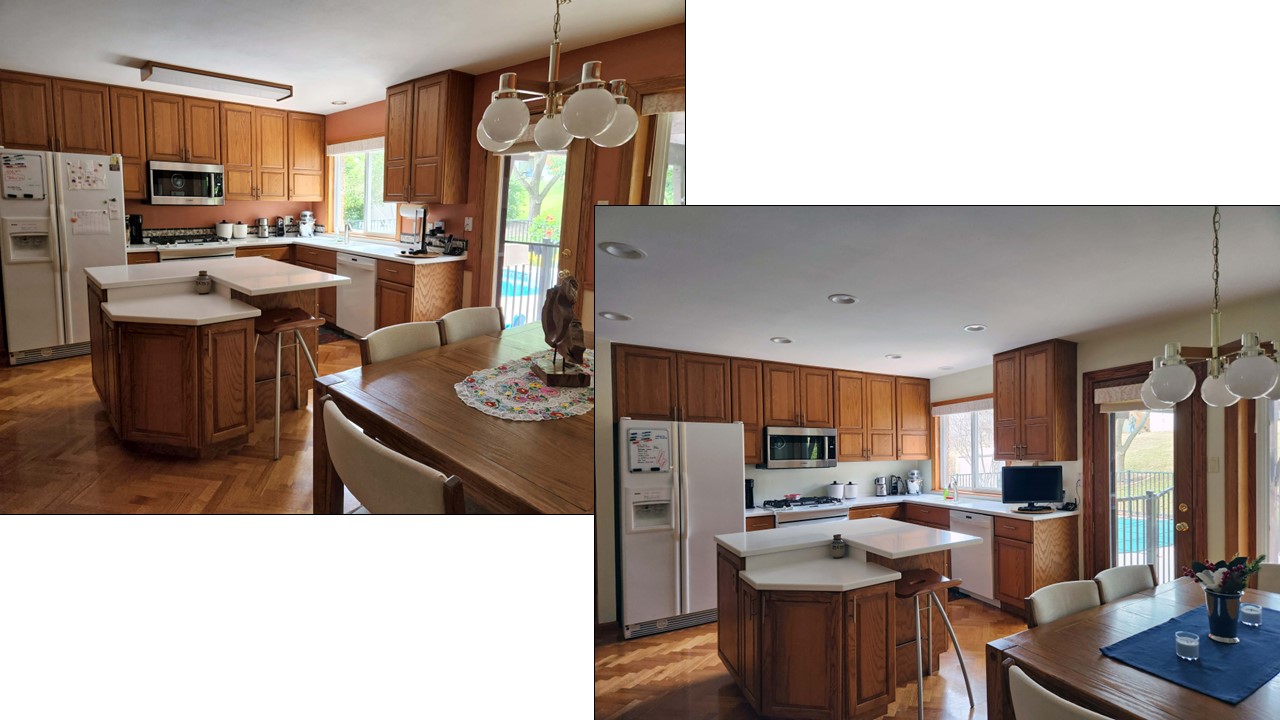
Ted and I have never come up with a reason why our builder wired the kitchen eating area ceiling light where he did. It’s not centered over the table (or anything else), so we always had to have a lamp with a chain to center the lighting over the table (left). We asked the electricians to center the electrical box for that lamp over the table. We shortened the chain and re-hung the lamp, but when we replace the lamp, a chain won’t be a requirement. Our interior designer said that removing the chair rail and painting the kitchen walls a single, lighter color would open up the room. She knows her stuff!
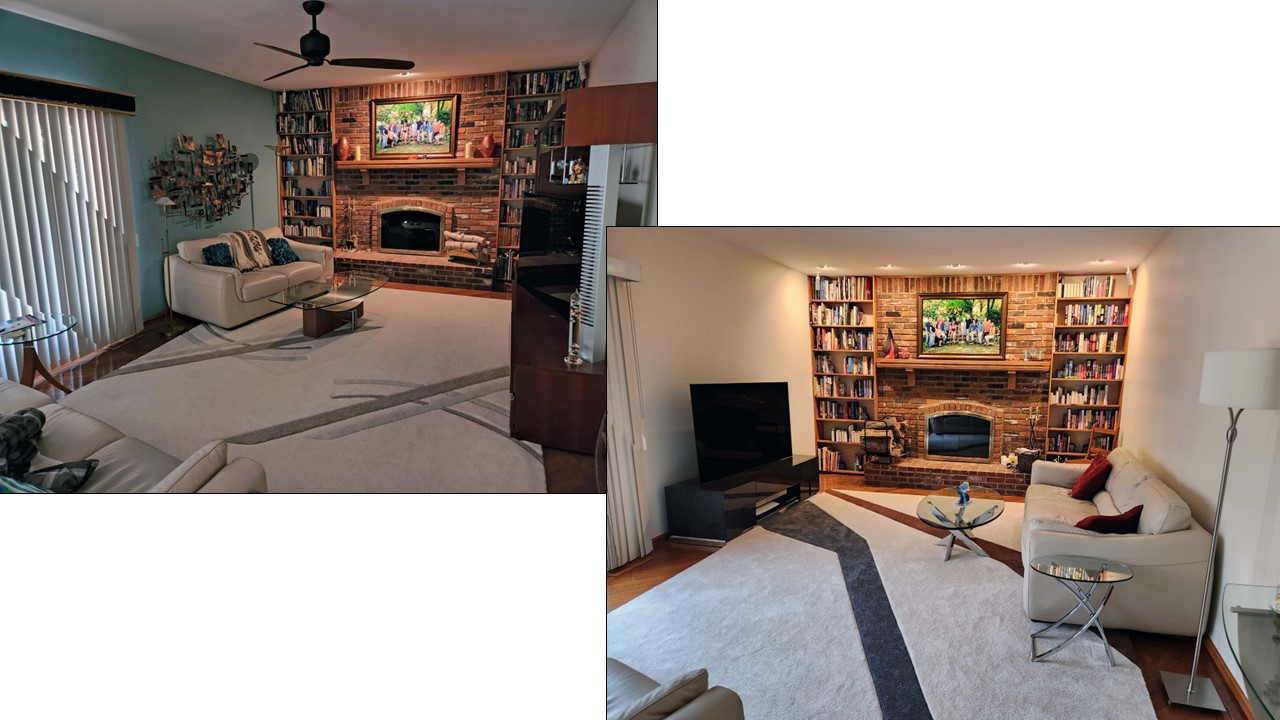
FAMILY ROOM
We have an 8-foot window wall on the near end of the family room, but that leaves the far end dark. In 2019, we had an electrician install an art light to highlight our 50th anniversary family picture. Without the art light, that end of the room would look even darker in the photo below (left). Our interior designer suggested limewashing the fireplace to lighten things up. We asked the painter about that and he, in turn, asked how often we use the fireplace. I told him that we burn more than a cord of wood each year. In that case, he said, the limewash would turn gray over time and there would be nothing to do about it. He suggested a light wall instead, and we like the row of eyeball lights the electricians installed. The designer was right about our old media center too. It was so big that it shut off the room from the doorway perspective and it didn’t match anything in the room. With a smaller media center, the room feels more spacious.
MORE TO COME
Ted and I still have a lot of finishing touches to add in every room: new valances for all the windows to match our new paint colors; new kitchen cabinets; some new pieces of furniture; some new pieces of wall art; and (my favorite) “more.” With all of this to be done, none of our rooms is completely updated at this point, and most of them have a somewhat stark look that will remain until we find replacements that we like. That stark look will keep us motivated to continue shopping, and to stick to our less talk and more action resolution.