
Just do it
Over the years, when I’ve checked into various places, I’ve discovered that there are other women with the same first and last names as mine. One time, I asked the check-in person how many other people shared my name on her list and she said, “Five.” Just the other day, I asked again and the registrar said, “Eight.” Wow!
When my kids were little, I took Jeff to the pediatrician for something or other, and the nurse needed clarification about which Diane and Jeff we were because there was another mother who shared my name and had a son named Jeff. During a recent (flattering) check-in experience, the check-in lady asked me to re-verify my birthdate. I told her I know there are other women with the same name as mine, but I didn’t know I shared a birthdate with any of them. “Oh, no,” she said, “you don’t. You just didn’t look that old.” 🙂
In all the time I’ve known about these name doppelgangers, I’ve never met one until (drum roll, please) my last haircut appointment. When I checked in, the check-in lady asked if I was with Donna or Michelle (the stylists). I said “Donna.” She replied that her computer showed me scheduled with Michelle. Then she noticed that I was listed with both Donna and Michelle. At that moment, another woman spoke up and said she had an appointment with Michelle, and we all realized that the other woman and I had the same first and last names.
Here I am with my name twin. We were seated in side-by-side chairs while we waited for Donna and Michelle, so we chatted with each other and decided we should have a photo of ourselves. You can see Donna and Michelle in the mirror behind us. Donna is taking the picture.
Today, there was serendipity at the salon.


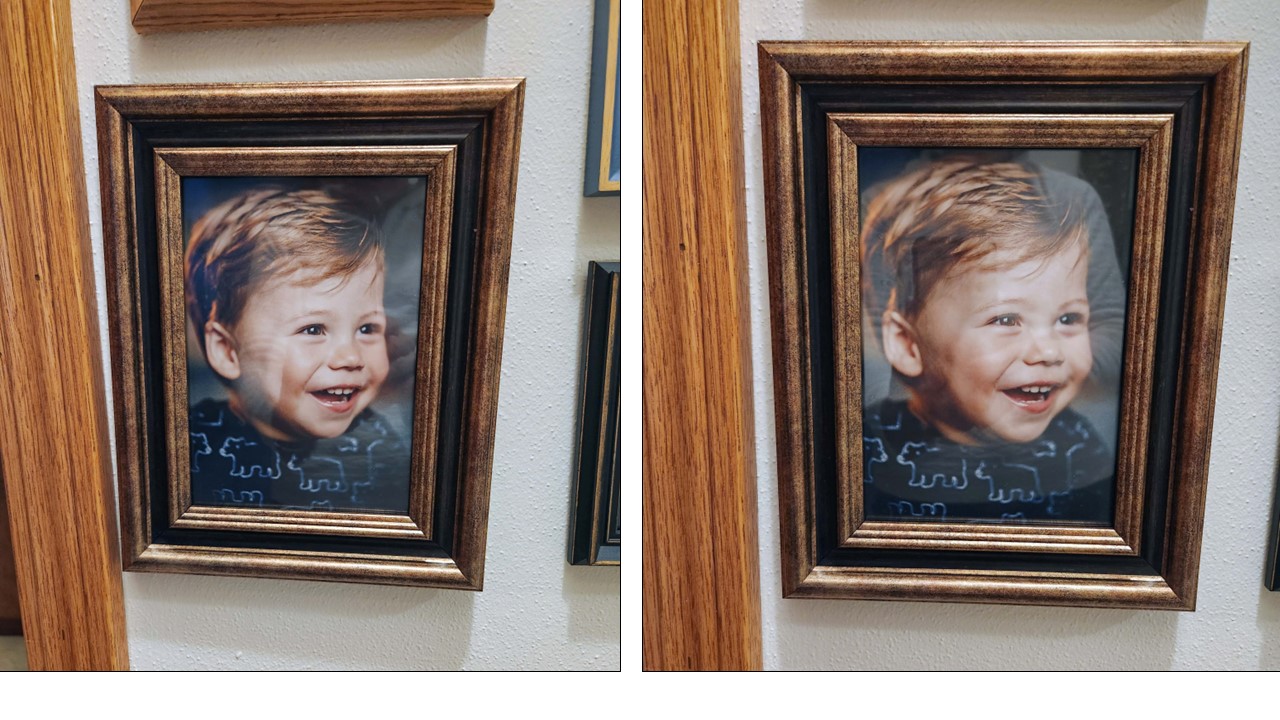
One of our gallery pictures of our grandson has always hung crooked, no matter what I did to straighten it. One day, I decided to weight the picture with pennies. Unfortunately, between Ted and me, we had only one penny, and that turned out to be insufficient. The picture still hung crooked.
I mentioned this little problem at a family gathering and said I thought I needed another two cents. The conversation moved on, but after a few minutes, Dylan re-entered the room and handed me two cents. Thank you, Dylan!
I added Dylan’s pennies to the back of the picture and it still didn’t hang straight, so I tried a nickel. That didn’t help, so I moved up to a quarter. That helped a little. When I added a second quarter, the picture hung straight.
I don’t think I’ve ever added more than two cents to a picture, but this one was a 53-cent job. The bottom corner of the picture butted up against the door frame. I wonder how far it would have tilted if the door frame didn’t stop it. Well, at least it’s finally straight and this little guy’s picture is no longer cockeyed.
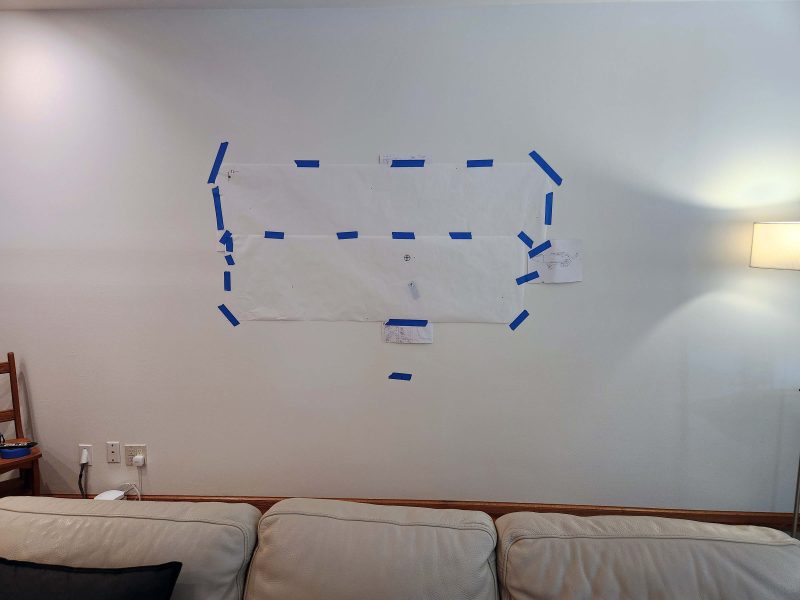
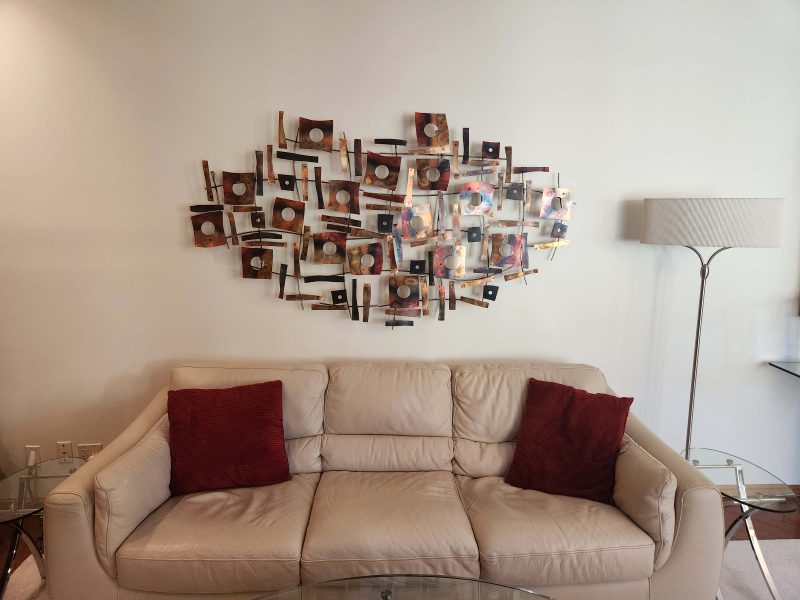
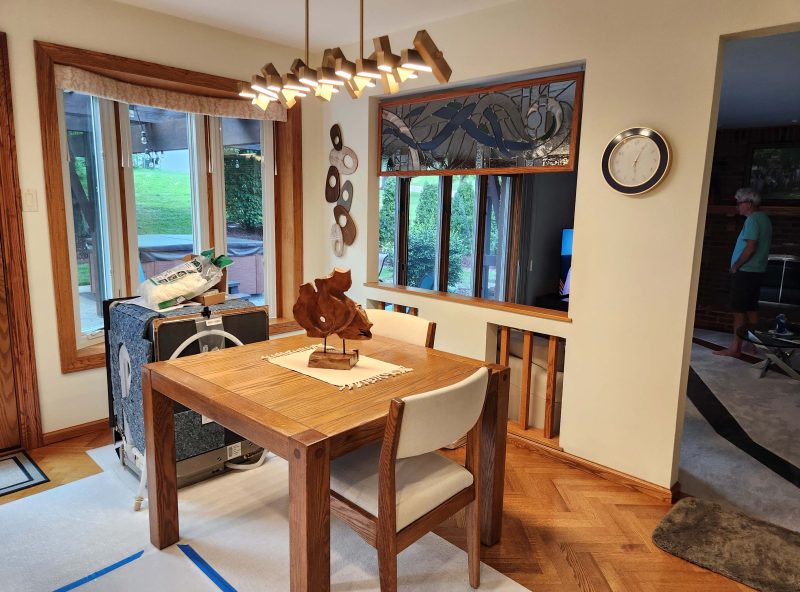
Ted and I had to clear our walls for the painters in Fall 2022. We were both tired of looking at the same old things on the walls, so we decided that we would only re-hang the things we missed looking at. One of the things we missed looking at was a two-piece sculpture. It’s not an easy thing to hang. The two pieces need to be properly aligned; they are heavy and awkward to handle; and the design pieces have sharp corners. An added challenge is that it needs to be hung on eight irregularly arranged hangers.
I decided that a template would probably avoid repeated trial-and-error efforts, so we spread some large, taped-together sheets of paper on the basement floor and properly aligned the sculpture pieces on them. Then we marked where the irregular hangers were so we’d know where to put the nails into the wall. The hangers are welded to the sculpture frame, but the frame does not extend to the edges of the sculpture. That provided another challenge: deciding where to place the template on the wall so that the sculpture would hang where we wanted it to be. We worked with the outside measurements of the sculpture and the template to determine the center, transferred those measurements to the wall, and then taped the template to the wall.
Instead of pounding the nails all the way in on the template markings, I tapped them just hard enough to make a visible dent in the drywall. Then we removed the template and put in four of the eight nails we needed–just enough to hold the sculpture temporarily–before hanging the sculpture to check its placement. It looked good, so we took it down and hammered in the other four nails. Now the sculpture is securely hung and the placement looks good. Nice work, if I do say so myself.
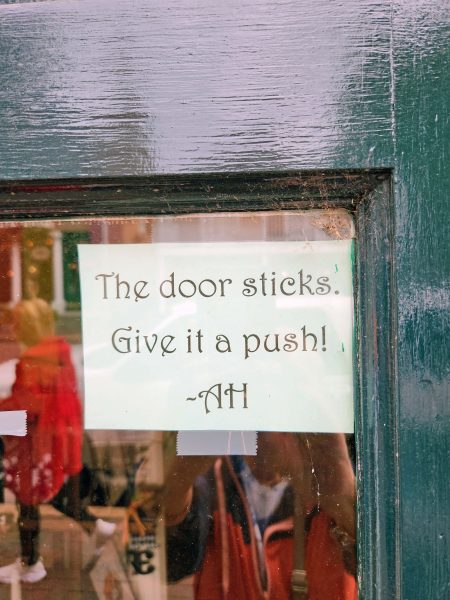
I saw this sign when I was shopping on historic Main Street in St. Charles.
Question: What kind of shoes does an optometrist wear?
Answer: “Seeing eye” shoes. Really. This is what my optometrist was wearing at my appointment.


Back in September, the U.S. Marine Corps literally lost (as in couldn’t find) one of its aircraft in South Carolina. The F-35 Lightning II stealth fighter jet went missing after the pilot ejected. The plane flew about 60 miles without its pilot and then crashed into a wooded area. The Marine Corps ordered a two-day stand down while they searched for the jet.
According to CNN, Rep. Nancy Mace of South Caroline wrote on X “How in the hell do you lose an F-35? How is there not a tracking device and we’re asking the public to what, find a jet and turn it in?”
Here’s an idea from Walt Handelsman, a cartoonist.

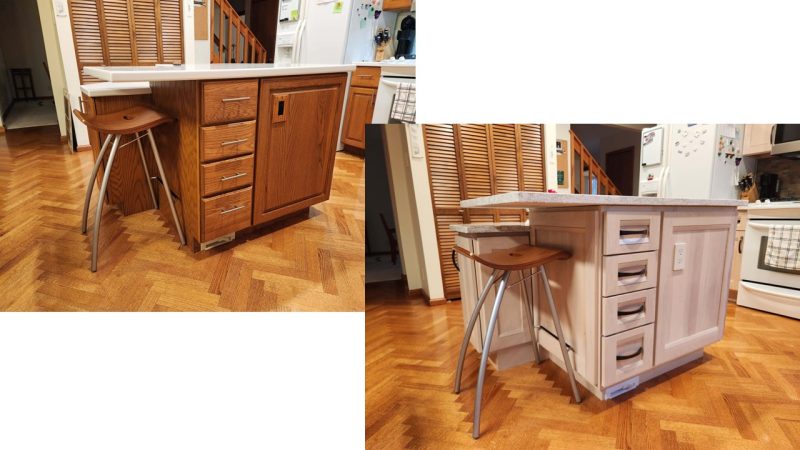
Thanks to the kitchen update, the basement workshop got an update too. The last time we updated our kitchen, we selected some of the old, to-be-removed cabinets from the kitchen and had them moved to the workshop for neater storage down there.
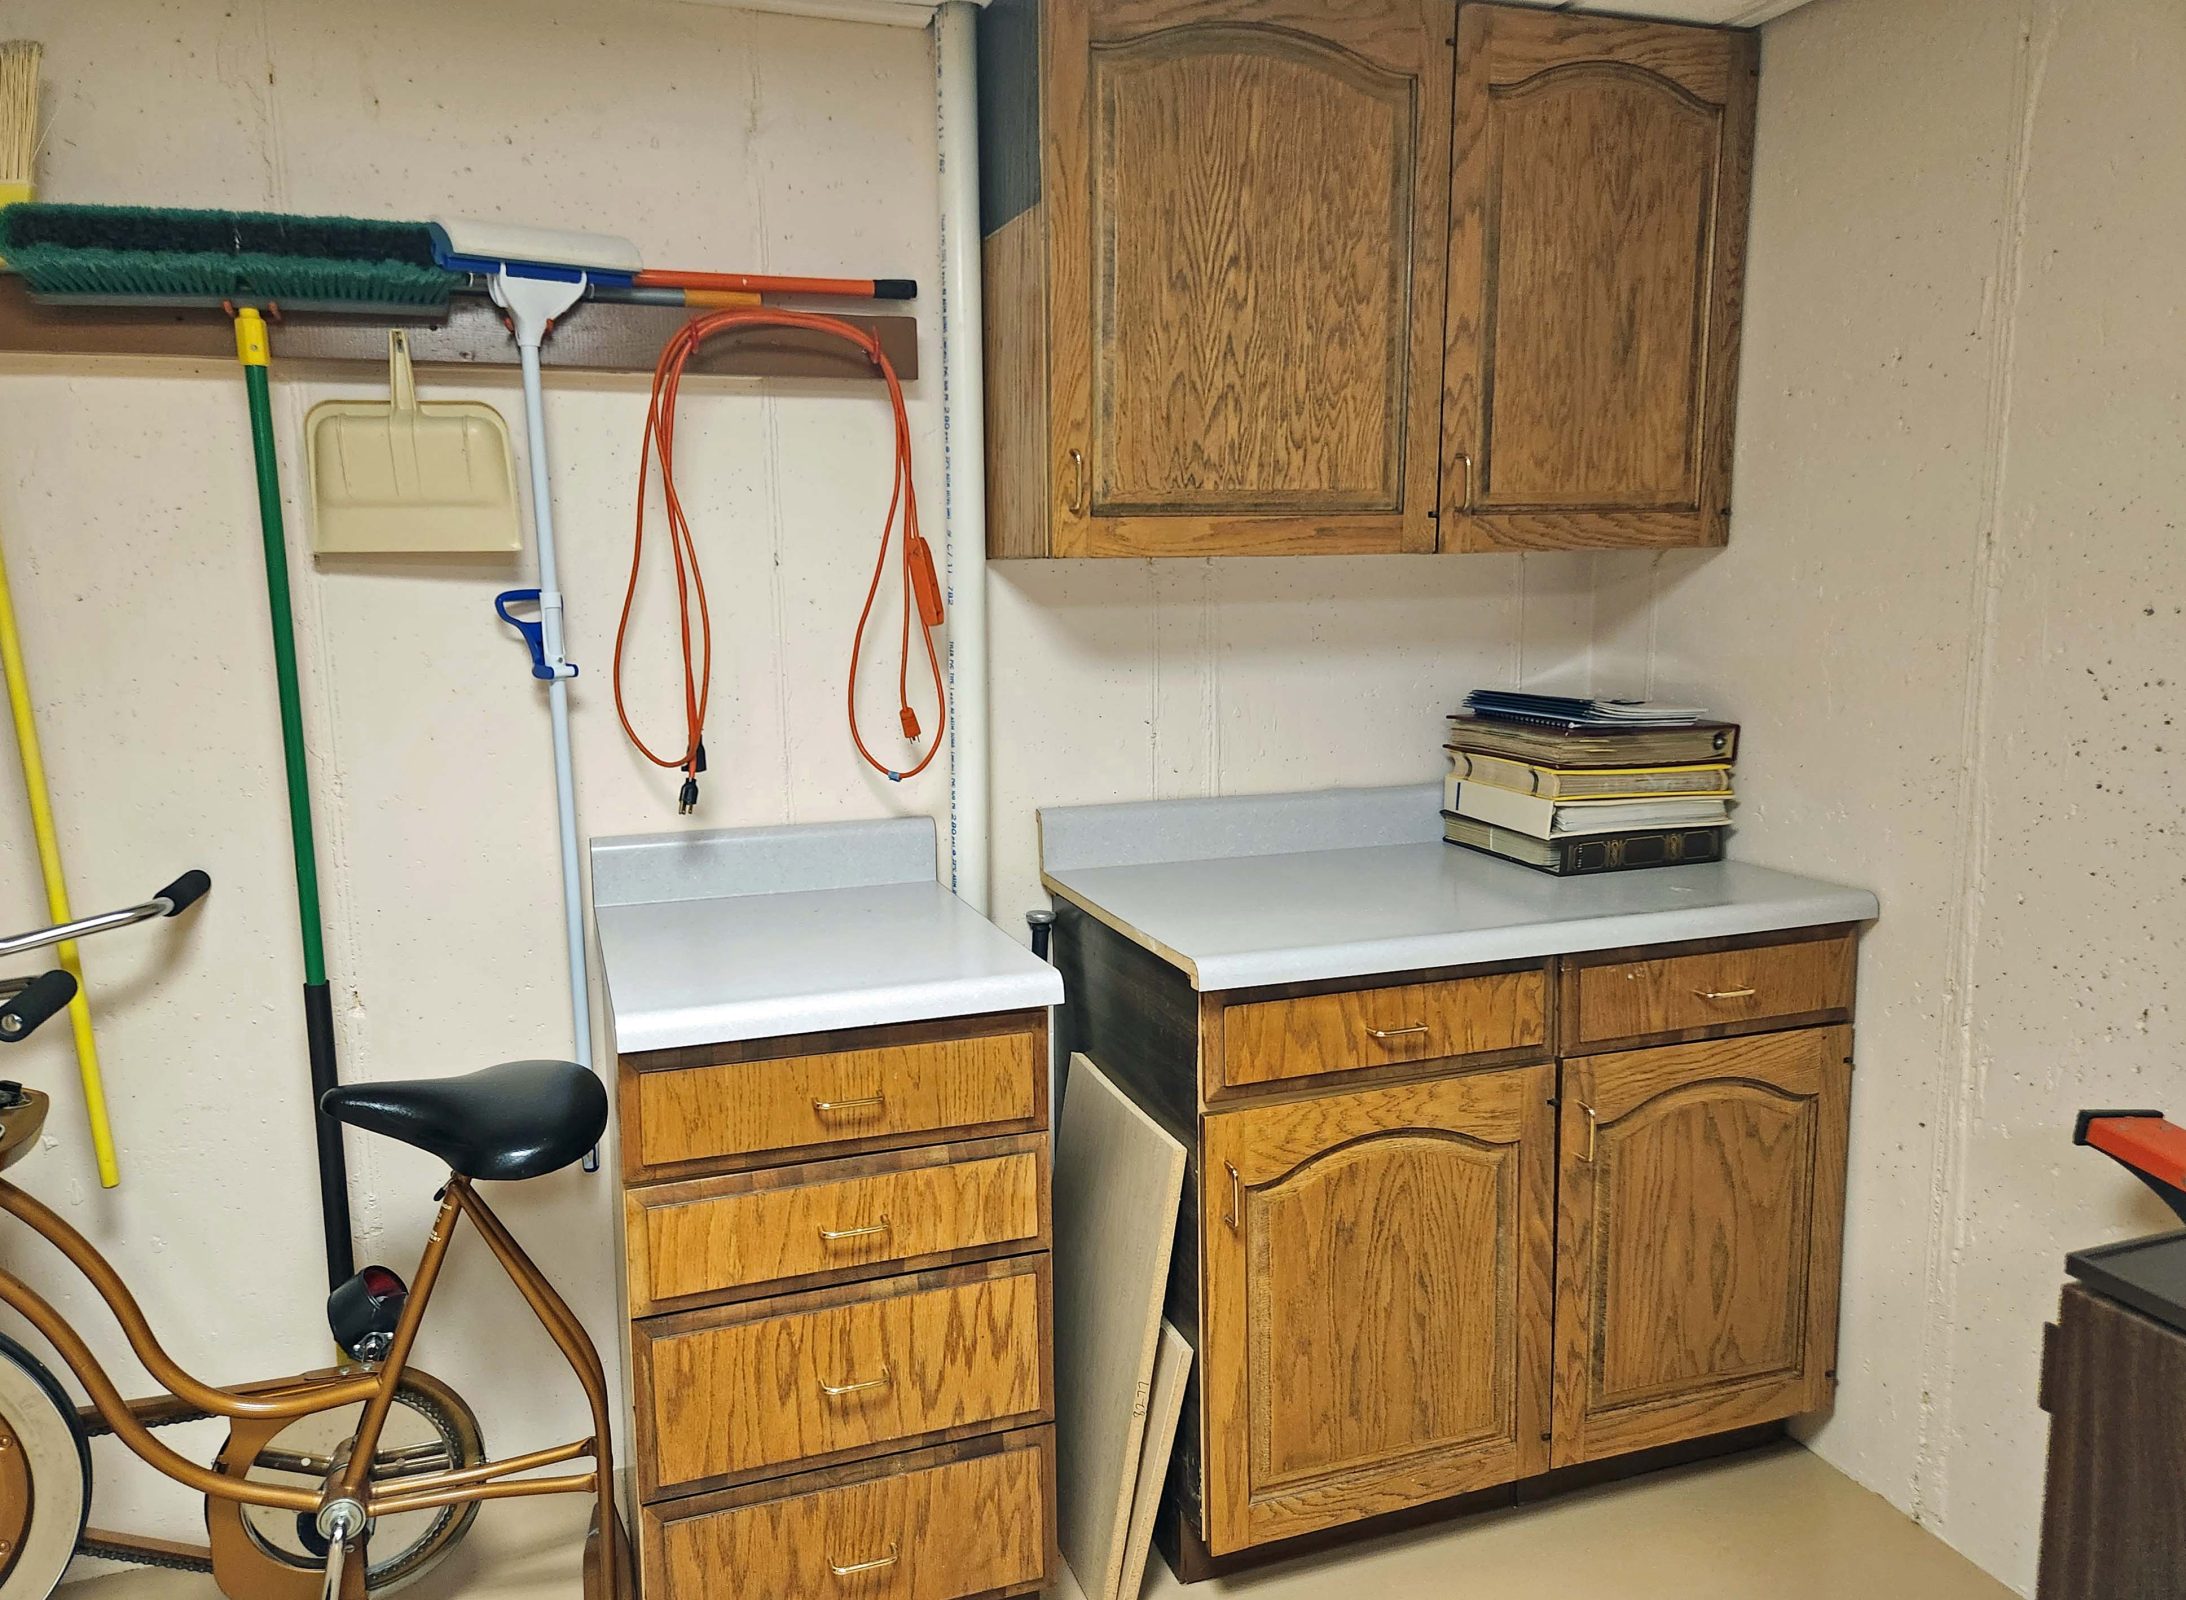
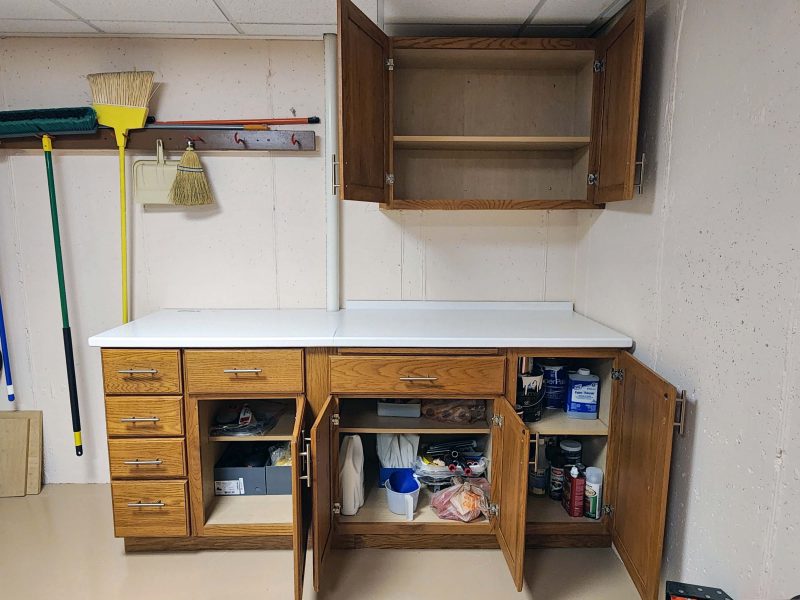
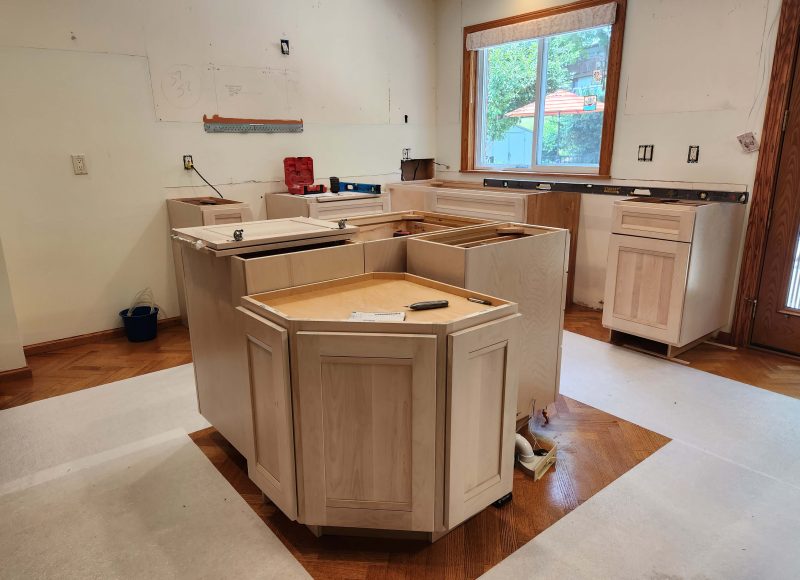
The cabinets pictured below were original to the house, and are now 44 years old. They show their age and the drawers no longer work very well. Naturally, the upper cabinet is installed (i.e., fastened to the wall). The lower three pieces, however, are just set in place against the wall with the countertop pieces simply resting on the cabinet tops, making those pieces easy to move. Not surprisingly, we never moved them. The PVC pipe drains the washing machine above, so the cabinets were placed separately on each side of it. The dark portions of the cabinet sides are the original color of the cabinets. I hated that dark color when we bought the house, so I stripped the cabinets and stained them lighter. The dark areas were against adjacent cabinets, so those portions didn’t get stripped. You can see the raw edge of the Formica countertop in the center. That countertop wasn’t originally on that cabinet; the workers at the time cut it to fit.
This was the workshop in the basement, so we didn’t need or expect beautiful cabinetry. We were satisfied for many years, but with new cabinets coming to the kitchen, it was the perfect time to replace these worn-out cabinets with something only half their age.
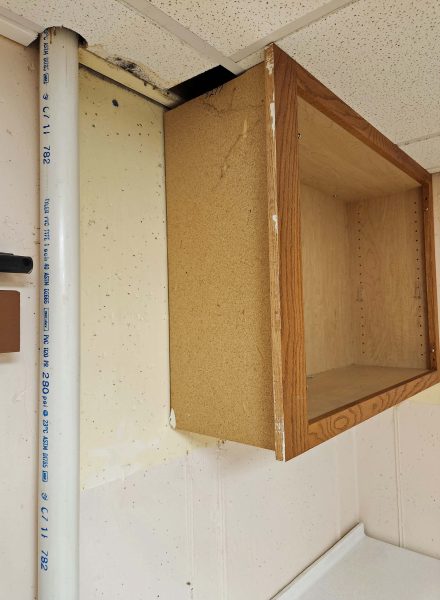
When our kitchen crew, Christian and Craig, removed the upper cabinets in the workshop, they noticed mold and some ceiling tile damage. That must have developed years ago when the washer hose broke and sent a full load of water to the basement floor–gallons of wash water and more gallons of rinse water. I left the washer running while I was away from home, so I wasn’t there to immediately turn off the water. Oops! What a mess that was to clean up! Since the cabinets were installed before the washer hose ruptured, we couldn’t dry the water or remove the ceiling tiles above them, and we couldn’t see the resulting damage. As a result, the water absorbed by the ceiling tiles in that area dried slowly enough to develop mold. It’s a good thing Christian and Craig could repair it now.
I expected the same kind of installation from Christian and Craig as we had last time: attach the upper cabinet to the wall, put the lower ones in place, and cut the countertop(s) to fit. Wow! Was I surprised!
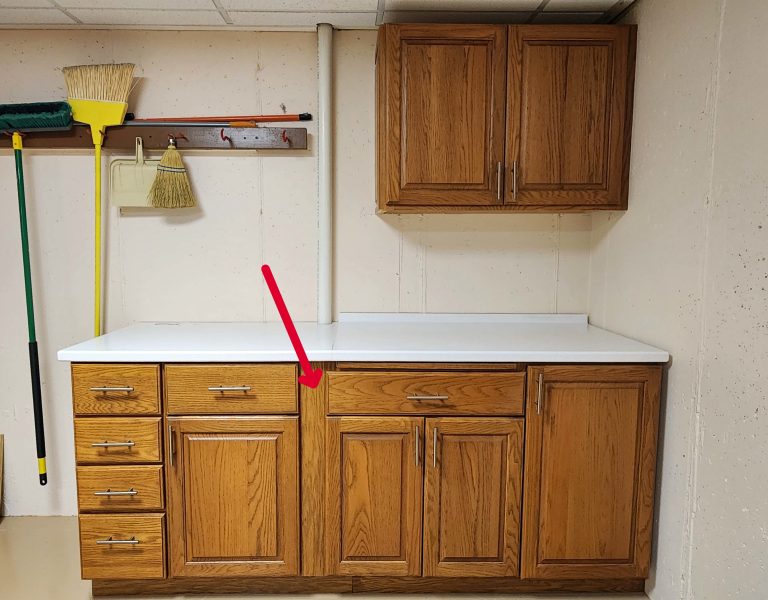
These guys didn’t put the cabinets in the basement; they installed them. They leveled everything and fastened every cabinet to its adjacent wall and to its adjacent cabinet. To hide the drainpipe space needed between the cabinets, the guys cut a spacer from a flat wood panel taken from a to-be-trashed cabinet from the kitchen, and inserted the spacer between the cabinet sections (arrow). None of the removed countertop pieces was long enough for the entire lower surface, so the right portion has a backsplash and the left portion doesn’t. To make a continuous countertop around the drainpipe, Christian cut a half-circle into the back edge of the countertop and joined the two pieces with a nearly invisible seam sealed with clear caulk. The back edge is also caulked along the wall. All of those details make the four lower cabinet pieces look like a single unit. Compare the photo below with the top photo above. Attention to detail makes a big difference!
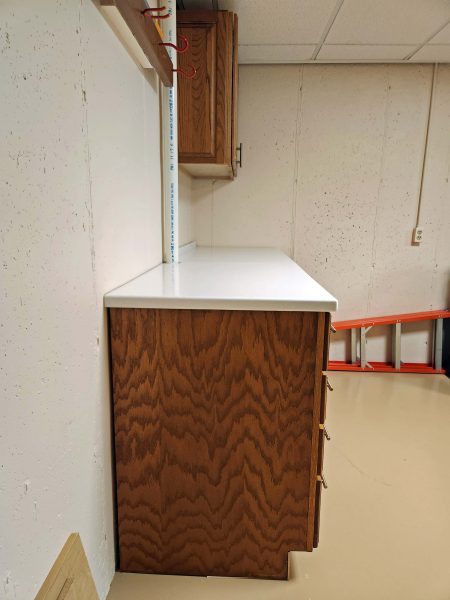
Speaking of details, . . . The over-the-top thing the guys did in the basement was to cover the exposed end of the upper cabinet with a trim piece (below). It’s not a perfect fit, but, like the spacer and the continuous countertop, I didn’t expect that level of detail in the workshop. Craig cut the piece from one of the old, matching cabinet doors and attached it to make the upper cabinet look nice from the side. Uh, that would be the side that faces the storage room. Doesn’t everyone want to see a beautifully finished workshop cabinet edge from the storage room?! Christian and Craig certainly do!
I expected these repurposed cabinets to look a lot like the previous ones, but in better condition. Instead, I feel like we ought to do something special in this room to justify such nice cabinetry. When I repeatedly complimented Christian and Craig on how beautiful the cabinets looked, they kind of shrugged as if to say, “How else would we have done it?” and Craig said, “Well, I like my workshop nice.” Obviously, it could have been done as simply as the previous crew did with the previous cabinets, but that’s not how these guys roll.
When we emptied all of our living area rooms for painting and carpeting in Fall 2022, we got rid of so many things, that we removed shelving and still have extra shelf space. The same was true when we refilled the “new” basement cabinets–we have extra space in our updated workshop. I wonder how long it will take us to fill all the empty shelf space we now have throughout the house. There’s a saying that the more countertop you have, the more things you set on it. I’ll bet the same is true for closets and shelves.
Our kitchen update project included some changes to bring our kitchen from its circa 2000 look to the 2020s era of design. Most of the changes were optional. One was not.
One evening last spring, while Ted and I were eating dinner, the chandelier we installed when we updated our kitchen 20+ years ago abruptly turned itself off. Everything looked good when we checked the breakers and the light switch connection. We tested the five light bulbs in another lamp and they all worked fine. In August 2022, we had the electrical box for this light moved to center it over the kitchen table. We wondered if there might be a problem with the installation, and felt nervous about using a light that might have wiring problems. I called our electrician, and he assured me that, as long as the switch was turned off, we were not in danger of an electrical fire. We planned to replace the chandelier with a new one during our kitchen update, but now we had a sense of urgency to shop.
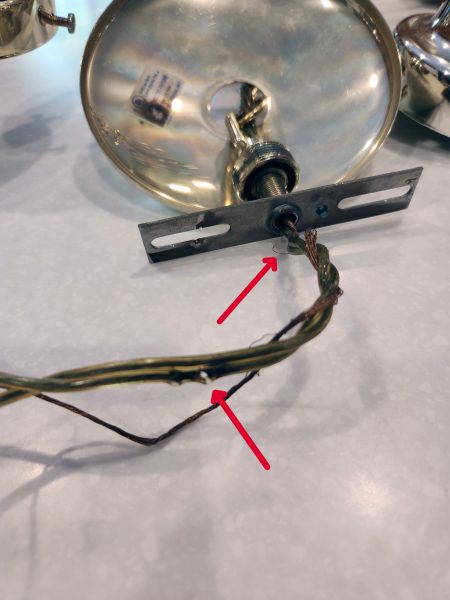
We bought a new chandelier and called the electrician to install it. When he removed the damaged light from the ceiling connection, he found the problem. The installer who moved the kitchen table light in 2022 (same company) pinched some wires with a screw when he attached the chandelier to the electrical box, and that eventually broke the wire. You can see the damage indicated by the arrows in the photo below. After installing the new light, the electrician prepared to leave and informed us there was no charge for the service. The company, he said, stands behind its work and we lost a chandelier due to their error. He even offered $100 toward our new light.
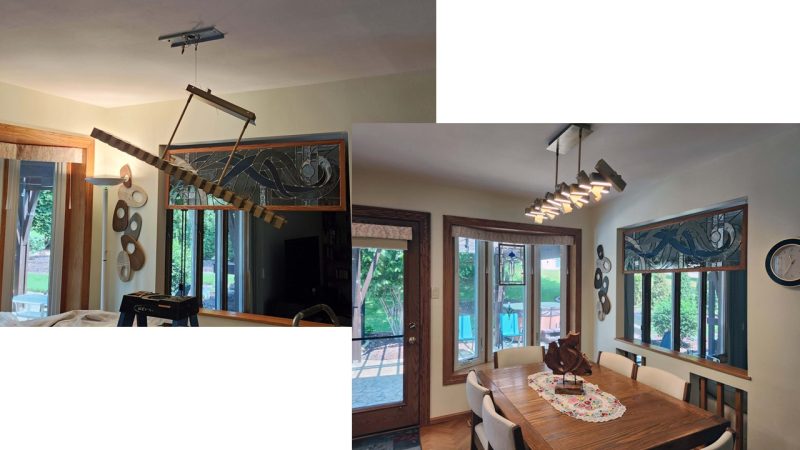
While he left his work area to get some other tools, the electrician let the (relatively heavy) new chandelier hang by a wire designed to hold the fixture during the installation process (left). I’d have been nervous about doing that, but it worked just fine. We used a 1980s vintage pole lamp from the basement (in the corner, left photo) for table lighting while we shopped and waited for the new chandelier installation. The right photo shows the new chandelier, properly attached to the ceiling.
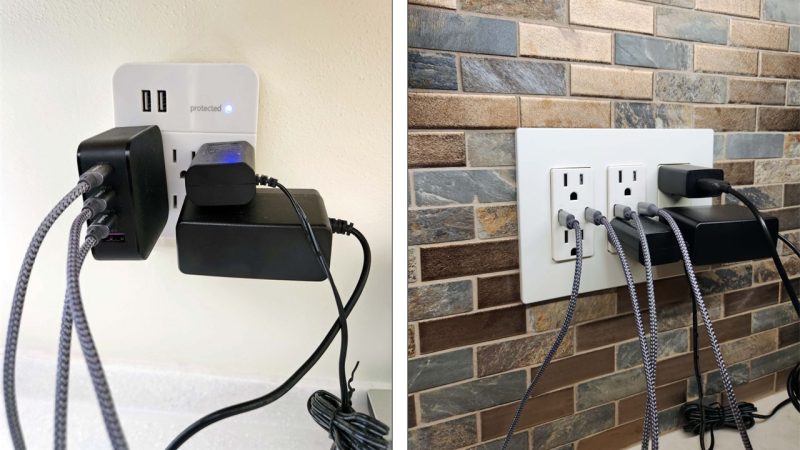
In addition to the new chandelier, we made a number of other changes to our kitchen design. There weren’t a lot of home devices to charge in the late 1990s when we last updated our kitchen, so one of our kitchen outlets used to look like the left photo. All of those plugs are inserted into a six-gang tree with 2 USB chargers which, in turn, is plugged into a two-gang outlet. Twenty-some years later, we had a six-gang outlet with built-in chargers installed to accommodate our current needs at that location. Much neater.
Instead of our Bed, Bath & Beyond silverware tray, we now have a two-tiered built-in silverware tray in this drawer.
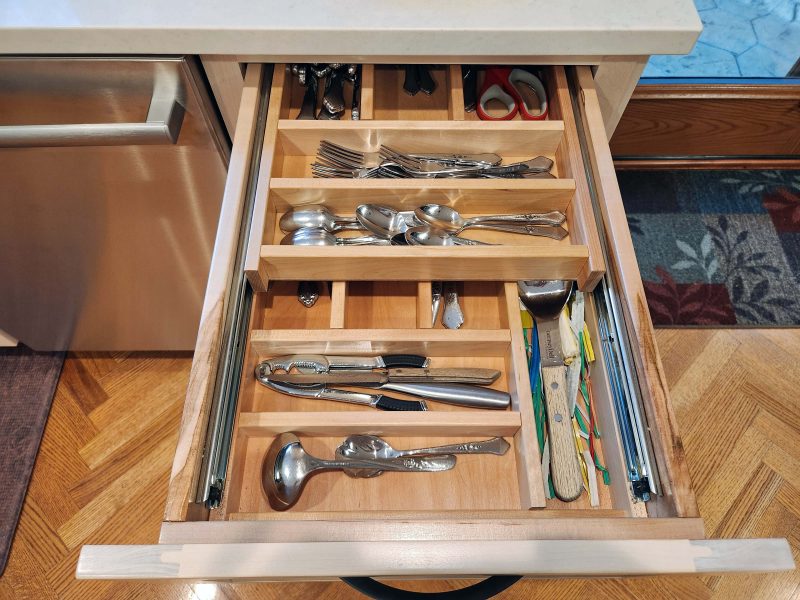
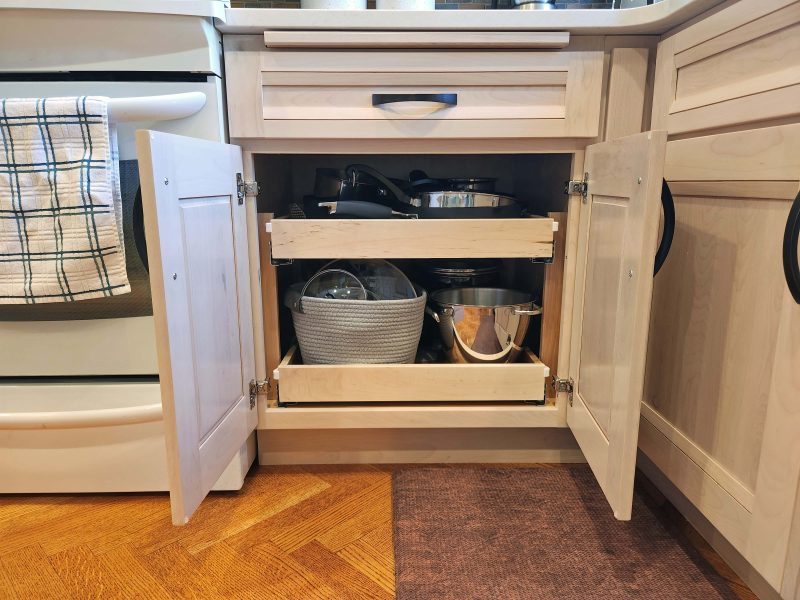
All of the lower cabinets have drawers instead of shelves. Now it’s much easier to put things away and to get them out because we don’t have to remove the items in the front to extract an item from the back.
We added a drawer to the island so that we can store placemats and napkins conveniently near the table.
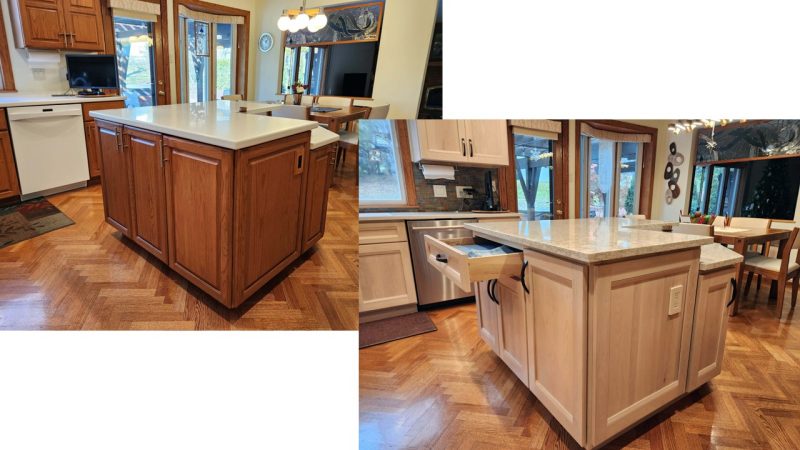
In our last kitchen update, the island backsplash matched the countertop. This time, we matched it to the backsplash over the cabinets.
Some of our previous cabinets had a matching flat panel on the exposed sides. This time, we added a trim panel to all the exposed sides, even in the corner where we keep the stool.
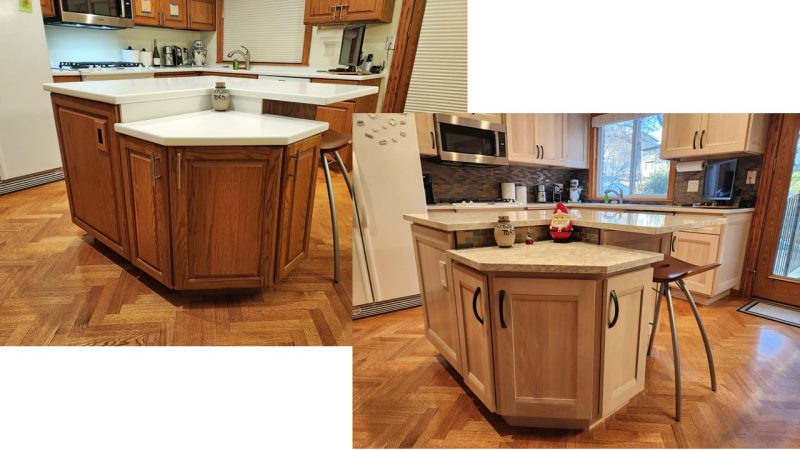
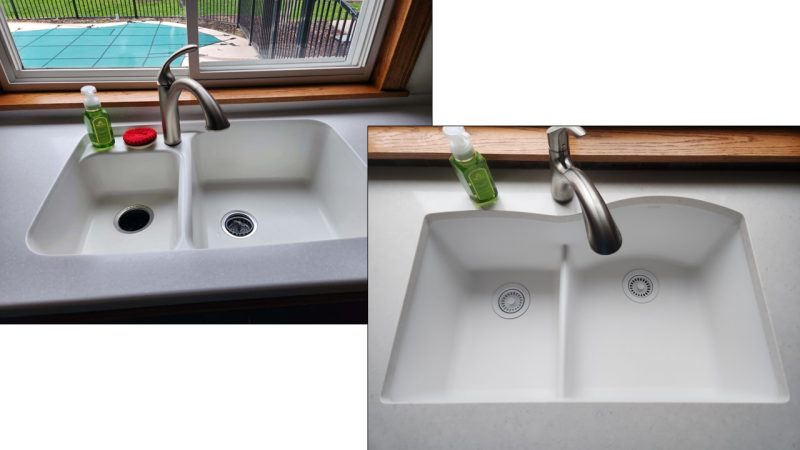
We replaced our Corian sink with a composite one. The Corian sink was still in great shape, but could not be removed from the surrounding Corian countertops, since they were poured together. Now we have a composite sink attached separately to the countertops.
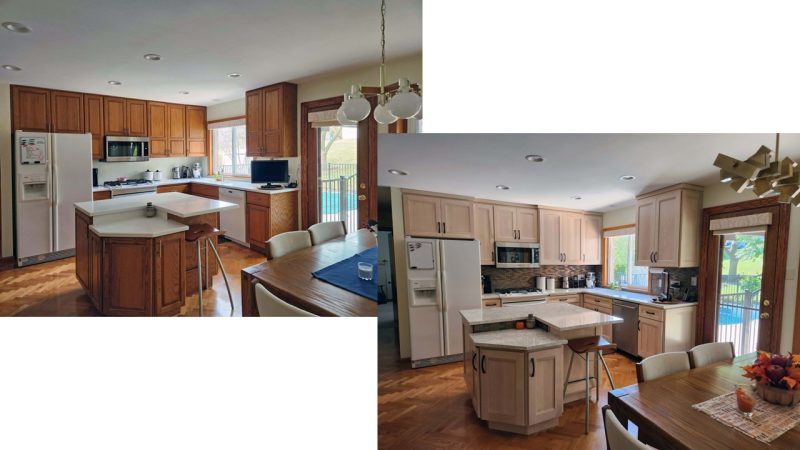
For this update, we ordered upper cabinets of varied depths to eliminate the straight-line front edge of the upper cabinets. Compare the old kitchen look (left) with the updated look (right).
Here’s a picture of Jimmy’s, Christian’s, Craig’s, Ted’s, and my favorite change: the LED strip lighting over the countertops. It’s gorgeous in the evenings when the random bronze-colored backsplash tiles shine softly in the light.

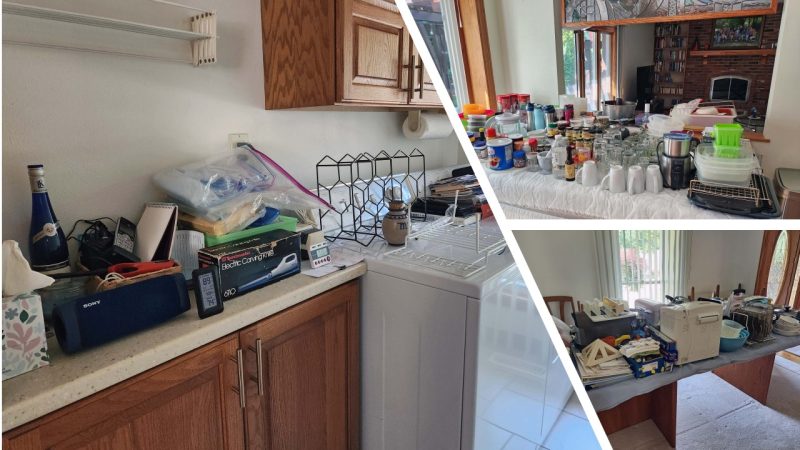
In addition to setting up temporary kitchen/dining areas in the basement, we had to empty all of the kitchen cabinets before the crew could begin their work.
Just like closets, you can get a lot of stuff in cabinets!
Jimmy, the company owner, sent Christian (left) and Craig (obviously, right) to start working on our kitchen on June 21. The two guys worked daily through July 16. They started by removing our old (20+ years) cabinets. The cabinets were installed from right to left, so needed to be removed in the opposite direction.
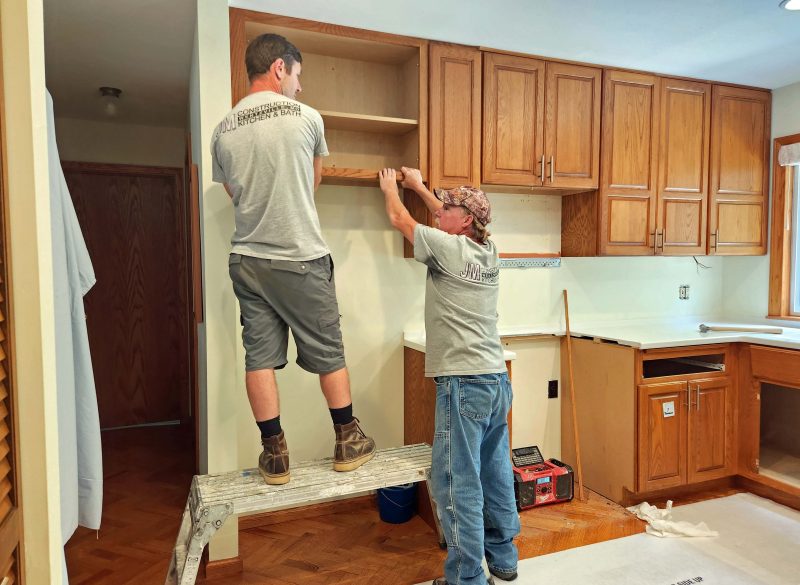
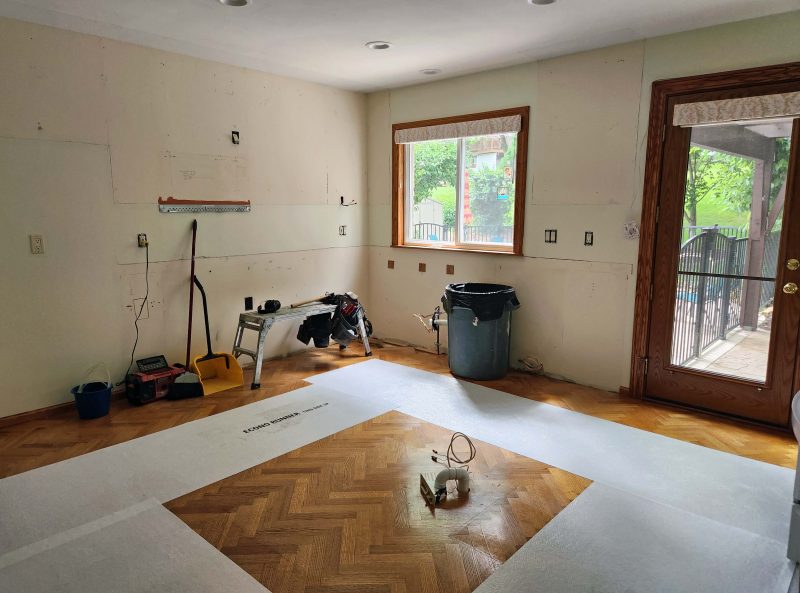
The cabinets are gone and the hardwood floor is well-protected. The kitchen looks so spacious!
When we replaced the original kitchen cabinets in our house, we put some of them in the basement to provide closed/covered storage. They are now 44 years old and definitely show their age. In our current kitchen contract, we included removing those original cabinets and replacing them with some of our current (now old) cabinets.
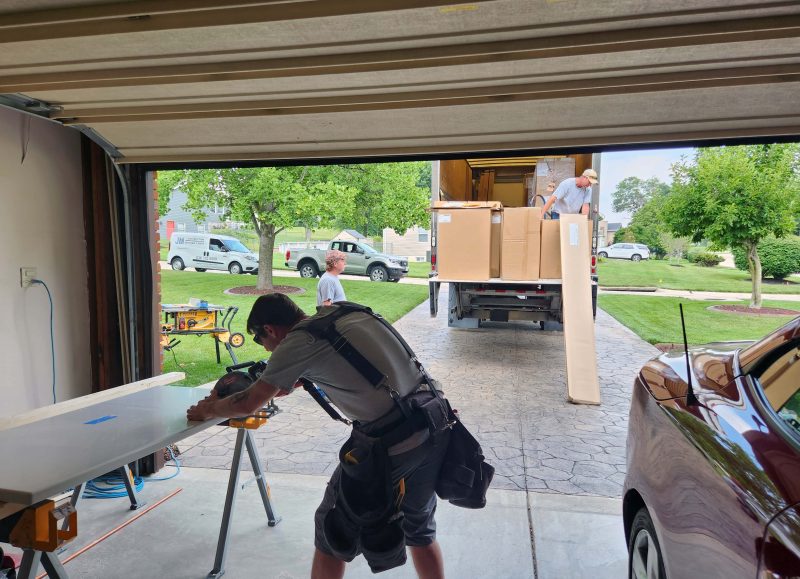
During this project, the guys made their mess in the garage and in the driveway, and cleaned it up every day. In the photo below, the truck is delivering the new cabinets and Christian is cutting one of our current/now old countertops to fit the new/old cabinet arrangement in the basement.
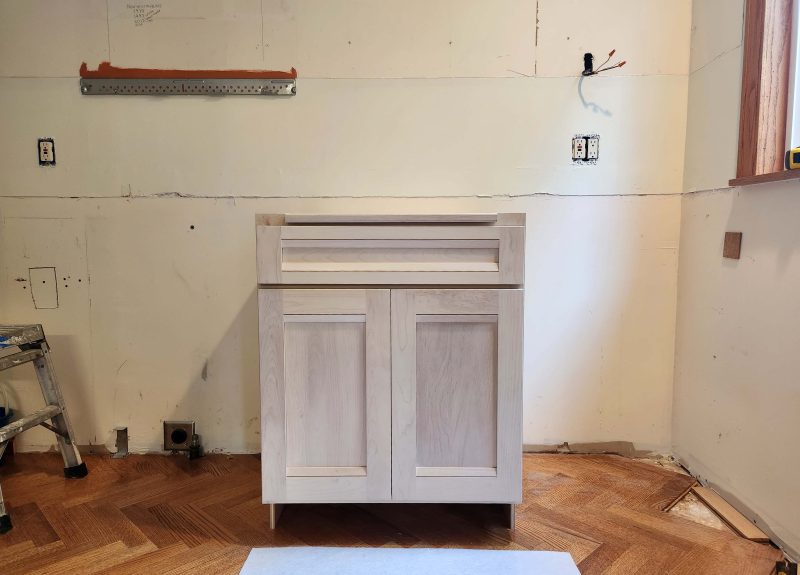
The first cabinet is installed. The wood is birch.
All of the base cabinets are installed. By doing the lower cabinets first, the guys can keep busy working on the upper cabinets while waiting for the countertops to be measured, manufactured, and installed. The island is actually four cabinets. It looks like a cabinet puzzle fitted together in this photo.
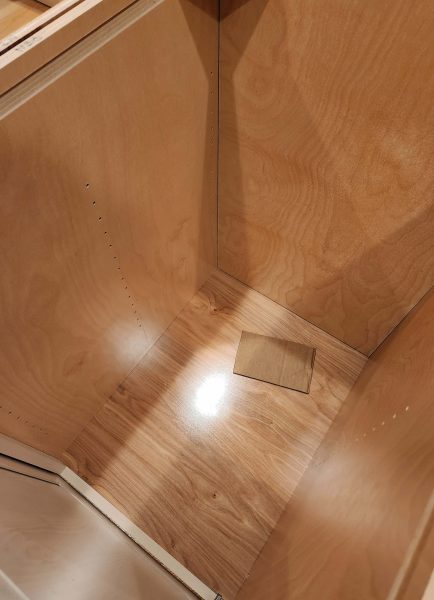
Even the interiors of the cabinets are beautifully finished.
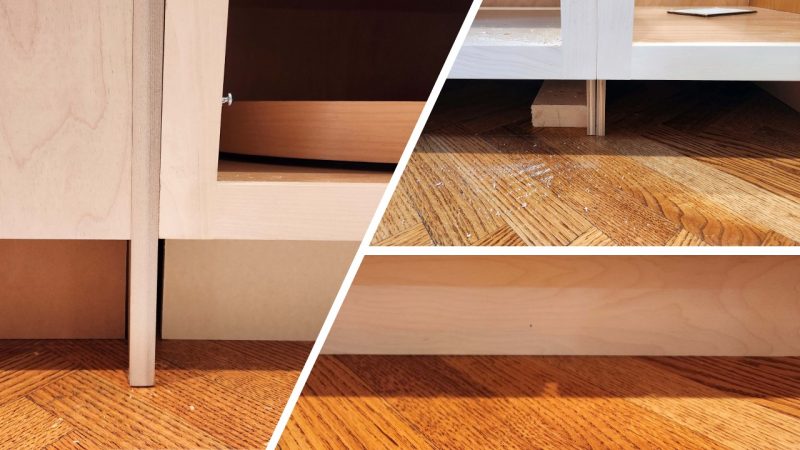
Some of the separate cabinets for the island were built with full-length side panels. When two cabinets were placed side-by-side, this created a great place to stub toes while working at the island (left image). Fortunately, Christian had a neat little toe kick saw that could cut a square corner under the cabinet (upper right image) to allow for a continuous toe kick all the way around the island (lower right image).
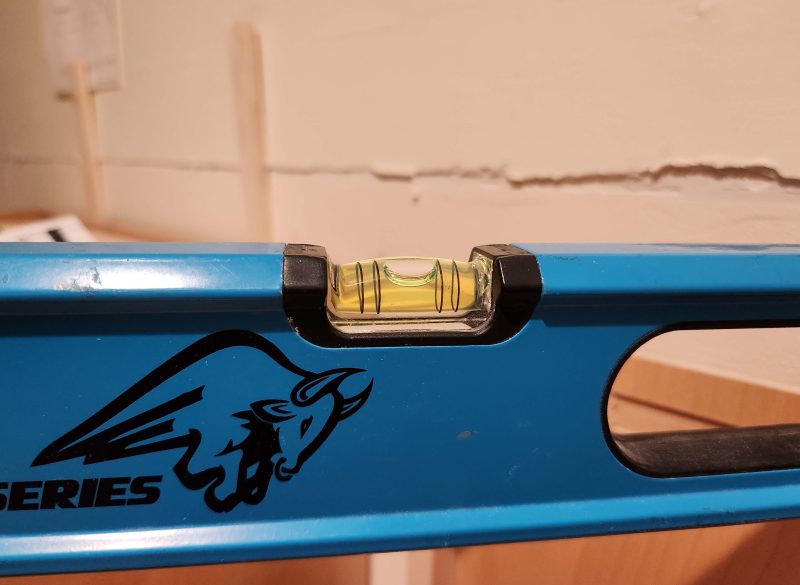
Christian was at least as picky as I am about details. His level was his constant companion. Are these cabinets level by themselves as well as with each other? . . .
. . . You bet they are!
Under-cabinet lighting for all the upper cabinets was part of our design and required new electrical work. You can see the large hole in the wall and wires extending from the walls where the lights will be connected to the switch.
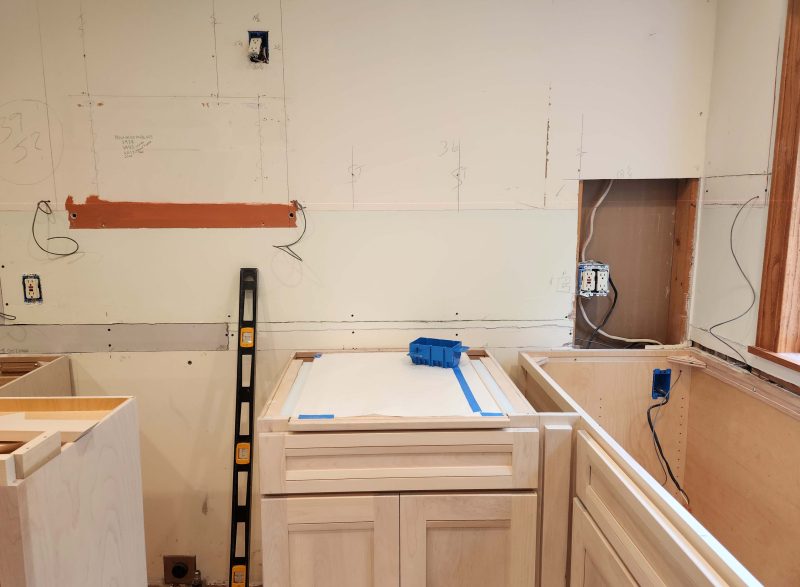
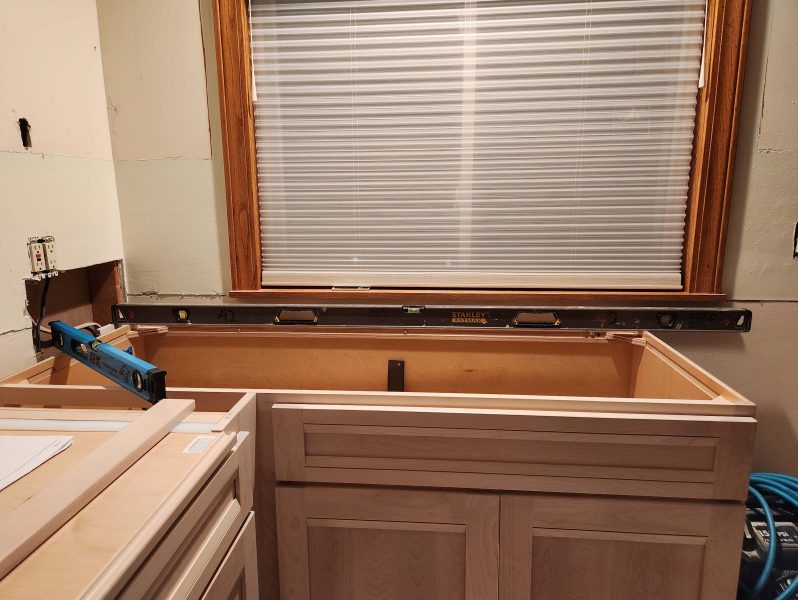
At this point, we ran into a problem and the guys had to pause their work for ten days while we waited for the countertops and a new cabinet to be made and delivered. Notice that rust-colored stripe of paint in the left center of the above photo. That was formerly covered by our microwave, which was mounted beneath a 24-inch long cabinet. You can also see the outline of the microwave installation template in that photo as well as the handwritten dates for each new microwave oven we installed. The delivered cabinet (short upper one, below) was only 18 inches long. Christian said he called the designer to verify the size because it seemed high to him. She verified an 18-inch long cabinet, so he installed it.
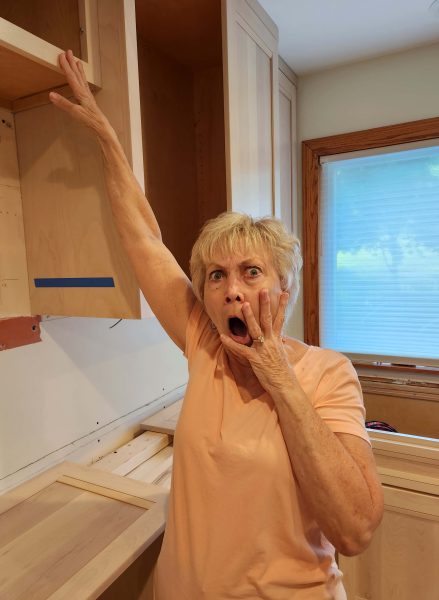
Why was that a problem? If we’d installed the microwave beneath that 18-inch cabinet, the bottom edge of the microwave would be where the top edge of the blue tape is in the photo below. The microwave cooking tray would be three inches above that line and the top edges of the cooking dishes in the microwave would be even higher. Check the blue tape line and my line of sight. I would have been unable to see whatever was in the microwave! Christian and Craig removed the 18-inch cabinet and the contractor ordered a longer one.
The mystery is why the designer planned an 18-inch cabinet for that space and why Jimmy, the boss man, who came to measure the cabinet dimensions in person didn’t catch the error either. As for Ted and me, cabinet length never came up in our design conversations, and we made the assumptions that the experts used standard lengths, and that the length of the two 24-inch long cabinets we’ve had above the microwave over the past 44 years was a standard length.
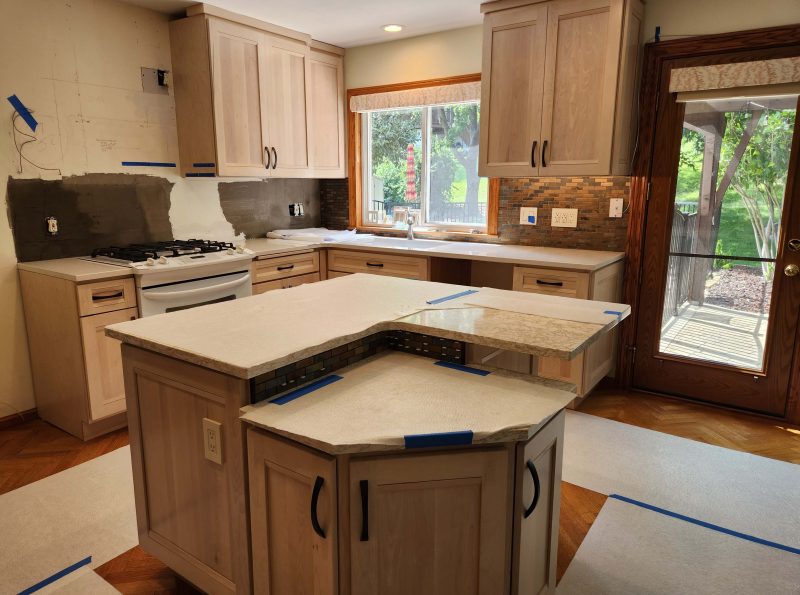
After the ten-day hiatus, work resumed on July 26 with the installation of the countertops.

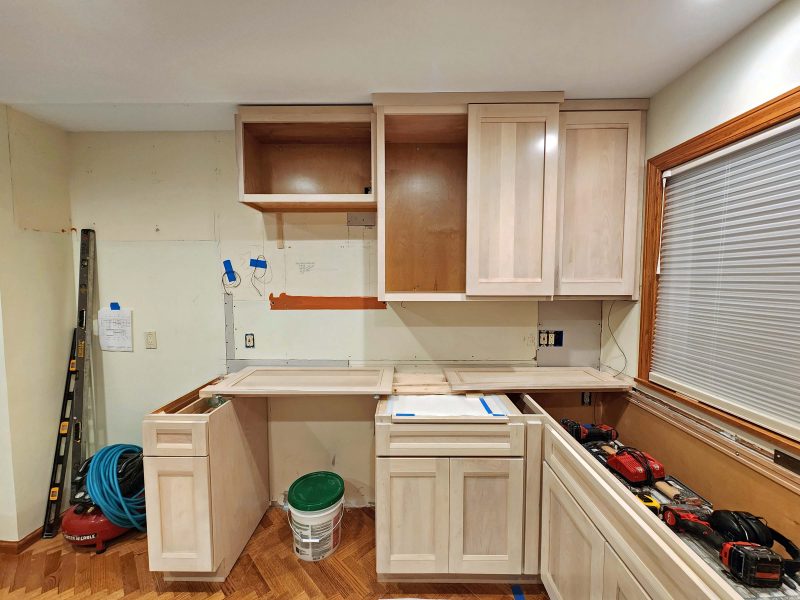
After the countertops were installed (still waiting for that over-the-microwave cabinet), Christian got started on the backsplash. You can see it below on the island between the two countertop levels and to the left of the exterior door. The wall above the cabinets on the left is multi-colored because there was another problem.
After Christian and Craig installed the stove, I noticed that its back edge was more than one-quarter inch farther from the wall on the left than on the right. Even to a non-perfectionist, the stove looked like it wasn’t pushed in all the way on the left. I tried pushing it in, but it was tight against the front edge of the lower cabinets and didn’t budge. I told Christian it was going to drive me crazy to have the stove looking crooked every day for the next 20 (?) years and he agreed. He explained that he (as a fellow perfectionist) squared that line of cabinets with the line of cabinets under the window. Doing that revealed that the two walls formed a greater-than-90-degree corner. This didn’t affect the line of the cabinets, because the countertop was measured and fitted after they were installed and it fit tightly against the fronts of the cabinets and against the wall.
To compensate for the crooked wall, Christian painstakingly built up the wall surface (the dark-colored stuff) that would be behind the backsplash. When the backsplash was installed, the back edge of the stove was in parallel with the backsplash. The refrigerator covers the left edge of the backsplash, but if you move the refrigerator and examine that backsplash edge, you’ll see that there’s one-quarter inch of built-up surface material visible behind the standard backsplash trim piece. Christian is my kind of project worker!
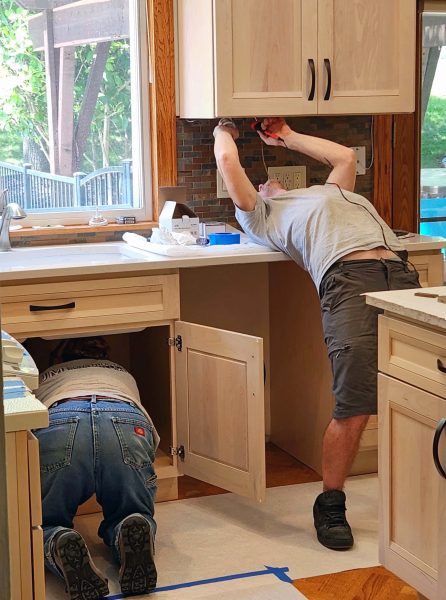
In this photo, Craig is installing the garbage disposal and Christian is finishing up the under-cabinet lighting. He admitted it was hard on his back and he was glad to be finished with that task.
The guys worked through August 1 and then went on another hiatus and worked on other jobs. The cabinet for over the microwave had not yet arrived, and Ted and I needed to prepare for our overseas trip. The remaining upper cabinets and some finishing work were completed on October 21 after we returned home.
Most of our interior house update was completed by December 2022. In February 2023, Ted and I got serious about updating the kitchen. We updated the lighting and had the room painted in 2022, but that’s all. We had our first appointment with our kitchen designer on February 21. The planning, selection, and ordering processes took awhile, and we were finally scheduled for the professional workers to arrive on June 21.
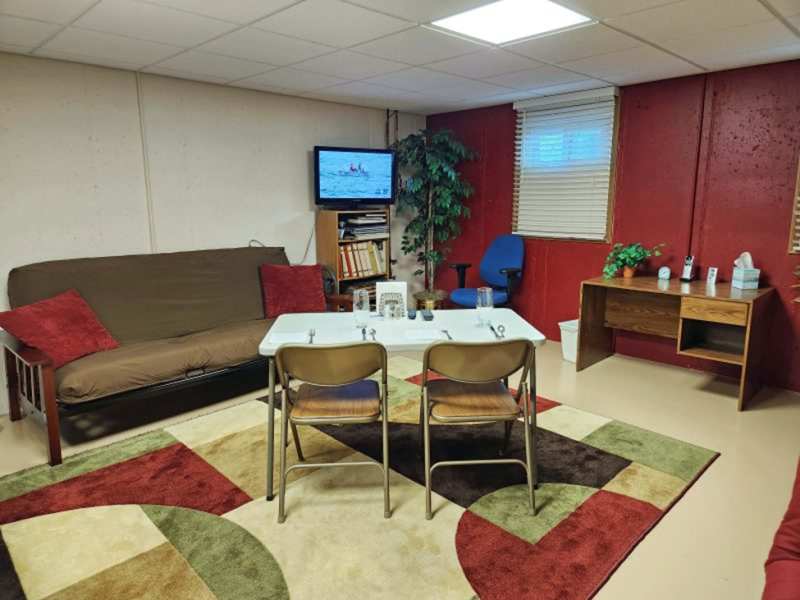
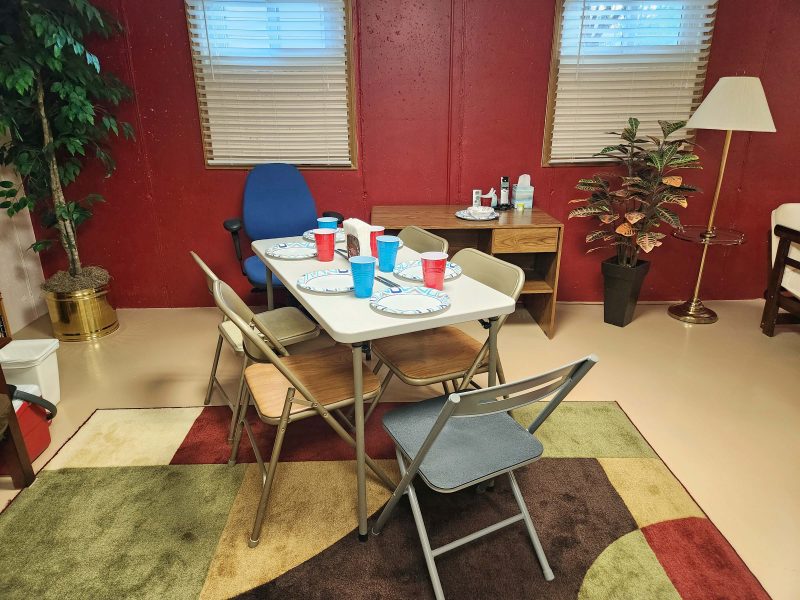
Before giving the pros permission to demolish our kitchen, we had to set up an alternate eating and cooking space. Just like 25 years ago, that space was in the basement. We got out my old Wal-Mart craft table and some of the folding chairs we acquired in the early 1970s with grocery store trading stamps, and voilà! we had a dining room.
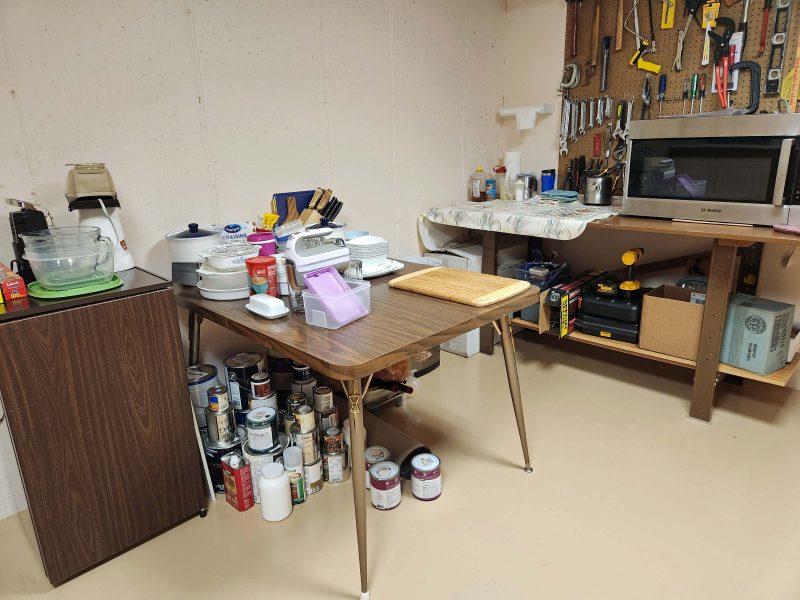
We also needed a prep/storage area. We set that up in the shop, where we have a table with a power outlet for the microwave. We won’t have the convenience of a stove for awhile, so I cooked and froze some meals in advance. We’re going to count on the microwave and eating out until the kitchen update is functional again. We used the shop table and our wedding gift kitchen table for prepping food and for storing the things we needed while the upstairs kitchen was unavailable. The paint cans under the table are not food-related. They are waiting to be put into “new” cabinets coming from our current kitchen.
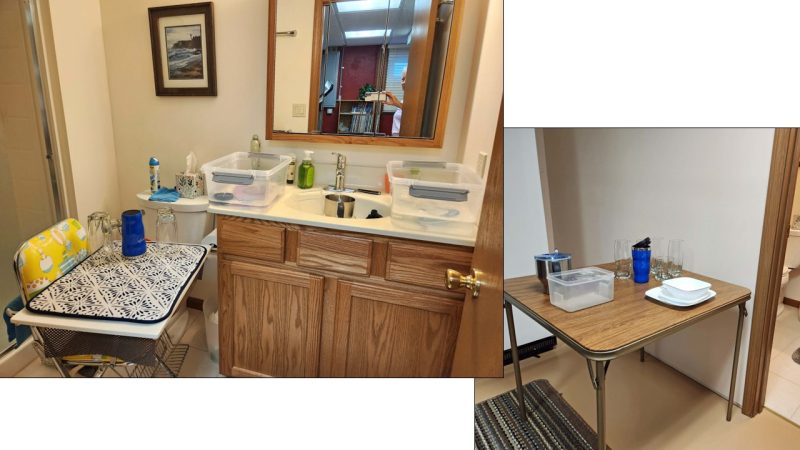
Dishwashing was a challenge, but not impossible. Since we didn’t do any big cooking projects, we didn’t have many pots or pans to wash. Our system was to scrape the dirty dishes, then stack them in the bathroom sink. A dishpan on the right worked for washing and one on the left took care of rinsing the dishes. A large cutting board on our 1972 vintage baby high chair served as a place to drain the rinsed dishes before drying them. Then we stacked the clean, dry dishes on our trading stamp card table just outside the bathroom door before taking them back to the shop and putting them in the prep/storage area. (Photographer visible in mirror.)
The crew had to pause our job for ten days while we waited for the delivery of a cabinet. It had already been five weeks since the work started, and my frozen dinner supply was running very low (i.e., gone). Fortunately, the guys were at a point at which they could connect the stove. (Still no sink or water source in the kitchen.) By then, we appreciated the luxury of having a stove and an oven. We had no countertops, so the microwave had to stay in the basement. All but two of the cabinets were installed and off the floor, so there was room for us to collapse our kitchen table and to eat beside our soon-to-be installed dishwasher. We’re moving up in the world–literally up–from the basement.
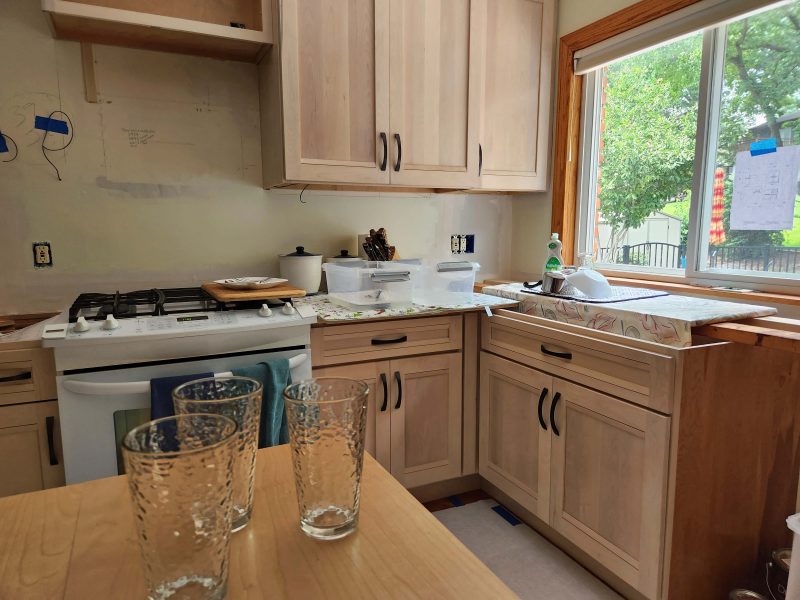
We laid some of the shelving from the yet-to-be-installed cabinets over the unfinished island to create some surface space. That made it possible for us to set things down somewhere in the room. Some 2x4s and two doors from our old cabinets covered with plastic tablecloths gave us counter space under the window and beside the stove.

Even dishwashing became a little easier. We didn’t have running water or a drain in the kitchen yet, but at least the dirty dishes could be set on the stove, washed and rinsed in our trusty dishpans, and set to dry where the future sink would be installed. Clean, dry dishes could be put on the shelf-covered island. That’s a lot more space than we had for doing dishes in the basement! We could work side-by-side and move our elbows!
All of the above was inconvenient, but not especially difficult. In fact, it worked well enough that we decided we could entertain guests. We didn’t have enough space in the kitchen yet, but we invited Kari’s family to join us for a pizza party in our basement dining room. With paper plates and cups and carry-out pizzas, it was easy and fun.
For several months, workers have been laying cables for broadband throughout our county. One day, this truck was parked on our street. It’s hard to read in the photo, but right above the orange cone, it says “We’ll be at your house in a Gigabit.”

Hallowe’en was more than a month ago, but I think this display is worth posting.

This neighborhood sign encapsulates the issue with only a few words.